Reveal Windows file server permissions with PowerShell's help
An unauthorized permissions change on a file share could lock out other users. Learn how to automate a report that shows permissions on the server to find these problems fast.
When you need to find the culprit behind a Windows file server permissions problem, try PowerShell to act as your detective to crack the case.
If many users suddenly lose access to folders in a file share, it's typically a Windows file server permissions issue. But it can take some work to uncover who made the unauthorized change. Manually checking an entire file server with many files and folders can be a tedious task. With PowerShell, you can use automation to build an audit report to track down folders with rights issues that you can then resolve.
How permissions work on a Windows file server
While there are several file systems available for Windows systems, the New Technology File System (NTFS) is the one used most widely today.
Among the features of NTFS is the ability to restrict access using access control lists (ACLs), which catalog each access control entry (ACE) that contain information about the user or group account and their access rights to an object, such as a file or a folder. Microsoft's documentation often uses Windows ACLs and NTFS permissions synonymously.
Based on the organization's needs, the administrator tailors NTFS permissions to control the access level to a folder, from full control rights to no access. Trouble can occur when a user with a higher access level, such as a C-level executive, changes Windows Server folder permissions that prevent users with a lower access level from getting to their files in that folder or a subfolder beneath it.
Before we dive into how to create a Windows file server permissions audit, you should understand the two methods to retrieve access information from a folder. This article will focus on PowerShell 7; however, unless noted, the commands will work the same in Windows PowerShell.
Even though we are using PowerShell 7, which is cross-platform, the Get-ACL cmdlet is only available on Windows.
Find Windows file server permissions with the Get-Acl cmdlet
The built-in Get-Acl cmdlet gets the security descriptor stored in the object, which in this case is the folder on the Windows file share. The security descriptor holds information, such as the object owner and ACLs, which show the users and groups that can access the folder. The following command will show the folder permissions:
Get-Acl .\Marketing\
The output gives the folder path, the folder's owner and the folder access list.

For additional details, such as the entire access list, add the Access property to the command:
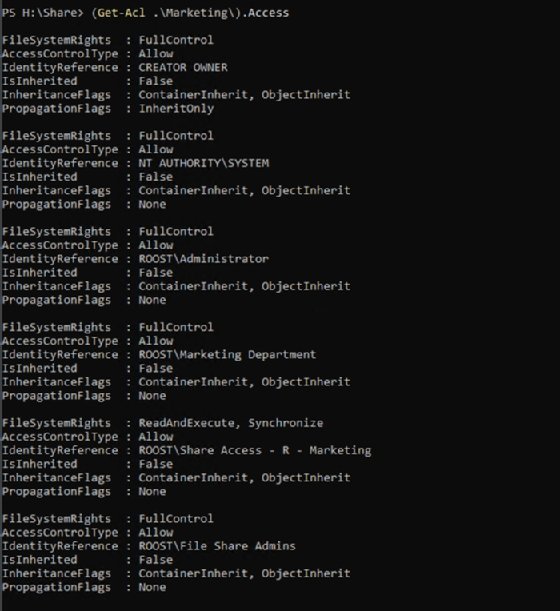
(Get-Acl .\Marketing\).Access

The cmdlet shows all the folder permissions are explicit; the IsInherited property indicates the permissions are not inherited from the parent folder. The output also shows the admins with access to this share followed the proper protocol by adding users to groups instead of directly to the folder.
Find Windows file server permissions with the Get-NTFSAccess cmdlet
The other method to look at the folder ACLs is through the Get-NTFSAccess cmdlet in the NTFSSecurity module. This cmdlet has similar syntax to Get-Acl:
Get-NTFSAccess .\Marketing\
This cmdlet produces output that is easier to understand when assessing NTFS permissions.

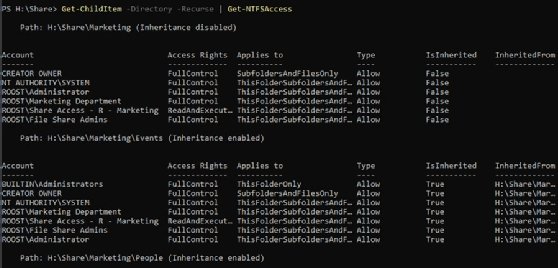
The table shows the IsInherited attribute that identifies folders with permissions that differ from the parent folder.
The best feature of Get-NTFSAccess is that it audits the entire file share with one line of PowerShell. You only need a few extra lines of code to format it into a presentable report.
To start, let's walk through how to recursively get the folder permissions using Get-ChildItem to find all the folders and then pipe the output to Get-NTFSAccess:
Get-ChildItem -Directory -Recurse | Get-NTFSAccess
On a large file share, it can take a fair amount of time to generate the console output. Be prepared to cancel it with CTRL+C or test it on a smaller folder first to make sure it's working as expected.

The screenshot shows the first few lines from the test environment. The Events subfolder permissions are all inherited and the InheritedFrom attribute references the root Marketing folder. However, this doesn't find permissions that aren't inherited. For this, use the Where-Object cmdlet and look for permissions that are not inherited using the exclamation mark, which is the Not operator:
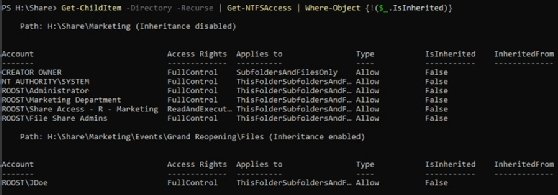
Get-ChildItem -Directory -Recurse | Get-NTFSAccess | Where-Object {!($_.IsInherited)}
This also can take a lot of time to run, so be prepared to wait if you run it on a folder with many files. In the test environment, only one folder has permissions that differ from the root folder.

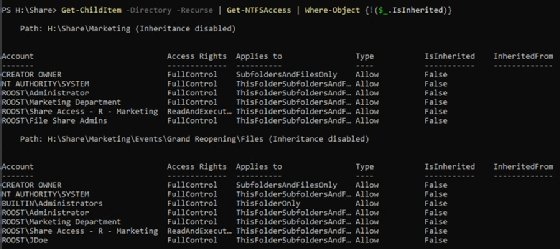
The output shows a user named John Doe has permissions to the Files folder, and the other inherited permissions are still enabled. If the user disabled inheritance on that folder, the report would show something different.

This user has performed a few irregular actions on the file share. They disabled inheritance and removed the File Share Admins group. There may be a logical explanation for it, but it is questionable behavior.
How to format the Windows file share permissions output into a report
Now that we have been able to produce the data, we can proceed to the presentation of the report to produce output in a readable fashion to share with a decision-maker in the department. In my experience, the report will usually go to the owners of each file share and a manager in IT. To keep it simple, we will export the report as an Excel spreadsheet.
There are two options: either run the PowerShell command from one line, which would be large, or assign the previous output to a variable and then output the variable to a spreadsheet. Because it can take a long time to collect all the permissions on a large or complex file share, the variable assignment route is the best way. Another benefit is you can examine the data before formatting the Windows file server permissions report.
How to use the ImportExcel module
You will use a cmdlet called Export-Excel in the ImportExcel module to produce the Excel file. It works in both Windows PowerShell and PowerShell 7. If you don't have it on your system, install it with the following command:
Install-Module ImportExcel
The following PowerShell code specifies the preferred parameters for Export-Excel to put the data in a table and automatically size the columns:
$notInherited = Get-ChildItem -Directory -Recurse | Get-NTFSAccess | Where-Object {!($_.IsInherited)}
$notInherited | Export-Excel C:\Path\To\Report.xlsx -TableName Permissions -AutoSize
This screenshot shows a sample of the spreadsheet generated automatically by PowerShell.

How to customize the Windows file share permissions report
To exclude properties, you use Select-Object to make the modifications to the report. Replace the earlier Export-Excel command with the one below:
$notInherited | Select-Object -ExcludeProperty
AccountType,InheritanceEnabled,InheritedFrom,IsInherited | Export-
Excel C:\temp\Report.xlsx -TableName Permissions -AutoSize
The screenshot shows the Excel spreadsheet with the curated data.

When you send the report, remind your audience to filter by the FullName column. Oftentimes a file server will have multiple folders with variations of a generic term, such as Files, so this filtering will keep the folders sorted in a more orderly fashion.


