
Getty Images/iStockphoto
Learn to automate with PowerShell and Task Scheduler
Using automation in tandem with scheduled tasks helps a busy admin stay on top of responsibilities big and small to free up time for more involved work.

Time is a precious commodity for IT workers, which makes it even more important to conserve as much as possible for pressing work.
A benefit of task automation with PowerShell is it lifts the administrator's workload to make them available should an emergency arise or keep them focused on a big project. If orchestrated correctly, the PowerShell script can run unattended without requiring any interaction beyond the initial setup. Noninteractive scripts can be executed with Windows Task Scheduler on specific conditions. Not only is this invaluable for saving time, but it ensures consistency and enables prompt responses to system events. This article looks at some examples of what can be done with Task Scheduler, how to use Task Scheduler with PowerShell and a walkthrough of a real-world example of a scheduled task that runs a PowerShell script.
What are the benefits of using PowerShell with Task Scheduler?
PowerShell is an extensive scripting language that is designed for systems administration, which makes it ideal for automating administrative tasks. PowerShell, combined with Task Scheduler, unlocks a wide range of possibilities. For example, if you've written scripts to run a report on a file share, search the event logs for specific events or run group membership audits in AD, adding those scripts to a schedule is a great way to increase their value. After those scripts execute, you can use Azure Logic Apps to send an email report.
How to manage Task Scheduler with PowerShell
If you are familiar with Task Scheduler in Windows, then you are likely aware that it has a GUI. What you might not know is you can manage it completely with PowerShell.
To start, use the following PowerShell command to list the existing scheduled tasks.
Get-ScheduledTask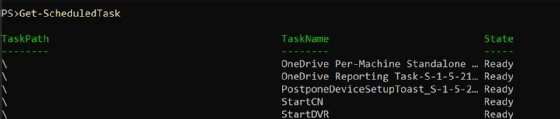
To narrow the search to a specific task path, use the following PowerShell command.
Get-ScheduledTask -TaskPath '\Microsoft\Office\'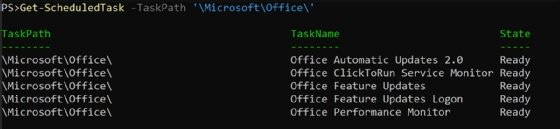
What are the steps to create a scheduled task?
To create a scheduled task with PowerShell use the following steps and cmdlets:
- Define the trigger: New-ScheduledTaskTrigger.
- Create an action: New-ScheduledTaskAction.
- Add any other settings: New-ScheduledTaskSettingsSet.
- Assign a principal to run the task: New-ScheduledTaskPrincipal.
- Register the task: Register-ScheduledTask.
- Update the task: Set-ScheduledTask.
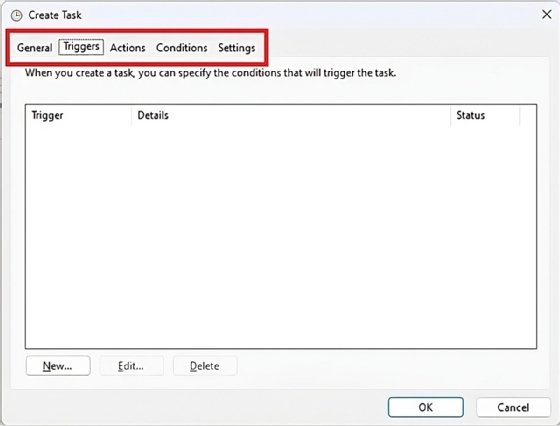
If you have used the GUI to build scheduled tasks, then the steps should sound familiar because the Create Task wizard has similarly named tabs.
Step 1. Define the trigger
The trigger of a scheduled task starts the task. Common triggers include running a task once, on a schedule, at startup and at logon.
Task Scheduler supports more advanced scenarios, such as running a task in response to other behavior, such as idle state, an event or locking/unlocking the workstation, but the current version of PowerShell does not support creating these events.
The following example creates a weekly task trigger using PowerShell.
$trigger = New-ScheduledTaskTrigger -Weekly -At 3AM -DaysOfWeek Sunday -WeeksInterval 1The trigger is stored in a $trigger variable.
Step 2. Create an action
The most important part of the scheduled task is what action it executes. To build on the use of PowerShell, the following code creates an action that runs a PowerShell script.
$action = New-ScheduledTaskAction -Execute 'powershell.exe' -Argument '-NoProfile -NonInteractive -WindowStyle Hidden -File "C:\scripts\script.ps1"'The code passes several arguments to the powershell.exe executable:
- -NoProfile. This prevents PowerShell from loading any profiles.
- -NonInteractive. This stops the opening of an interactive prompt.
- -WindowStyle Hidden. This hides the window.
- -File "C:\scripts\script.ps1". This runs the script at the specified file path.
To use PowerShell 7, replace powershell.exe with pwsh.exe.
For this tutorial, the command is stored in a variable.
Step 3. Add additional settings
There are many additional settings that can be set on a scheduled task. To view them all, you can look at the documentation for New-ScheduledTaskSettingsSet with this command.
help New-ScheduledTaskSettingsSetCommon options include the following:
- -ExecutionTimeLimit: This sets a time limit on the task.
- -DisallowDemandStart: This prevents running the task on demand.
- -Compatibility: This sets the compatibility level, which is useful for tasks that are exported and imported to older systems.
- -RunOnlyIfIdle: This only executes the task when the system is idle.
- -StartWhenAvailable: This sets the task to start as soon as possible after a missed trigger.
Assign the command and any settings to a variable for use in a script.
$settings = New-ScheduledTaskSettingsSet -DisallowDemandStartStep 4. Assign a principal -- optional
To run the scheduled task with a specific account or system identity, use the New-ScheduledTaskPrincipal command to assign a principal. This lets you define the security context -- or the principal -- under which the task runs.
For example, you can assign the task to run under the system account.
$principal = New-ScheduledTaskPrincipal -UserID "NT AUTHORITY\SYSTEM" -LogonType ServiceAccount -RunLevel HighestRegistering the task with this principal requires administrator rights.
Step 5. Register the task
After creating the trigger, action and any necessary settings, the next step is to register the scheduled task. For this, use splatting syntax to pass the parameters from the hash table to the Register-ScheduledTask cmdlet.
$splat = @{
    TaskName = 'Run PowerShell Script'
    Trigger = $trigger
    Action = $action
    Settings = $settings
    Principal = $principal
    TaskPath = '\TechTarget\'
}
Register-ScheduledTask @splat
The PowerShell code also gives the task a name and a custom location to store the task. Adjust those as needed.
If you need to run this task without the user account needing to be logged in, you need to include a username and password.
$splat = @{
    TaskName = 'Run PowerShell Script'
    Trigger = $trigger
    Action = $action
    Settings = $settings
    TaskPath = '\TechTarget\'
    User = 'domain\username'
    Password = (Read-Host)
}
Register-ScheduledTask @splat
Step 6. Update the scheduled task
Many tasks require some adjustments over time. Here's how to retrieve the task and update it. For example, to change the trigger, make a new trigger, and assign it to the task:
$trigger = New-ScheduledTaskTrigger -Weekly -At 3AM -DaysOfWeek Saturday -WeeksInterval 1
Set-ScheduledTask -TaskName 'Run PowerShell Script' -TaskPath '\TechTarget\' -Trigger $trigger
The PowerShell code creates a weekly trigger that runs on Saturdays at 3 a.m., updating the existing task.
How to keep a service running with PowerShell
If you have a critical service on a server, using a simple PowerShell script, combined with Task Scheduler, can ensure it continues running.
$serviceName = 'MyService'
While ($true) {
    if ((Get-Service -Name $serviceName).Status -eq 'Stopped') {
        Start-Service -Name $serviceName
    }
    Start-Sleep -Seconds 5
}
This simple PowerShell script checks to see if a service has stopped every five seconds. If it is, then the script restarts the service. If you use this type of code on a critical system, then be sure to add some logging and notifications to root out any problems.
With this file saved at C:\scripts\servicemonitor.ps1, create the task.
$splat = @{
    Trigger = New-ScheduledTaskTrigger -AtStartup
    Action = New-ScheduledTaskAction -Execute 'powershell.exe' -Argument '-NoProfile -NonInteractive -WindowStyle Hidden -File "C:\scripts\servicemonitor.ps1"'
    Settings = New-ScheduledTaskSettingsSet -StartWhenAvailable -RestartCount 5 -RestartInterval (New-TimeSpan -Minutes 1)
    Principal = New-ScheduledTaskPrincipal -UserID "NT AUTHORITY\SYSTEM" -LogonType ServiceAccount -RunLevel Highest
    TaskPath = '\TechTarget\'
    TaskName = 'Service Monitor'
}
Register-ScheduledTask @splat
The settings tell Task Scheduler to start the task as soon as possible after a missed start with the -StartWhenAvailable parameter and to also restart it if it fails with the -RestartCount and -RestartInterval parameters.
Because the script uses a system principal, you must run the script with administrator privileges to create this scheduled task.
Stay productive with unattended automation
PowerShell is an incredible tool for administrators to increase their productivity. Combining it with Windows Task Scheduler gives you more flexibility to automate any administrative task, regardless of the timing or frequency. By scheduling scripts, you can automate routine tasks, reduce the chance that something slips your notice and free more time for more strategic activities.
Anthony Howell is an IT strategist with extensive experience in infrastructure and automation technologies. His expertise includes PowerShell, DevOps, cloud computing, and working in both Windows and Linux environments.