Sergey Nivens - Fotolia
Get back on the mend with Active Directory recovery methods
Administrators should have a few of these data protection techniques up their sleeves to keep Active Directory from a total breakdown.
Active Directory is the bedrock of most Windows environments, so it's best to be prepared if disaster strikes.
AD is an essential component in most organizations. You should monitor and maintain AD, such as clear out user and computer accounts you no longer need. With routine care, AD will run properly, but unforeseen issues can arise. There are a few common Active Directory recovery procedures you can follow using out-of-the-box technology.
Loss of a domain controller
Many administrators see losing a domain controller as a huge disaster, but the Active Directory recovery effort is relatively simple -- unless your AD was not properly designed and configured. You should never rely on a single domain controller in your domain, and large sites should have multiple domain controllers. Correctly configured site links will keep authentication and authorization working even if the site loses its domain controller.
You have two possible approaches to resolve the loss of a domain controller. The first option is to try to recover the domain controller and bring it back into service. The second option is to replace the domain controller. I recommend adopting the second approach, which requires the following actions:
- Transfer or seize any flexible single master operation roles to an active domain controller. If you seize the role, then you must ensure that the old role holder is never brought back into service.
- Remove the old domain controller's account from AD. This will also remove any metadata associated with the domain controller.
- Build a new server, join to the domain, install AD Directory Services and promote to a domain controller.
- Allow replication to repopulate the AD data.
How to protect AD data
Protecting data can go a long way to make an Active Directory recovery less of a problem. There are a number of ways to protect AD data. These techniques, by themselves, might not be sufficient. But, when you combine them, they provide a defense in depth that should enable you to overcome most, if not all, disasters.
First, enable accidental deletion protection on all of your organizational units (OUs), as well as user and computer accounts. This won't stop administrators from removing an account, but they will get warned and might prevent an accident.

Recover accounts from the AD recycle bin
Another way to avoid trouble is to enable the AD recycle bin. This is an optional feature used to restore a deleted object.
Enable-ADOptionalFeature -Identity 'Recycle Bin Feature' -Scope ForestOrConfigurationSet `-Target sphinx.org -Confirm:$false
After installing the feature, you may need to enable it through AD Administrative Center. Once added, you can't uninstall the recycle bin.
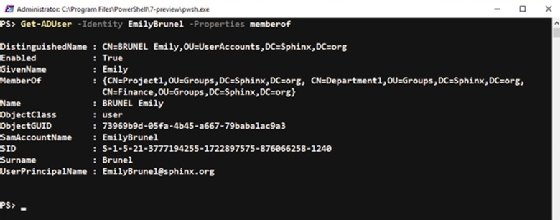
Let's run through a scenario where a user, whose properties are shown in the screenshot below, has been deleted.

To check for deleted user accounts, run a search in the recycle bin:
Get-ADObject -Filter {objectclass -eq 'user' -and Deleted -eq $true} -IncludeDeletedObjects
The output for this command returns a deleted object, the user with the name Emily Brunel.

For a particularly volatile AD, you may need to apply further filters to identify the account you wish to restore.
If you have a significant number of objects in the recycle bin, use the object globally unique identifier (GUID) to identify the object to restore.
Get-ADObject -Filter {ObjectGUID -eq '73969b9d-05fa-4b45-a667-79baba1ac9a3'}
`-IncludeDeletedObjects -Properties * | Restore-ADObject
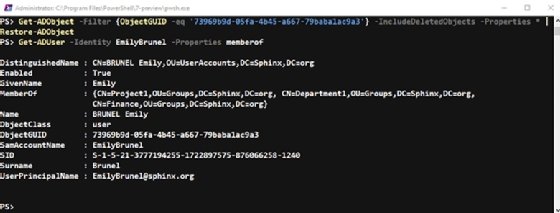
The screenshot shows the restored object and its properties, including the group membership.

Generate AD snapshots
The AD recycle bin helps restore an object, but what do you do when you restore an account with incorrect settings?
To fix a user account in that situation, it helps to create AD snapshots to view previous settings and restore attributes. Use the following command from an elevated prompt:
ntdsutil snapshot 'Activate Instance NTDS' Create quit quit
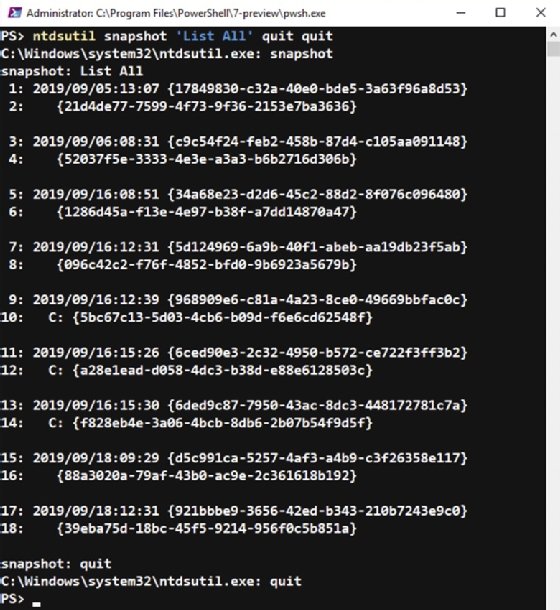
The Ntdsutil command-line tool installs with AD and generates the output in this screenshot when creating the snapshot.

You don't need to take snapshots on every domain controller. The number of snapshots will depend on the geographic spread of your organization and the arrangement of the administration team.
The initial snapshot captures the entire AD. Subsequent snapshots take incremental changes. The frequency of snapshots should be related to the amount of movement of the data in your AD.
Restore data from a snapshot
In this test scenario, let's assume that the group memberships of a user account have been incorrectly changed. Run the following PowerShell commands to remove the user's group memberships:
Remove-ADGroupMember -Identity finance -Members (Get-ADUser -Identity EmilyBrunel) -Confirm:$false
Remove-ADGroupMember -Identity department1 -Members (Get-ADUser -Identity EmilyBrunel) -Confirm:$false
Remove-ADGroupMember -Identity project1 -Members (Get-ADUser -Identity EmilyBrunel) -Confirm:$false
You need to identify the snapshot from which you will restore the data. The following command lists the snapshots:
ntdsutil snapshot 'List All' quit quit

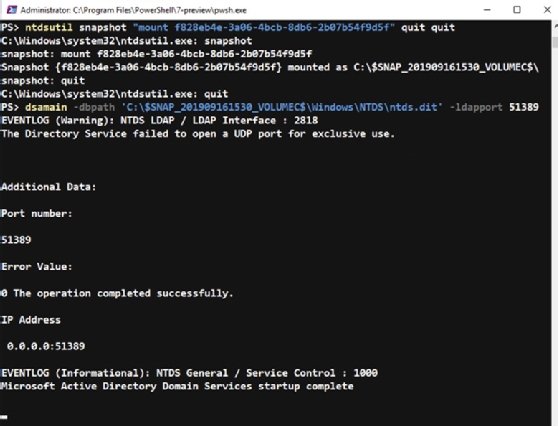
To mount the snapshot, run the following command:
ntdsutil snapshot "mount f828eb4e-3a06-4bcb-8db6-2b07b54f9d5f" quit quit
Run the following command to open the snapshot:
dsamain -dbpath 'C:\$SNAP_201909161530_VOLUMEC$\Windows\NTDS\ntds.dit' -ldapport 51389
The Dsamain utility gets added to the system when you install AD Domain Services. Note that the console you use to mount and open the snapshot is locked.

When you view the group membership of the user account in your AD, it will be empty. The following command will not return any output:
Get-ADUser -Identity EmilyBrunel -Properties memberof | select -ExpandProperty memberof
When you view the same account from your snapshot, you can see the group memberships:
Get-ADUser -Identity EmilyBrunel -Properties memberof -Server TTSDC01.sphinx.org:51389  | select -ExpandProperty memberof
CN=Project1,OU=Groups,DC=Sphinx,DC=org
CN=Department1,OU=Groups,DC=Sphinx,DC=org
CN=Finance,OU=Groups,DC=Sphinx,DC=org
To restore the group memberships, run the following:
Get-ADUser -Identity EmilyBrunel -Properties memberof -Server TTSDC01.sphinx.org:51389  | select -ExpandProperty memberof |
ForEach-Object {Add-ADGroupMember -Identity $_ -Members (Get-ADUser -Identity EmilyBrunel)}
After reinserting the group memberships from the snapshot version of the account, add the user into those groups in your production AD.
Your user account now has the correct group memberships:
Get-ADUser -Identity EmilyBrunel -Properties memberof | select -ExpandProperty memberof
CN=Project1,OU=Groups,DC=Sphinx,DC=org
CN=Department1,OU=Groups,DC=Sphinx,DC=org
CN=Finance,OU=Groups,DC=Sphinx,DC=org
Press Ctrl-C in the console in which you ran Dsamain, and then unmount the snapshot:
ntdsutil snapshot "unmount *" quit quit
Run an authoritative restore from a backup
In the last scenario, imagine you lost a whole OU's worth of data, including the OU. You could do an Active Directory recovery using data from the recycle bin, but that would mean restoring the OU and any OUs it contained. You would then have to restore each individual user account. This could be a tedious and error-prone process if the data in the user accounts in the OU changes frequently. The solution is to perform an authoritative restore.
Before you can perform a restore, you need a backup. We'll use Windows Server Backup because it is readily available. Run the following PowerShell command to install:
Install-WindowsFeature -Name Windows-Server-Backup
The following code will create a backup policy and run a system state backup:
Import-Module WindowsServerBackup
$wbp = New-WBPolicy

$volume = Get-WBVolume -VolumePath C:
Add-WBVolume -Policy $wbp -Volume $volume

Add-WBSystemState $wbp

$backupLocation = New-WBBackupTarget -VolumePath R:
Add-WBBackupTarget -Policy $wbp -Target $backupLocation

Set-WBVssBackupOptions -Policy $wbp -VssCopyBackup

Start-WBBackup -Policy $wbp
The following command creates a backup of the system state, including the AD database:
Add-WBSystemState $wbp
The following code creates a scheduled backup of the system state at 8 a.m., noon, 4 p.m. and 8 p.m.
Set-WBSchedule -Policy $wbp -Schedule 08:00, 12:00, 16:00, 20:00
Set-WBPolicy -Policy $wbp
In this example, let's say an OU called Test with some critical user accounts got deleted.
Reboot the domain controller in which you've performed the backup, and go into Directory Services Recovery Mode. If your domain controller is a VM, you may need to use Msconfig to set the boot option rather than using the F8 key to get to the boot options menu.
$bkup = Get-WBBackupSet | select -Last 1
Start-WBSystemStateRecovery -BackupSet $bkup -AuthoritativeSysvolRecovery
Type Y, and press Enter to restore to original location.
At the prompt, restart the domain controller to boot back into recovery mode.
You need to mark the restored OU as authoritative by using Ntdsutil:
ntdsutil
C:\Windows\system32\ntdsutil.exe: activate instance NTDS
Active instance set to "NTDS".
C:\Windows\system32\ntdsutil.exe: authoritative restore
authoritative restore: restore subtree "ou=test,dc=sphinx,dc=org"
A series of messages will indicate the progress of the restoration, including the number of objects restored.
Exit ntdsutil
authoritative restore: quit
C:\Windows\system32\ntdsutil.exe: quit
Restart the domain controller. Use Msconfig before the reboot to reset to a normal start.
The OU will be restored on your domain controller and will replicate to the other domain controllers in AD.
A complete loss of AD requires intervention
In the unlikely event of losing your entire AD forest, you'll need to work through the AD forest recovery guide at this link. If you have a support agreement with Microsoft, then this would be the ideal time to use it.


