Downloading and Installing Windows PowerShell
In this excerpt from "Essential PowerShell" you'll learn the steps and procedures for downloading and installing Windows PowerShell. You'll also go over the process of taking WPS for a test run in interactive mode and script mode.
 |
This chapter excerpt from Essential PowerShell, by Holger Schwichtenberg, is printed with permission from Addison-Wesley Professional, Copyright 2008. Click here to purchase the entire book. |
Windows Server 2008 is the first operating system that includes WPS on the DVD. However, it is an additional feature that can be installed through Add Feature in the Windows Server 2008 Server Manager.
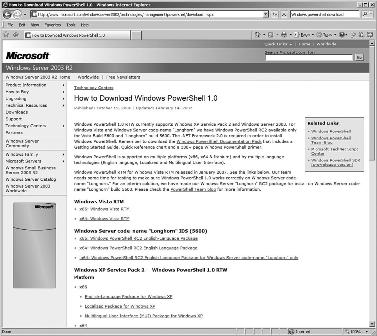
WPS can be downloaded (see Figure 1.1) and installed as an add-on to the following operating systems:
- Windows XP for x86 with Service Pack 2
-
- Windows XP for x64 with Service Pack 2
-
- Windows Server 2003 for x86 with Service Pack 1
-
- Windows Server 2003 for x64 with Service Pack 1
-
- Windows Server 2003 for Itanium with Service Pack 1
-
- Windows Vista for x86
-
- Windows Vista for x64
Note that WPS is not included in Windows Vista, although Vista und WPS were released on the same day. Microsoft decided not to ship any .NET-based applicatcoions with Vista. Only the .NET Framework itself is part of Vista.
| POWERSHELL DOWNLOAD PAGE www.microsoft.com/windowsserver2003/technologies/management/powershell/download.mspx |
WPS requires that .NET Framework 2.0 or later be installed before running WPS setup. Because Vista ships with .NET Framework 3.0 (which is a true superset of 2.0), no .NET installation is required for it. However, on Windows XP and Windows Server, you must install .NET Framework 2.0, 3.0, or 3.5 first (if they are not already installed by another application).
| MICROSOFT .NET FRAMEWORK 3.0 REDISTRIBUTABLE PACKAGE www.microsoft.com/downloads/details.aspx?FamilyId=10CC340B-F857- 4A14-83F5-25634C3BF043&displaylang=en |
The setup routine installs WPS to the directory %systemroot%\ system32\WindowsPowerShell\V1.0(on 32-bit systems) or %systemroot%\ Syswow64\WindowsPowerShell\V1.0 (for 64-bit systems). You cannot change this folder during setup.
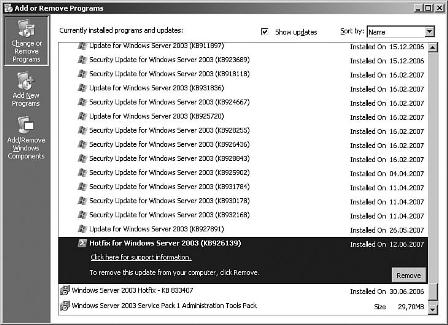
| TIP If for any reason you want to uninstall WPS, note that WPS is considered a software update to the Windows operating system (that is, not a normal application). Therefore, in the Add or Remove Programs control panel applet, it is not listed as a program; instead, it is listed as an update called Hotfix for Windows (KB x). The Knowledge Base (KB) number varies on different operating systems. However, you can identify WPS installation in the list by its icon (see Figure 1.2). On Windows XP and Windows Server 2003, you must check the Show Updates check box to see the WPS installation. |
Taking WPS for a Test Run
This section includes some commands to enable you to try out a few WPS features. WPS has two modes, interactive mode and script mode, which are covered separately.
WPS in Interactive Mode
First, you'll use WPS in interactive mode.
Start WPS. An empty WPS console window will display (see Figure 1.3). At first glance, you might not see much difference between it and the traditional Windows console. However, there is much more power in WPS, as you will soon see.
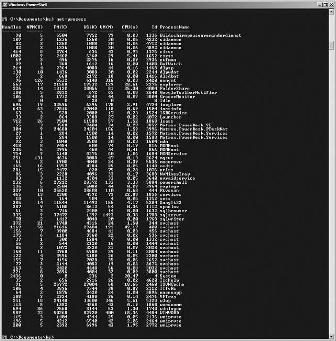
At the command prompt, type get-process and then press the Return key. A list of all running processes on your local computer will display (see Figure 1.4). This was your first use of a simple WPS commandlet.
| NOTE Note that the letter case does not matter. WPS does not distinguish between uppercase and lowercase letters in commandlet names. |
At the command prompt, type get-service i*. A list of all installed services with a name that begins with the letter I on your computer will display (see Figure 1.5). This was your first use of a commandlet with parameters.
Type get- and then press the Tab key several times. You will see WPS cycling through all commandlets that start with the verb get. Microsoft calls this feature tab completion. Stop at Get-Eventlog. When you press Enter, WPS prompts for a parameter called LogName (see Figure 1.6). LogName is a required parameter. After typing Application and pressing Return, you will see a long list of the current entries in your Application event log.
The last example in this section introduces you to the pipeline features of WPS. Again, we want to list entries from a Windows event log, but this time we want to get only some entries. The task is to get the most recent ten events that apply to printing. Enter the following command, which consists of three commandlets connected via pipes (see Figure 1.7):
Get-EventLog system|Where-Object{ $_.source -eq "print" }
|Select-Object -first 10
Note that WPS seems to get stuck for a few seconds after printing the first ten entries. This is the correct behavior because the first commandlet (Get-EventLog) will receive all entries. The filtering is done by the subsequent commandlets (Where-Object and Select-Object). Unfortunately, Get-EventLog has no included filter mechanism.
WPS in Script Mode
Now it's time to try out PowerShell in script mode and incorporate a WPS script. A WPS script is a text file that includes commandlets/elements of PowerShell Script Language (PSL). The script in this example creates a new user account on your local computer.
Open Windows Notepad (or any other text editor) and enter the following lines of script code (which consists of comments, variable declarations, COM library calls, and shell output):
Listing 1.4 Create a User Account
### PowerShell Script
### Create local User Acount
# Variables
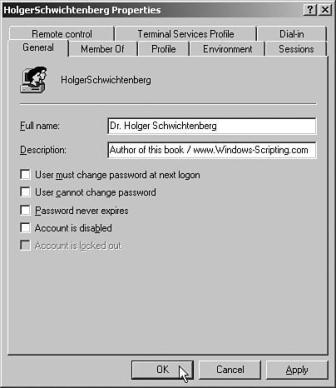
$Name = "Dr. Holger Schwichtenberg"
$Accountname = "HolgerSchwichtenberg"
$Description = "Author of this book / Website: www.windows-scripting.com"
$Password = "secret+123"
$Computer = "localhost"
"Creating User on Computer $Computer"
# Access to Container using the COM library "Active Directory Service Interface (ADSI)"
$Container = [ADSI] "WinNT://$Computer"
# Create User
$objUser = $Container.Create("user", $Accountname)
$objUser.Put("Fullname", $Name)
$objUser.Put("Description", $Description)
# Set Password
$objUser.SetPassword($Password)
# Save Changes
$objUser.SetInfo()
"User created: $Name"
Save the text file with the name createuser.ps1 into the directory c:temp. Note that the file extension must be .ps1.
Now start WPS. Try to start the script by typing c:\temp\createuser.ps1. (You can use tab completion for the directory and filenames.) This attempt will fail because script execution is, by default, not allowed in WPS (see Figure 1.8). This is not a bug; it is a security feature. (Remember the Love Letter worm for WSH?)
For our first test, we will weaken the security a little bit (just a little). We will allow scripts that reside on your local system to run. However, scripts that come from network resources (including the Internet) will need a digital signature from a trusted script author. Later in this book you learn how to digitally sign WPS scripts. You also learn to restrict your system to scripts that you or your colleagues have signed.
To allow the script to run, enter the following:
Set-ExecutionPolicy remotesigned
Then, start the script again (see Figure 1.9). Now you should see a message that the user account has been created (see Figure 1.10).
Figure 1.10 (click to enlarge)

![]() ESSENTIAL POWERSHELL
ESSENTIAL POWERSHELL
![]()
![]() Part 1: What is PowerShell?
Part 1: What is PowerShell?
![]() Part 2: Downloading and Installing PowerShell
Part 2: Downloading and Installing PowerShell
![]() Part 3: PowerShell Community Extensions and PowerShell Plus
Part 3: PowerShell Community Extensions and PowerShell Plus
| Dr. Holger Schwichtenberg is one of Germany's well-known experts for .NET and Windows Scripting technologies, is a Microsoft MVP, a .NET Code Wise Member, a board member of codezone.de, MSDN Online Expert, and a INETA speaker. He has published more than 20 books for Addison Wesley and Microsoft Press in Germany, in addition to more than 400 journal articles, notably for the IT journals iX, DOTNET Pro, and Windows IT Pro. He can be reached at [email protected]. |


