ra2 studio - Fotolia
How to fix 7 common remote desktop connection problems
When the connection between a desktop and its host fails, it's time to do some remote desktop troubleshooting. Check firewalls, security certificates and more if a remote desktop is not working.

When the remote desktop connection between a Windows desktop and its host fails, it's time to do some remote desktop troubleshooting by checking firewalls, security certificates and more.
Administrators can encounter many remote desktop connection problems, including network failure, Secure Sockets Layer (SSL) certificate issues, authentication troubles and capacity limitations.
As a desktop admin, you can prevent and solve common remote desktop problems by using these tips.
1. Network failure
A lack of a valid communications path can prevent a client from connecting to a remote desktop session. The easiest way to diagnose this issue is through the process of elimination.
First, try to establish a session from a client that has been able to successfully connect in the past. The goal is to find out if the problem is specific to an individual client, the network or a terminal server/Windows server.
If you suspect the network might be to blame, try to narrow down the scope of the issue to find the root cause. In doing so, you might discover that the problem affects wireless connections but not wired ones. Likewise, you might discover the problem is unique to VPN traffic or a particular subnet.
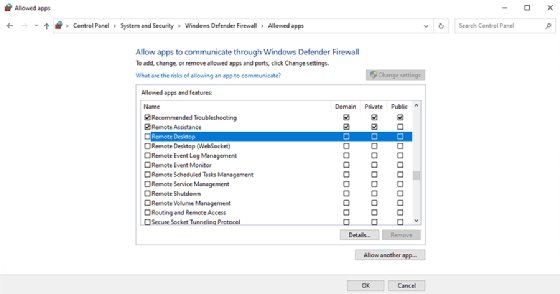
2. Firewall problems
It's easy to dismiss the notion that a firewall could contribute to a remote desktop not working, but it's quite common. Some organizations configure their corporate firewall to block outbound RDP traffic, thereby preventing connectivity to remote systems. It's also common for organizations to make it so that an RDP session can only be connected through a VPN.
To avoid firewall problems, ensure that the port your remote desktop software uses is open on any firewalls residing between client computers and the server they connect to. Remote Desktop Protocol-based tools use RDP port 3389 by default.
You can check to make sure that the Windows Defender Firewall service allows RDP traffic and update general firewall settings by completing these steps:
- Open the Control Panel by entering Control at the Windows Run prompt.
- Click System and Security.
- Click Windows Defender Firewall.
- Click Allow an Appor Feature Through Windows Defender Firewall.
- Select the Remote Desktop option.
- Click OK.
3. SSL certificate issues
Security certificates can also cause remote desktop connection problems. Many VDI products use SSL encryption for users that access VDI sessions outside the network perimeter. But SSL encryption requires the use of certificates, which creates two problems that can cause a remote desktop to not work.
First, if remote desktops are going to connect properly, client computers must trust the certificate authority that issued the certificate. This isn't usually a problem for organizations that purchase certificates from large, well-known authorities, but clients won't always trust the certificates an organization generates in-house. Use a reliable certificate authority to ensure that clients establish remote desktop connectivity.
If you're using a certificate provided by an enterprise certificate authority, download a copy of the certificate authority's root certificate and add it to the client's certificate store in a way that is associated with the certificate.
The client must also be able to verify the certificate the server uses. The verification process can break down if the certificate has expired or if the name on the certificate doesn't match the name of the server using it.
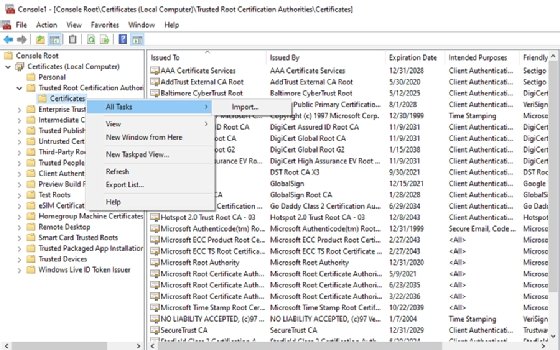
To check if your network endpoint trusts your certificate authority and import any required certificates, complete these steps:
- Enter the MMC command at the Windows Run prompt.
- Select the Add / Remove Snap-In Command from the File menu.
- Choose Certificates from the list of available snap-ins and click Add.
- When prompted, choose the Computer Account option and click Next.
- Choose the Local Computer option and click Finish.
- Click OK.
- Navigate through the console tree to Certificates (Local Computer) \ Trusted Root Certification Authorities \ Certificates.
- Browse the list of certification authorities to make sure that your certificate authority is listed. If not, right-click on the Certificates container and choose the All Tasks | Import option.
After verifying and importing the root certificate that will allow Windows to trust the SSL certificate, take the following steps.
-
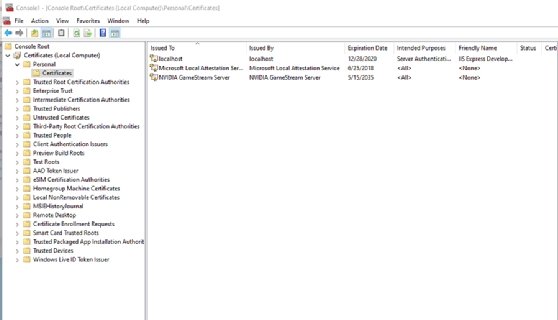
- Check for the existence of the SSL certificate. Navigate through the console tree to Certificates (Local Computer) | Personal | Certificates.
- If the SSL certificate does not exist or has expired, right-click on the Certificates container and choose the All Tasks | Import commands from the shortcut menus.
- Follow the prompts to import the certificate.
![The SSL certificate list]()
The list of trusted SSL certificates for the firewall. 4. DNS problems
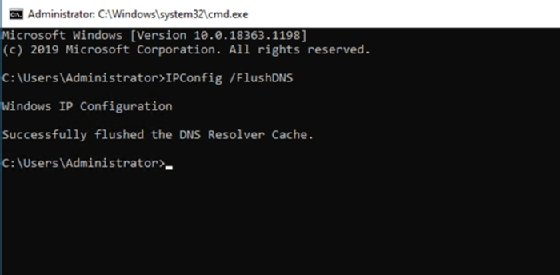
Many remote desktop connectivity problems can be traced to DNS issues. If an admin changes a host's IP address, then clients might not be able to connect to the host until the client's DNS resolver cache expires. To expire a DNS resolver cache, follow these steps:
- Open an elevated Command Prompt window by entering the CMD command at the Windows Run prompt.
- Enter the IPConfig /FlushDNS command.
![Fixing the DNS cache]()
The process for resolving the DNS cache. Clients might also have trouble connecting to a host if they use an external DNS server that is unable to resolve hosts on the organization's private network. To fix this problem, modify the client's IP address settings so it uses one of the organization's DNS servers rather than an external DNS.
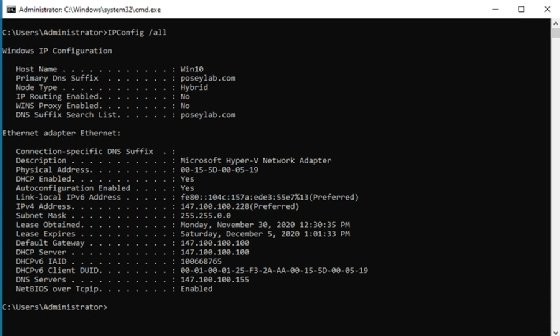
As an alternative, you might be able to connect to a remote system by specifying its IP address rather than a host name. To determine whether an endpoint is connected to the correct DNS server, complete the following steps:
- Open a Command Prompt window by entering the CMD command at the Windows Run prompt.
- Enter the IPConfig / all command.
- Verify that the correct DNS server is being used with the Preferred network adapter. If the DNS server listed is incorrect, then you can manually specify a different DNS server in the PC's IP address properties or configure the PC to use a DHCP server.
These steps should work for both Windows 10 and Windows 11.
![Verifying DNS server usage]()
The process to verify that a PC is pointed to the proper DNS server. 5. Permission and licensing issues
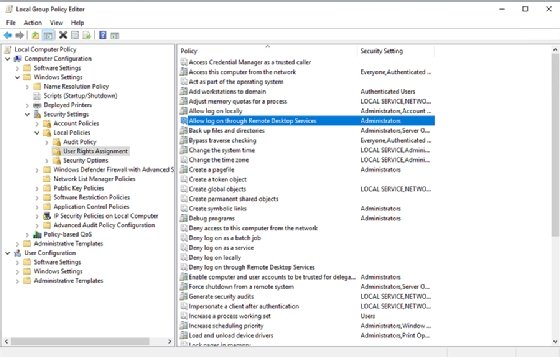
For users to access a remote resource through the Remote Desktop Services, you must assign them the Logon Through Remote Desktop Services right. Otherwise, the users will receive an error when they try to connect to the remote computer. To make sure you have the proper permissions assigned, complete these steps on the remote server:
- Open the Group Policy Object Editor by entering the GPEdit.msc command at the Windows Run prompt.
- Navigate through the console tree to Computer Configuration \ Windows Settings \ Security Settings \ Local Policies \ User Rights Assignment.
- Double-click on Allow log on through Remote Desktop Services.
- Add the necessary groups and click OK.
You could also experience remote desktop connectivity issues if you deplete your pool of licenses. If users are connecting through the Remote Desktop Services, then make sure that you have a sufficient number of RDS CALs and that the CALs have been properly installed. It is worth noting that Microsoft allows for a 120-day grace period before it begins enforcing CALs. Hence, if your deployment is relatively new and you suddenly begin having problems, check if your RDS CALs are installed.
![RDS permission verification]()
Verifying that the endpoint has the right permissions to access Remote Desktop Services. 6. Dropped connections
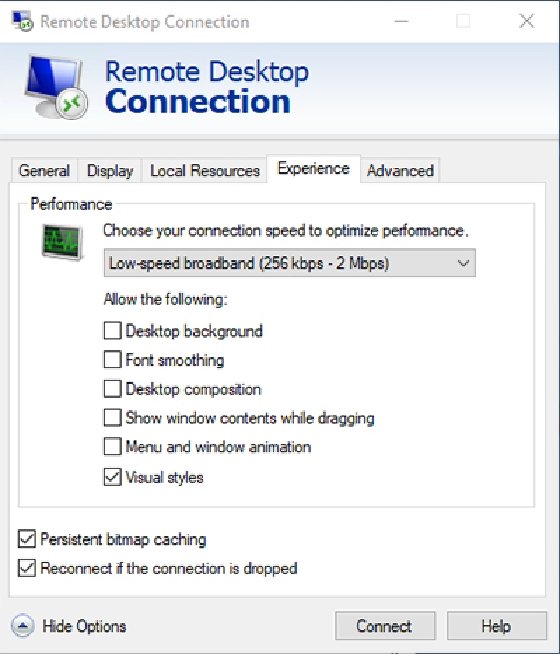
Sometimes the client can establish an RDP session, but the available bandwidth is inadequate to support the session's requirements. The session might appear to freeze, or you might see a black screen. In some cases, the client might drop the connection and display a message that says 'Reconnecting.'
If you suspect there might not be enough bandwidth to support the RDP session, try closing any applications and shutting off other devices that might be consuming bandwidth.
You can adjust the RDP client to use a lower display resolution or color depth and disable visual features, such as font smoothing or the Windows background. To reduce the bandwidth consumption of the native Windows RDP client, follow these steps:
- Open the RDP client.
- Expand the console by clicking on the Show Options link.
- Select the Experience tab.
- Select the Low-speed broadband option from the drop-down menu.
- Click Connect.
![RDP low-speed broadband]()
The remote desktop session Windows with the low-speed broadband option selected. 7. CredSSP problems
RDP connectivity can sometimes fail due to issues with the Credential Security Support Provider (CredSSP) protocol. The CredSSP provides a means of sending user credentials from a client computer to a host computer when an RDP session is in use. By default, the RDP only works if both the client and the RDP host use an updated CredSSP provider. If a system does not include an up-to-date CredSSP provider, the client will typically display an authentication error.
The best way to fix this is to ensure that both the client and the host are running supported Windows versions and both systems are fully updated. You can temporarily turn off the CredSSP requirement to test whether it is the source of the problem. The exact steps vary from one Windows version to the next, but here is a general description:
- Open the System Properties sheet and select the Remote tab.
- Verify that Allow Remote Connections is enabled.
- Deselect the Allow Connections Only From Computers Running Remote Desktop With Network Level Authentication check box.
- Click Connect.
Brien Posey is a former 22-time Microsoft MVP and a commercial astronaut candidate. In his more than 30 years in IT, he has served as a lead network engineer for the U.S. Department of Defense and a network administrator for some of the largest insurance companies in America.