A golden image can do wonders for organizations' operational efficiency in virtual desktop environments, but administrators need to learn the ins and outs of this technology before they can deploy it.
A properly configured golden image, which is a preconfigured machine template that IT can replicate to many end users, contains all the necessary software, settings and configurations that business users need. The advantage of using a golden image is that it ensures consistent and standardized configuration, which is especially important for an environment with hundreds or thousands of users. Golden images also make deployment and maintenance simpler by reducing the time it takes to create and update multiple virtual machines (VMs).
Azure Virtual Desktop (AVD) administrators can create a golden image with the native functionality in the Azure Portal and tools such as Hashicorp Packer and Azure Image Builder. But they also must know how to duplicate and distribute versions of this image to ensure an efficient AVD environment.
How to create the base VM for the golden image
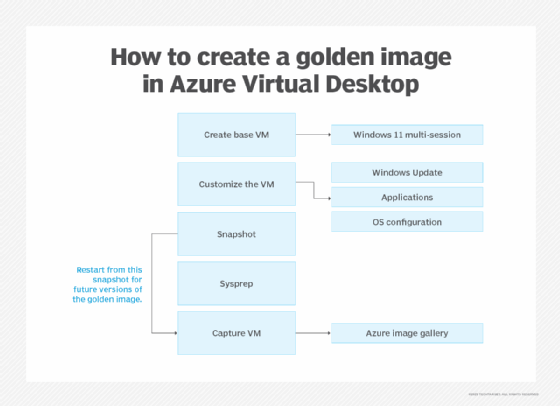
As an AVD administrator, you should start the golden image creation process with a VM in Azure that will serve as the base, as shown in Figure 1.
Figure 1. A graphic outlining the process of creating a golden image.
It does not matter what size or redundancy level it has because this machine will be terminated when you capture the VM to create the virtual hard disk image.
The only important part of this configuration is the following:
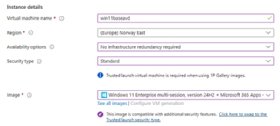
Figure 2. The details for the virtual machine instance that will serve as the basis for the golden image.
Image type, such as Enterprise multi-session Windows 11 with Microsoft 365 apps installed (Figure 2).
The placement of the VM in a network where you have access to it.
Microsoft has a set of predefined images available for AVD, both with and without Microsoft 365 apps installed.
If you deploy a VM using trusted launch, the only option to store the image afterward is using Azure Image Gallery.
Applying configurations to the golden image VM
Despite the addition of this new feature, you should also consider additional management technologies such as MSIX app attach to simplify golden image management.
Once the VM is created and running, you can customize the configurations and install any necessary updates and applications on the VM.
While you can perform this deployment and configuration manually using the Azure Portal, you can also use tools such as PowerShell, Ansible, Terraform or Azure Image Builder to automate this process. You can also automate the applications that you need to deploy.
Windows is still a generic OS, and if you want to get the most out of it and maximize the number of users that can log on to it, you need to optimize it. A useful tool here is the Virtual Desktop Optimization Tool, which is a set of text-based tools that apply settings to the OS to improve performance.
You should also ensure that any required and available Windows updates are installed on the machine.
When you are done with the VM configuration, take a snapshot of the VM. In the portal, you can perform this action by navigating to VM > Disk > OS Disk.Then select Create snapshot.
Once you have the snapshot available, you can always use this as a point-in-time to create a new virtual machine. Because the capturing of the VM image destroys the VM itself, keep in mind the VM needs to be created as a disk before you can create a new VM from the snapshot.
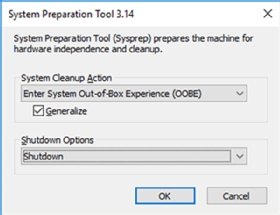
Once you are done with customizing the image, we need to finalize with running sysprep on the machine. You should go to C:\Windows\System32\Sysprep and run sysprep.exe (Figure 3).
Figure 3. The System Preparation -- or sysprep -- tool ready to prepare the VM.
After the VM has powered off, deallocate it by clicking on the VM in the Azure Portal and select Stop.
After the VM shows Stopped or Deallocated, click on Capture and choose Image.
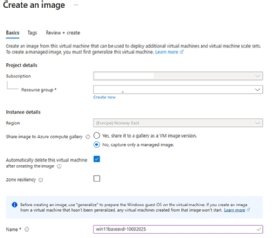
Then define managed image if you choose Generation 1 VM or a shared image library if you choose Generation 2 VM. Remember to have a consistent naming prefix so you know the content of the image, including the date, image version, OS version and whether the image contains certain line-of-business applications (Figure 4).
Figure 4. The image creation tab showing the name of the newly created VM.
Distributing the golden image as a VM
Once you have an image, you can use it as a base for the AVD machines. To use this new image, go into the Azure Portal and search for host pools.
From there, select Create a new host pool. Host pool is just a collection of virtual machines made available through AVD.
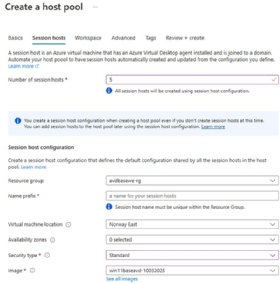
When you go through the wizard, you have the option to define the following:
How many session hosts will there be.
Virtual Machine Location -- note that the image you created needs to be in the same location.
Define the SKU, including the size of the VM.
Machine name prefix.
The image itself.
The desired virtual network.
Account information, such as the local administrator.
At the bottom of Figure 5, you can see the custom image from earlier in the process.
Figure 5. The option to choose the number of session hosts to create based on the golden image VM.
Once you've completed this wizard, it will provision a set of VMs based upon that image that you recently created.
One of the downsides of using this feature with AVD in the past was that there was no option to replace or upgrade existing host pools with a new image. Fortunately, Microsoft recently added -- at least in preview at the time this article publishes -- the ability to update an existing host pool using a new image. This will make it even easier to create and update host pools with new images through the Azure Portal.
Despite the addition of this new feature, you should also consider additional management technologies such as MSIX app attach to simplify golden image management. You don't need to install applications directly on the image with app attach -- instead, you can attach them from a network share.
Marius Sandbu is a cloud evangelist for Sopra Steria in Norway who mainly focuses on end-user computing and cloud-native technology.