Alex - stock.adobe.com
Improve Azure storage security with access control tutorial
These step-by-step guidelines detail how to grant limited access in Microsoft Azure storage. This best practice helps keep storage secure from internal and external threats.
Least-privilege access is a longstanding principle that admins should apply to Microsoft Azure storage security.
Users should only have access to what they need to do their jobs. This best practice for Azure storage security helps to limit the blast radius of a ransomware attack. Ransomware operates under a user's permissions and cannot attack anything that a user can't access.
This same basic concept also extends to role-based access control. Microsoft Azure offers identity and access management (IAM) roles that admins can assign to users, groups and service principals. Always assign the most restrictive role that still allows users to do their jobs.
Step by step: Setting access
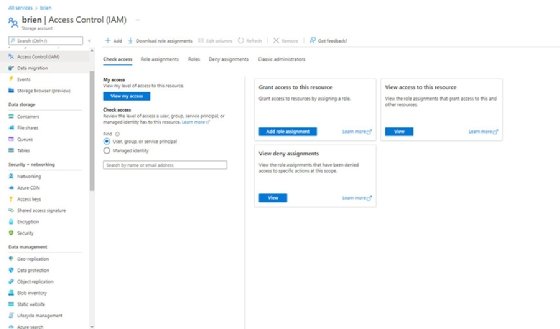
To grant access to an Azure storage account, open your storage account, and then click on the Access Control (IAM) tab, as shown here.

To grant access to storage resources, click on the Add role assignment button. This takes you to the Add role assignment screen, where you can choose an IAM role to assign. The Owner role, for example, provides full access to the resource, whereas the Reader role allows read-only access.
Once you have selected a role, click Next. You are taken to a screen that prompts you to choose the users, groups or service principals to whom you wish to assign the role.
Click Next once more, and you see a screen that gives you the opportunity to review the settings. Assuming that everything looks good, click the Review + Assign button to make the role assignment.
Just as it is possible to grant permissions to a storage account, you can use the same technique to grant access to Azure Blob Storage. To do so, open the container that you want to configure, and then click on the Access Control (IAM) tab. The resulting configuration screen is identical to the one shown in the previous figure.
This method is for granting permissions to users within your organization. However, a container's contents can also be accessible to the public. While public access has its place, you probably don't want the world to be able to access all of your Blobs. As such, check a container's access to make sure that it is set to your preferred level.
To do so, click on the container, and then click on the Change access level button. As you can see in the screenshot here, you can provide anonymous read access to either Blobs or to both Blobs and containers. There is also a Private option, which prevents anonymous access altogether.

Work around a major access issue
One of the biggest Azure storage security challenges is users who should not have access to your storage account key, but who need more than just basic access to your storage account, either permanently or temporarily.
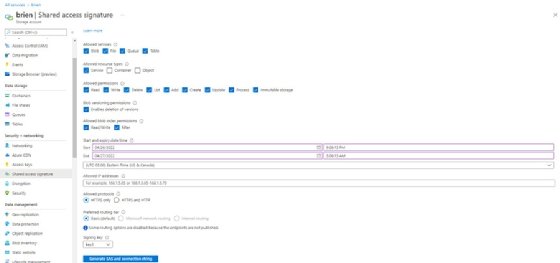
Address this need by creating a shared access signature (SAS). Open your storage account within the Azure portal, and then select the Shared access signature tab. As you can see in the screenshot here, the options on this tab enable you to choose the services and resources that users can access, as well as the permissions over those resources. Additionally, you can specify a start and end time for the SAS, which makes it possible to grant access to storage resources on a temporary basis.

When you are finished, click the Generate SAS and connection string button. This causes Azure to generate a series of URLs corresponding to the various services that you have selected. It also generates a SAS token and a connection string. Anyone who accesses the storage resources through these URLs is bound by the restrictions that you have put into place.


