Top static malware analysis techniques for beginners
Malware will eventually get onto an endpoint, server or network. Using static analysis can help find known malware variants before they cause damage.
Malware analysis helps security teams improve threat detection and remediation. Through static analysis, dynamic analysis or a combination of both techniques, security professionals can determine how dangerous a particular malware sample is. They can also analyze how malware functions once on a system and improve future alerts to similar malware attacks.
In Malware Analysis Techniques: Tricks for the triage of adversarial software, published by Packt, author Dylan Barker introduces analysis techniques and tools to study malware variants.
The book begins with step-by-step instructions for installing isolated VMs to test suspicious files. From there, Barker explains beginner and advanced static and dynamic analysis techniques, as well as de-obfuscating tricks and utilizing the Mitre ATT&CK framework.
In this Chapter 2 excerpt, Barker explains how static analysis lets security teams collect data from a suspicious file without executing it. Through hashing and fuzzy hashing techniques and tools, security professionals can learn whether a malware sample has been cataloged. Given how often attackers tweak malware to create new signatures to fool antivirus software, the next step involves executing the file in an isolated VM and observing its actions. Barker also shows how security teams can use open source intelligence through VirusTotal to learn about a known malware variant. VirusTotal is a scanning engine for malware samples, comparing files, hashes, URLs and more to a database and against antivirus engines.
The rest of Chapter 2, available here, covers malware serotyping and examining ASCII or Unicode strings in the binary.
More on Malware Analysis Techniques
To learn more about malware detection methods, check out this interview with author Dylan Barker.
Malware analysis is divided into two primary techniques: dynamic analysis, in which the malware is actually executed and observed on the system, and static analysis. Static analysis covers everything that can be gleaned from a sample without actually loading the program into executable memory space and observing its behavior.
Much like shaking a gift box to ascertain what we might expect when we open it, static analysis allows us to obtain a lot of information that may later provide context for behaviors we see in dynamic analysis, as well as static information that may later be weaponized against the malware.
In this chapter, we'll review several tools suited to this purpose, and several basic techniques for shaking the box that provide the best information possible. In addition, we'll take a look at two real-world examples of malware, and apply what we've learned to show how these skills and tools can be utilized practically to both understand and defeat adversarial software.
In this chapter, we will cover the following topics:
- The basics -- hashing
- Avoiding rediscovery of the wheel
- Getting fuzzy
- Picking up the pieces
Technical requirements
The technical requirements for this chapter are as follows:
- FLARE VM set up, which we covered in the previous chapter
- An internet connection
- .zip files containing tools and malware samples from https://github.com/PacktPublishing/Malware-Analysis-Techniques
The basics -- hashing
One of the most useful techniques an analyst has at their disposal is hashing. A hashing algorithm is a one-way function that generates a unique checksum for every file, much like a fingerprint of the file.
That is to say, every unique file passed through the algorithm will have a unique hash, even if only a single bit differs between two files. For instance, in the previous chapter, we utilized SHA256 hashing to verify whether a file that was downloaded from VirtualBox was legitimate.
Hashing algorithms
SHA256 is not the only hashing algorithm you're likely to come across as an analyst, though it is currently the most reliable in terms of balance of lack of collision and computational demand. The following table outlines hashing algorithms and their corresponding bits:
| Algorithm |
Output Bits |
Broken |
| MD5 |
128 |
Yes |
| SHA1 |
160 |
Yes |
| SHA256 |
256 |
No |
| SHA512 |
512 |
No |
Analysis Tip
In terms of hashing, collision is an occurrence where two different files have identical hashes. When a collision occurs, a hashing algorithm is considered broken and no longer reliable. Examples of such algorithms include MD5 and SHA1.
Obtaining file hashes
There are many different tools that can be utilized to obtain hashes of files within FLARE VM, but the simplest, and often most useful, is built into Windows PowerShell. Get-FileHash is a command we can utilize that does exactly what it says -- gets the hash of the file it is provided. We can view the usage of the cmdlet by typing Get-Help Get-FileHash, as shown in the following screenshot:
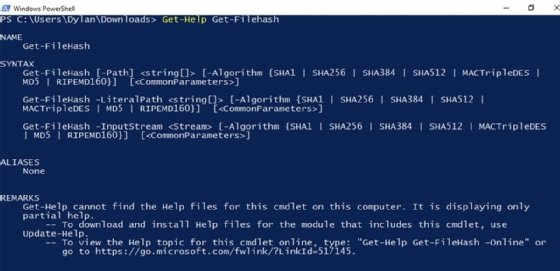
In this instance, there are two files available at https://github.com/PacktPublishing/Malware-Analysis-Techniques. These files are titled md5-1.exe and md5-2.exe. Once downloaded, Get-FileHash can be utilized on them, as shown in the next screenshot. In this instance, because there were the only two files in the directory, it was possible to use Get-ChildItem and pipe the output to Get-FileHash, as it accepts input from pipeline items.
Analysis Tip
Utilizing Get-ChildItem and piping the output to Get-FileHash is a great way to get the hashes of files in bulk and saves a great deal of time in triage, as opposed to manually providing each filename to Get-FileHash manually.
In the following screenshot, we can see that the files have the same MD5 hash! However, they also have the same size, so it's possible that these are, in fact, the same file:
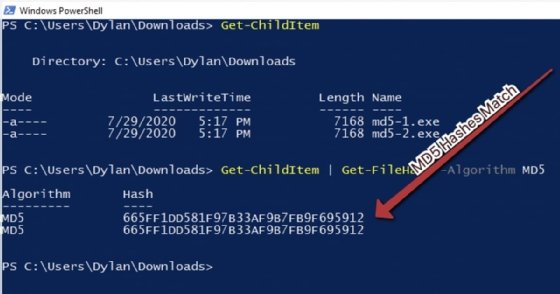
However, because MD5 is known to be broken, it may be best to utilize a different algorithm. Let's try again, this time with SHA256, as illustrated in the following screenshot:
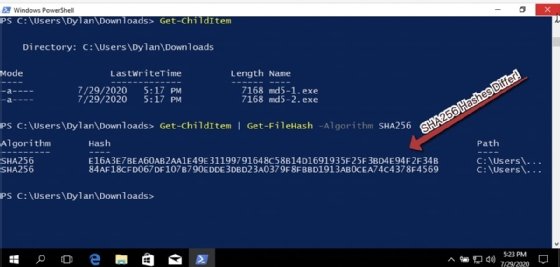
The SHA256 hashes differ! This indicates without a doubt that these files, while the same size and with the same MD5 hash, are not the same file, and demonstrates the importance of choosing a strong one-way hashing algorithm.
Avoiding rediscovery of the wheel
We have already established a great way of gaining information about a file via cryptographic hashing -- akin to a file's fingerprint. Utilizing this information, we can leverage other analysts' hard work to ensure we do not dive deeper into analysis and waste time if someone has already analyzed our malware sample.
Leveraging VirusTotal
A wonderful tool that is widely utilized by analysts is VirusTotal. VirusTotal is a scanning engine that scans possible malware samples against several antivirus (AV) engines and reports their findings.
In addition to this functionality, it maintains a database that is free to search by hash.
Navigating to https://virustotal.com/ will present this screen:
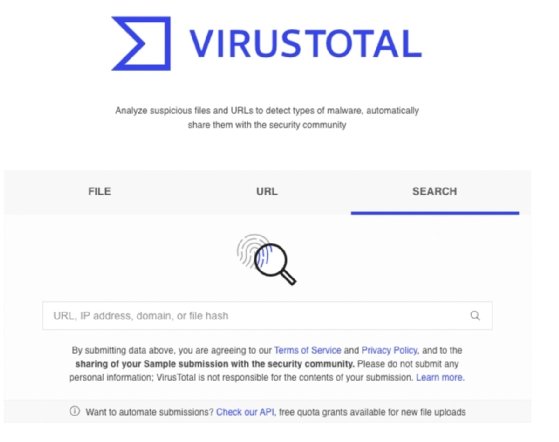
In this instance, we'll use as an example a 275a021bbfb6489e54d471899f7db9d1 663fc695ec2fe2a2c4538aabf651fd0f SHA256 hash. Entering this hash into VirusTotal and clicking the Search button will yield results as shown in the following screenshot, because several thousand analysts have submitted this file previously:
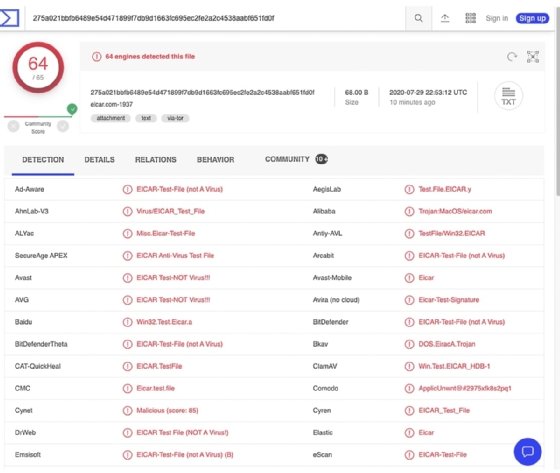
Within this screen, we can see that several AV engines correctly identify this SHA256 hash as being the hash for the European Institute for Computer Antivirus Research (EICAR) test file, a file commonly utilized to test the efficacy of AV and endpoint detection and response (EDR) solutions.
It should be apparent that utilizing our hashes first to search VirusTotal may greatly assist in reducing triage time and confirm suspected attribution much more quickly than our own analysis may.
However, this may not always be an ideal solution. Let's take a look at another sample -- 8888888.png. This file may be downloaded from https://github.com/PacktPublishing/Malware-Analysis-Techniques.
Warning!
888888.png is live malware -- a sample of the Qakbot (QBot) banking Trojan threat! Handle this sample with care!
Utilizing the previous section's lesson, obtain a hash of the Qakbot file provided. Once done, paste the discovered hash into VirusTotal and click the search icon, as illustrated in the following screenshot:
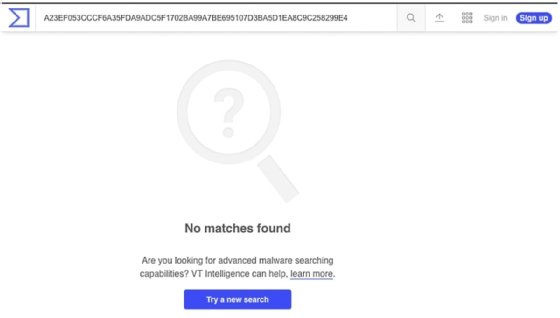
It appears, based on the preceding screenshot, that this malware has an entirely unique hash. Unfortunately, it appears as though static cryptographic hashing algorithms will be of no use to our analysis and attribution of this file. This is becoming more common due to adversaries' implementation of a technique called hashbusting, which ensures each malware sample has a different static hash!
Analysis Tip
Hashbusting is quickly becoming a common technique among more advanced malware authors, such as the actor behind the EMOTET threat. Hashbusting implementations vary greatly, from adding in arbitrary snippets at compile- time to more advanced, probabilistic control flow obfuscation -- such as the case with EMOTET.
Getting fuzzy
In the constant arms race of malware authoring and Digital Forensics and Incident Response (DFIR) analysts attempting to find solutions to common obfuscation techniques, hashbusting has also been addressed in the form of fuzzy hashing.
ssdeep is a fuzzy hashing algorithm that utilizes a similarity digest in order to create and output representations of files in the following format:
chunksize:chunk:double_chunk
While it is not necessary to understand the technical aspects of ssdeep for most analysts, a few key points should be understood that differentiate ssdeep and fuzzy hashing from standard cryptographic hashing methods such as MD5 and SHA256: changing small portions of a file will not significantly change the ssdeep hash of the file, whereas changing one bit will entirely change the cryptographic hash.
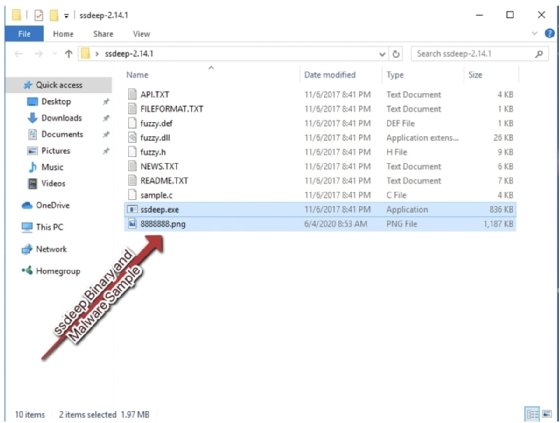
With this in mind, let's take a ssdeep hash of our 8888888.png sample. Unfortunately, ssdeep is not installed by default in FLARE VM, so we will require a secondary package. This can be downloaded from https://github.com/PacktPublishing/Malware-Analysis-Techniques. Once the ssdeep binaries have been extracted to a folder, place the malware sample in the same folder, as shown in the following screenshot:
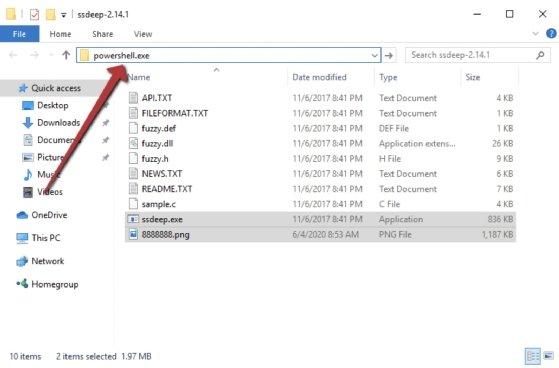
Next, we'll need to open a PowerShell window to this path. There's a quick way to do this in Windows -- click in the path bar of Explorer, type powershell.exe, strike Enter, and Windows will helpfully open a PowerShell prompt at the current path! This is illustrated in the following screenshot:
With PowerShell open at the current prompt, we can now utilize the following to obtain our ssdeep hash: .\ssdeep.exe .\8888888.png. This will then return the ssdeep fuzzy hash for our malware sample, as illustrated in the following screenshot:

We can see that in this instance, the following fuzzy hash has been returned:
6144:JanAo3boaSrTBRc6nWF84LvSkgNSjEtIovH6DgJG3uhRtSUgnSt9BYbC
38g/T4J:JaAKoRrTBHWC4LINSjA/EMGU/ShomaI
Unfortunately, at this time, the only reliable publicly available search engine for ssdeep hashes is VirusTotal, which requires an Enterprise membership. However, we'll walk through the process of searching VirusTotal for fuzzy hashes. In the VirusTotal Enterprise home page, ssdeep hashes can be searched with the following:
ssdeep:"<ssdeephashhere>"
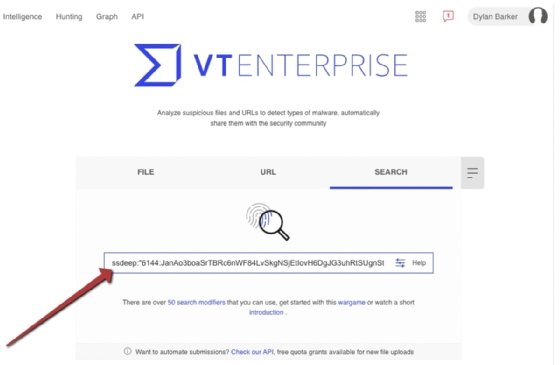
Because comparing fuzzy hashes requires more computational power than searching rows for fixed, matching cryptographic hashes, VirusTotal will take a few moments to load the results. However, once it does, you will be presented with the page shown in the following screenshot, containing a wealth of information, including a corresponding cryptographic hash, when the sample was seen, and engines detecting the file, which will assist with attribution:
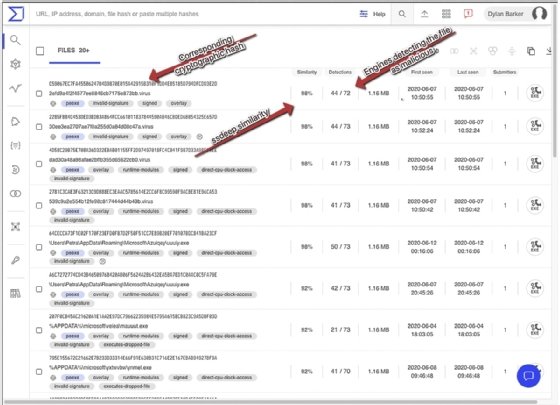
Clicking one of the highly similar cryptographic hashes will load the VirusTotal scan results for the sample and show what our sample likely is, as illustrated in the following screenshot:
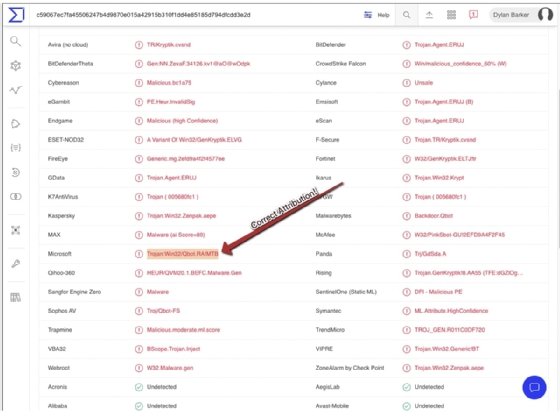
If you do not have a VirusTotal Enterprise subscription, all is not lost in terms of fuzzy hashing, however. It is possible to build your own database or compare known samples of malware to the fuzzy hashes of new samples. For full usage of ssdeep, see their project page at https://ssdeep-project.github.io/ssdeep/usage.html.
About the author
Dylan Barker is a technology professional with 10 years' experience in the information security space, in industries ranging from K-12 and telecom to financial services. He has held many distinct roles, from security infrastructure engineering to vulnerability management. In the past, he has spoken at BSides events and has written articles for CrowdStrike, where he is currently employed as a senior analyst.
