Getty Images/iStockphoto
Introduction to IP addressing and subnetting
IP addresses and subnets are necessary for effective network communications. Learn how IP addresses and subnets work, and compare classful and classless IP addresses.

Network devices use IP addresses and subnets to identify the source and destination of communications and manage network addresses respectively.
IP addresses contain two parts: a network identifier and a host identifier. The network ID specifies an area of the network where a device resides, much like an area code identifies a section of a telephone network. The host ID labels a specific device in that network section, similar to how a telephone number identifies a specific phone within an area code.
Most business networks still rely on IP version 4 (IPv4) addresses, which offer about 4.3 billion unique variations. Internet identities use most of these, but the newer IP version 6 (IPv6) standard provides more addresses and other benefits.
Computers work with IPv4 addresses as 32-bit binary strings. Humans usually convert binary to a dotted decimal address, which is easier to write and understand. For example, the binary string 11000000.00000000.00000010.00000010 converts to the IP address 192.0.2.2. Its associated subnet mask converts from 11111111.11111111.11111111.11111100 to 255.255.255.252.
Subnet masks clarify which part of the address is the network ID and which is the host ID. Routers, computers and network troubleshooters use IP addresses and subnet masks to manage network traffic, which ensures information sent from one system arrives at its destination.
IP address fundamentals
Network devices typically have the following three identities:
- Physical address. MAC address.
- Logical address. IP address.
- Hostname. Useful for humans to recognize the device.
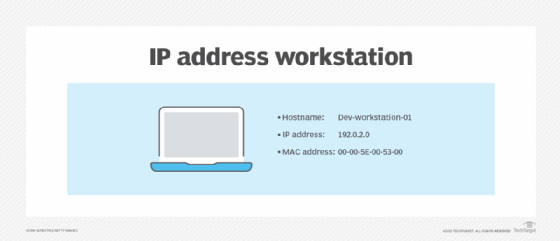
In the case of IPv4 addresses, each host has a unique IP address on the network, and nodes rely on it to exchange information. Data breaks down into pieces, known as packets, which then travel across the network. Each packet contains a source and destination IP address, much like postal service mail includes a destination and return address on the envelope.

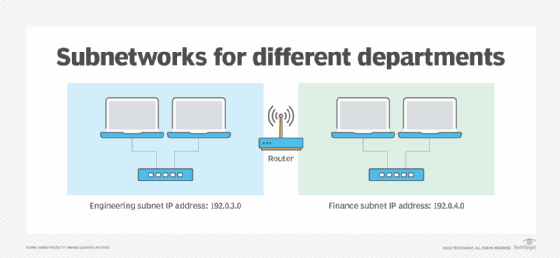
Administrators can subdivide networks into smaller, more manageable sections. This process lets them control the flow of network traffic, isolate traffic to increase security and limit traffic to certain areas of the network to improve performance.
These network segments are called subnetworks, or subnets. Each subnet has a unique identifier within the larger network ID. When administrators divide a network into parts, such as engineering and finance, the address structure is based on numbers.
Private IP address ranges
Systems and sites on the public internet consume most of the roughly 4.3 billion available IPv4 addresses. However, private networks can reserve some ranges for internal use. Networks in home offices and businesses likely use one of these ranges.
The following table defines private IPv4 address ranges.
| Reserved class | Range | Default subnet mask | Description |
| Class A | 10.0.0.0 | 255.0.0.0 | Larger networks with many hosts. |
| Class B | 172.16.0.0 | 255.255.0.0 | Medium networks with a moderate number of hosts. |
| Class C | 192.168.0.0 | 255.255.255.0 | Smaller networks with fewer hosts. |
Subnet vs. subnet mask
Confusion arises between the terms subnet and subnet mask. Subnets are an isolated network segment, which is a piece of the network that an administrator divides off. Network administrators typically create subnets for the following reasons:
- Security. Subnets isolate traffic for privacy.
- Performance. Subnets manage traffic to reduce network congestion.
Subnets created for security purposes prevent specific traffic types from traversing the rest of the network, where they could be vulnerable to interception. For example, network administrators might isolate all computers in the finance department to a single subnet, which effectively prevents finance network communications from moving across the entire network.
Subnets for performance decrease competition for network access on congested networks. If an organization's engineering department regularly transfers files that affect network performance for other users, network administrators can isolate the engineers to their own subnet, which reduces the effect of their file transfers on other users. Network administrators often define multiple subnets for both security and performance reasons.
Subnet masks, on the other hand, play a different role. Network devices use the subnet mask to determine which part of a host's IP address is the network ID and which part is the host ID. Subnet masks are always used with IP addresses. Essentially, subnets are an area of the network, while subnet masks help devices determine the network area to which they belong.
IP address classes
IPv4 addresses divide into five classes. The primary difference between the first three classes -- Class A, Class B and Class C -- is the number of subnets versus the number of hosts per subnet.
The following table outlines the details between IP address classes.
| Name | First octet | Number of subnets | Number of hosts | Description |
| Class A | 1 to 126 | 126 | Approximately 16.7 million | Many hosts per network. |
| Class B | 128 to 191 | 16,384 | 65,536 | Many hosts per network. |
| Class C | 192 to 223 | Approximately 2.1 million | 254 | Many networks with fewer hosts per network. |
| Class D | 224 to 239 | n/a | n/a | Multicasting. |
| Class E | 240 to 254 | n/a | n/a | Experimental. |
Class D addresses are for a specific type of communication known as multicasting, which lets a host transmit thousands of data streams to other devices. Class E also isn't used with standard IPv4 networking. Instead, IP address researchers use Class E addresses for experimental and developmental purposes. This classification system is known as classful addressing. Classful addressing relies on rigid divisions between the network ID and host ID. These divisions always occur at the eighth, 16th or 24th bits in the address.
This design often wastes addresses, however. For example, Class B networks provide 65,000 host IDs, and Class C networks offer only 254 host IDs. If a network has 2,000 devices, and administrators select Class B, they could waste around 63,000 addresses.
Classless addressing, on the other hand, lets network administrators define network IDs at any point for more efficient use of the available addresses. For example, to satisfy a network with 2,000 host IDs, administrators can use a subnet mask of 255.255.248.0/21 to provide 2,048 total host IDs. The extra number at the end of the subnet mask is called a Classless Inter-Domain Routing (CIDR) notation, which specifies a number of bits in the subnet mask. This method lets admins add more IP addresses without using a different class.
The following table shows examples of subnet masks, their corresponding CIDR notations and the number of total IP addresses per subnet.
| CIDR notation | Subnet mask | Number of total hosts per subnet |
| /19 | 255.255.224.0 | 8,192 |
| /20 | 255.255.240.0 | 4,096 |
| /21 | 255.255.248.0 | 2,048 |
| /22 | 255.255.252.0 | 1,024 |
| /23 | 255.255.254.0 | 512 |
Troubleshoot IP addresses and subnet masks
Network administrators often face two common IP address troubleshooting scenarios: misconfiguration and an inability to communicate with an essential network service.
Network administrators can manually configure some devices, such as servers, routers and printers, with an IP address, subnet mask and other network settings. However, any typographical error in these settings prevents the device from communicating correctly on the network.
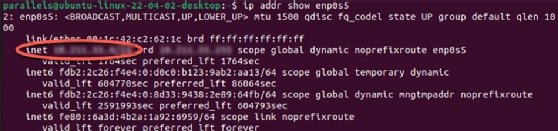
One of the first network troubleshooting steps is to verify these settings, including the subnet mask. Network administrators should update subnet masks with valid settings if they're incorrect.
The following table lists commands that display IP address settings on three popular OSes.
| Command | OS |
| ip addr | Linux |
| Ipconfig | Windows |
| Ifconfig | macOS |
Most client workstations, tablets, smartphones and other devices receive their IP address configuration from a Dynamic Host Configuration Protocol (DHCP) server. This server stores a pool of available IP address settings and leases addresses to client devices. A properly configured DHCP server doesn't make any typographical errors.
However, if the client system can't reach the DHCP server, it doesn't receive an IP address configuration. It assigns itself a default configuration with Automatic Private IP Addressing (APIPA). APIPA addresses begin with 169.254. The configuration won't communicate correctly on most networks, so network administrators should investigate why the client can't reach the DHCP server if this occurs. One reason, for example, could be that the server is down.
Wrap-up
IP addresses and subnet masks are fundamental components of network communications. Each network node has a unique IP address consisting of a network identifier and a host identifier. Depending on the network design, these identifiers aren't universally consistent.
Subnet masks help the system and administrators determine which part of the IP address is the network ID and which is the host ID. Network administrators typically check these network settings first during troubleshooting.
Network administrators divide larger networks into subnets, and a device's IP address and subnet mask indicate the network section to which it belongs. Administrators use subnets to isolate traffic for security and performance.
Most business networks still rely on IPv4, which uses five classes to distinguish various IP address ranges. Classes A, B and C are common on most internal networks. Network professionals must understand their network design to use tools like ipconfig, ip addr, ifconfig and ping to troubleshoot communication issues.
Damon Garn owns Cogspinner Coaction and provides freelance IT writing and editing services. He has written multiple CompTIA study guides, including the Linux+, Cloud Essentials+ and Server+ guides, and contributes extensively to TechTarget Editorial and CompTIA Blogs.