
pressmaster - stock.adobe.com
7 steps to set up a home network
This guide teaches networking newbies how to set up a home network, from understanding hardware components to managing network performance and security.

In the past few years alone, internet dynamics have changed drastically. Users must strengthen their home networks in order to have strong, reliable connectivity.
More people work from home than ever before. Years ago, a family might have shared a single computer. Now, each family member has multiple internet-connected devices. All these additional computers, tablets and phones rely on the home network for connectivity. Smart home and automation devices have also become common in the home, expanding networks with even more devices.
These devices are used all day long for both work and school. Most homes use a broadband connection, as many people rely on customer premises equipment (CPE) from their ISP for internet connectivity. The increase in and frequent use of these devices strain the broadband network, and it is no longer an adequate setup for a home network.
Remote employees can enhance their ISP's CPE by optimizing internet connectivity and usage. These seven steps help build a stronger, more reliable home network.
1. Evaluate home network hardware
When setting up a home network, consider using the following hardware components:
- An access device, typically a cable or asymmetric DSL modem.
- A router for directing traffic into and out of your network.
- A switch for connecting wired clients.
- An access point (AP) for connecting wireless clients.
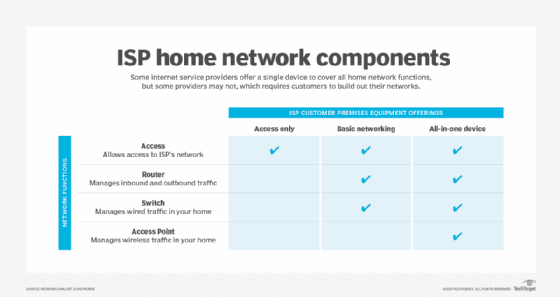
An ISP can set up a home network in multiple ways. Some ISPs provide a single CPE device to cover all the above network functions. Other providers, however, might only provide a single access device with no additional networking capabilities, requiring users to build out their networks. Depending on what your ISP offers and how complex your needs might be, you might need to buy additional equipment to extend access to more devices.
2. Compare wired vs. wireless devices
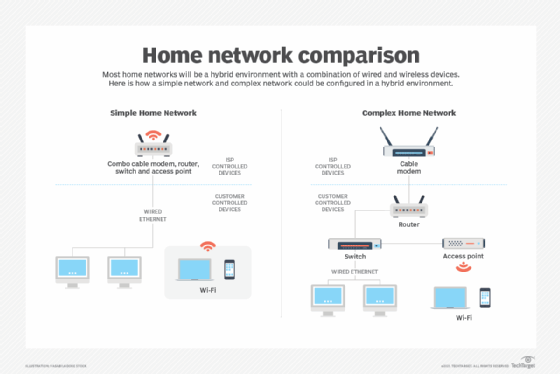
Most home networks are a hybrid environment with a combination of wired and wireless devices.
Generally speaking, wired devices provide better performance and quality of service (QoS) than wireless devices. But that upside comes with a potentially higher cost and, usually, less flexibility. Wireless devices are easier to move around and use almost anywhere. They might have lower or spottier performance, however, especially when trying to access large files or participate in video conference calls.
Typical wired devices include desktop computers, some media streaming devices, DVRs/cable boxes and smart TVs. Wired devices use an RJ-45 connector that enables a connection via Ethernet. Many devices, like computers, include both wired and wireless connections. Wherever appropriate, choose a wired connection over wireless because it provides better speed and a more stable connection.
Typical wireless devices include the following:
- Laptops.
- Tablets.
- Phones.
- Some media streaming devices.
- Smart home devices, such as cameras, lights, doorbells, locks and garage door openers.
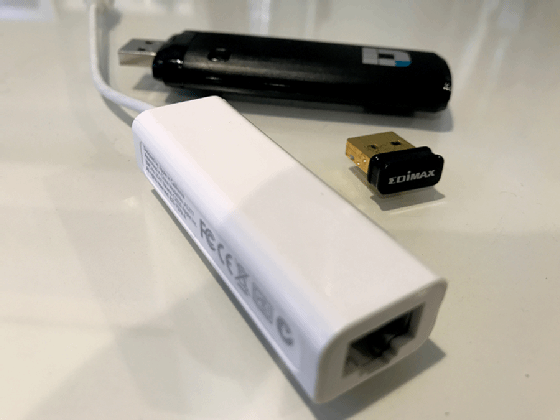
If your work-from-home environment includes a laptop but you don't need to change locations frequently, use a wired Ethernet connector. If you can't use a wired connection and the laptop's integrated adapter is older, then it might be helpful to replace it with a newer USB Wi-Fi adapter to provide better overall performance.
3. Connect wired client devices
Connecting wired devices is straightforward. Use an RJ-45 network cable to plug the device in to the switch or router. Most routers support Gigabit Ethernet (1,000 Mbps). If your devices also support Gigabit Ethernet, you can reach those high speeds only if you use Cat5e, Cat6 or Cat6a cables between the device and the router. The older Cat5 cable tops out at 100 Mbps.
Cat5e Ethernet cables can reach gigabit speeds but might have performance issues for longer runs. Cat6 or Cat6a cables are better options because they offer higher speeds up to 10 Gbps. The performance difference between Cat6 and Cat6a is negligible unless homes have 10 Gbps devices, in which case Cat6a offers better performance for longer distances. Cat6a cables are typically used in data centers, large offices or advanced home networks.
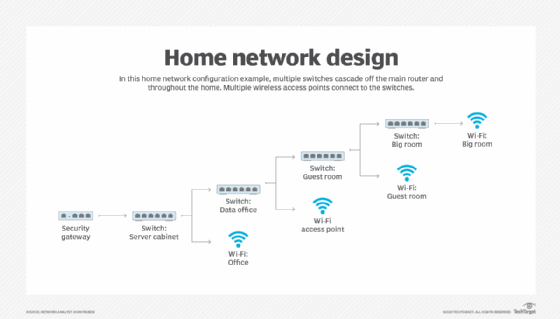
Switches enable connectivity between multiple wired devices and a single Ethernet segment. Multiple switches can cascade throughout the home, and multiple wireless APs can connect to switches.
Switches are available in both managed and unmanaged varieties. An unmanaged switch is less expensive and typically offers only a simple set of features. These are typically sold in five- or eight-port versions and can be bought for a few dollars per port. A managed switch is more expensive but provides more capabilities for managing traffic. Managed switches enable advanced features, like virtual LANs, different logical networks, traffic segmentation and traffic blocking for certain clients.
Some switches also provide Power over Ethernet that delivers power to remote devices. PoE switches can power connected devices, such as APs or video security cameras, so an additional electrical port is not required. This is helpful for cameras located in out-of-the-way places.
4. Connect wireless client devices
Wi-Fi capability from your ISP's all-in-one CPE or an added Wi-Fi AP is essential to connect Wi-Fi clients. Be sure to set a Wi-Fi password with either Wi-Fi Protected Access 2 (WPA2) or WPA3 to ensure others cannot access and compromise your network. Wi-Fi has different generations, such as Wi-Fi 5 and Wi-Fi 6. Find the latest version your router supports, and ensure laptops have the same version -- or as close as possible -- for the best performance. A USB adapter is the easiest way to update if needed.
Wireless devices work on two different wireless bands: 2.4 GHz and 5 GHz. Don't confuse 5 GHz with 5G, which is a cell phone standard, not a Wi-Fi standard. 2.4 GHz has lower bandwidth but generally does a better job of connecting devices that are further away, making it great for smart home devices. 5 GHz has higher bandwidth and more throughput but generally does not transmit as far as 2.4 GHz.
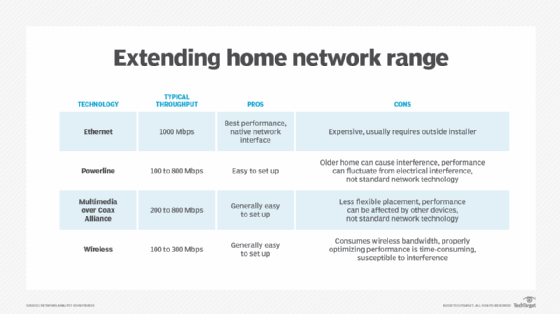
5. Extend home network range
Often, CPE is in a main living area, like a family room, usually far away from the home office. The first step to extending your network range is making sure your CPE, router and APs are optimized for the best performance. Your ISP should ensure optimized CPE, and online speed tests can help verify the performance between a router and ISP.
The next step is reaching the faraway spots in your home with additional APs. In this case, a wired Ethernet connection is best. Additionally, a powerline adapter can extend Ethernet. Powerline adapters use your home's electrical wiring with Multimedia over Coax Alliance cables or cable TV cables. Another option to extend a Wi-Fi signal is to do it wirelessly through a mesh system, like AmpliFi, Eero or Linksys Velop.
Each extension capability has its pros and cons. Ethernet cabling is always the best option, but it carries a higher price tag and might require some home modifications, such as drilling holes into walls. The single biggest benefit of using an Ethernet cable to extend your network is you can attach it to a switch instead of connecting it to one client.
By extending your network beyond the router with an Ethernet cable and adding a switch, you can connect multiple wired clients in another location in the home. Add more wireless APs to the switch to bring Wi-Fi to remote parts of your home with an Ethernet uplink.
Wireless extenders -- sometimes called signal boosters -- are generally a poor idea. They appear to provide better performance but instead mask the performance problems. Users are simply given the illusion of a stronger connection without providing much advantage.
6. Protect your home network
Whether you're using your ISP's routing capabilities or buying your own router, securing your network is a vital step when setting up a home network. This means setting up user passwords and changing all default passwords on any device that accesses or controls the network.
Also, make sure the firewall is active on the router. A firewall is designed to allow only certain traffic through and block the rest.
All routers use virtual ports for different applications. For example, web traffic uses port 80, secure web traffic uses port 443, and gaming or streaming devices might require certain ports to be open as well. Ensuring that you only open the minimal number of firewall ports helps keep you safer in the long run.
Check that you've disabled remote access to the cable modem and router unless you truly need to access resources outside the network. Lastly, a strong WPA2 or WPA3 password is a must for any wireless network components.
7. Optimize network performance
A final consideration for building a network is performance optimization. Performance is measured in several different ways, including the following:
- Bandwidth, which is the maximum data transfer rate and is typically measured in megabits per second.
- Latency, which is how long it takes a packet to arrive and is measured in milliseconds.
- Jitter, which is the amount of variance in latency, also measured in milliseconds.
Most network speed tests provide all these numbers. As you make changes, test to see if the changes improve your performance.
Much of the optimization typically happens on the Wi-Fi side because Wi-Fi has more variables to assign. For example, the physical layout of the home might affect performance. Obstacles such as walls, glass or microwave ovens can add interference.
Knowing which Wi-Fi network channels your neighbors use also helps optimize your performance. For 2.4 GHz bands, a best practice is using channels 1, 6 or 11 because these are nonoverlapping channels. It might look like channel 4 or 8 are best because nobody uses them. But, because of channel width, those channels create interference and overlap onto channels 1, 6 and 11, which everyone else uses.
Once the network infrastructure is optimized, it's time to optimize applications. This process can start with assigning QoS for your network, which is typically done in the router. QoS enables certain packets to have a higher priority than others based on their type. In this step, you can assign a higher priority for video or VoIP traffic so that a game or large download does not affect video conference call quality. Every router has a different method for setting QoS, so consult your manual.
Editor's note: This article was originally written by John Fruehe and updated by editors to reflect industry changes and improve reader experience.
John Fruehe is an independent enterprise technology analyst with more than 25 years of experience. He has specialized in enterprise networking and data center markets with a focus on product marketing.