local area network (LAN)
What is a local area network (LAN)?
A local area network (LAN) is a group of computers and peripheral devices that are connected together within a distinct geographic area, such as an office building or campus. The devices are connected via a common communications line or wireless connection to a server.
A LAN may serve as few as two or three users in a home office or thousands of users in a corporation's central office. Homeowners and IT administrators set up LANs so that network nodes can communicate and share resources, such as printers or network storage.
A LAN includes various network components, such as cables, switches, routers, firewalls, load balancers and wireless access points (WAPs). It can be connected to a wide range of network devices, such as game consoles, servers, desktop and laptop computers, printers and internet of things (IoT) devices.
How does a LAN work?
LAN networking typically requires Ethernet cables and Layer 2 (L2) switches along with devices that can connect and communicate using Ethernet. Larger LANs often include L3 switches or routers to streamline traffic flows. Each device connected to a LAN is assigned a unique IP address that maps to its physical address, also known as the media access control (MAC) address. Ethernet switches use the device's MAC address to transport data across the network. A LAN enables users to connect to internal servers, websites and other LANs that belong to the same wide area network (WAN). Ethernet and Wi-Fi are the two primary ways to enable LAN connections. Ethernet is an IEEE specification for physical network connections that enables computers to communicate with each other. Wi-Fi uses radio waves in the 2.4 gigahertz and 5 GHz spectrum to connect computers to the LAN. Legacy LAN technologies, including token ring, Fiber Distributed Data Interface and Attached Resource Computer Network, have lost favor as Ethernet and Wi-Fi speeds increased and connectivity costs decreased.
Differences between wired LAN, wireless LAN and virtual LAN
A LAN can be configured as wired, wireless or virtual.
Wired LAN
A wired LAN uses switches and Ethernet cabling to connect endpoints, servers and IoT devices to the corporate network. For small businesses with only a handful of devices, a wired LAN can consist of a single unmanaged LAN switch with enough Ethernet ports to interconnect all devices.
Wireless LAN
A wireless LAN (WLAN) enables devices to connect to the network without the need for physical cables. Wireless LANs send data over radio waves using wireless network technology. This type of LAN is frequently seen in homes, workplaces, coffee shops and restaurants where mobility is crucial. WLANs enable networked devices, such as computers, cellphones and tablets, to connect to the internet or other shared resources.
Wireless LANs use the IEEE 802.11 specification to transport data between end devices and the network using wireless spectrum. In many situations, a WLAN is preferable to a wired LAN connection because of its flexibility and cost savings, as it isn't necessary to run cabling throughout a building. Companies assessing WLANs as a primary means of connectivity often have users who rely exclusively on smartphones, tablets and other mobile devices.
Virtual LAN
Larger LANs that connect thousands of devices require additional hardware, software and configuration steps to ensure the network is performing optimally. This is where the concept of virtual LANs (VLANs) comes into play.
Because an Ethernet LAN is a shared medium, if an organization has too many devices connected to a single LAN, the amount of broadcast traffic, which is heard by all devices on the LAN, can create congestion and bottlenecks. To alleviate the amount of broadcast traffic being sent and received on a LAN, the network can be broken into multiple VLANs. This condenses the broadcast traffic so it's only heard by other devices within that VLAN -- not the entire network. This eliminates much of the broadcast overhead that can lead to performance problems.
Although VLANs can help reduce broadcast congestion issues, they create another problem. When devices on different VLANs need to talk to each other, an L3 switch is required to transmit and receive traffic between the two LANs. This is known as inter-VLAN routing. Additionally, because large enterprise networks are almost always broken up into hundreds of VLANs, they require routers to be deployed throughout parts of the overall network. Today, vendors integrate L3 routing capabilities into network switches to create an L3 switch. Thus, an L3 switch can perform both switching and inter-VLAN routing functions on a single appliance.
Setting up a basic LAN
Operating systems, such as Microsoft Windows, Linux, macOS X, Android and iOS, have IP version 4 and IPv6 networking capabilities incorporated into them. Additionally, essentially all PC, tablet and smartphone hardware come with an Ethernet port, Wi-Fi chip or both. This means that, as long as the network administrator has a relatively up-to-date laptop or desktop PC, it's fairly straightforward to network machines together onto a wired or wireless LAN.
Setup of a simple wired LAN requires an administrator to connect the end device to a LAN switch using a twisted-pair Ethernet cable. Once connected, the devices can communicate with each other on the same physical LAN or VLAN.
To set up a wireless network, the administrator needs a WAP. The WAP can be configured to broadcast a network service set identifier and require devices to authenticate to the network using one of several Wi-Fi authentication techniques. Popular authentication options include Wi-Fi Protected Access 2 pre-shared key and WPA2 Enterprise.
The benefits of using LAN
LANs enable devices to connect, transmit and receive information between them. The benefits of LAN technologies include the following:
- Centralized access to resources. A LAN enables access to centralized applications residing on servers, as well as resource sharing, including software and printers. For example, an organization can incorporate a single licensed program to be used by any device on the same LAN to save costs and provide easy accessibility.
- Efficient communication. A LAN provides effective communication between devices, enabling users to send and receive messages and data easily. Additionally, data stored on the server can be accessed by LAN users at any time, encouraging seamless collaboration.
- Shared internet connection. A LAN enables multiple devices on a LAN to share a single internet connection.
- Data protection. It's easy to configure security protocols and tools to prevent LAN users from unwanted access, resulting in a secure networking system. Furthermore, LAN enables easy control and maintenance of the entire network, ensuring a safe and controlled environment for data sharing and communication.
- Fast communication. A LAN provides a high data transfer rate. For example, Fast Ethernet offers a speed of 100 megabits per second, whereas Gigabit Ethernet often reaches a speed of 1,000 Mbps.
Types of LAN
LANs can come with various underlying architectures, each with its own characteristics and capabilities. Common LAN architecture types include the following.
Peer-to-peer
A peer-to-peer LAN directly connects two devices -- generally, workstations or PCs -- together using an Ethernet cable. There's generally no hierarchy between the devices.
Client-server
A client-server LAN consists of multiple endpoints and servers that are connected to a LAN switch. The switch directs communication streams between the multiple connected devices.
Ethernet
Ethernet is the most widely used LAN architecture. It specifies the network speed, MAC mechanism, cable types and network interface adapters utilized on the network. It is widely used in both wired and wireless networks.
Token ring
Token ring is a LAN architecture that has traditionally been utilized, but it's less prevalent now. It uses tokens to control network access and operates at a speed of 100 Mbps.
Asynchronous Transfer Mode
Asynchronous Transfer Mode (ATM) is a switching network architecture that uses 53-octet cells to transport data. It can be used in LANs and has been recognized for its capacity to handle multimedia traffic. ATM LAN emulation enables the development of VLANs over an ATM backbone.
Cloud-managed
A cloud-managed LAN uses a centralized cloud platform to oversee access control, policy enforcement, network provisioning, and other security- and performance-related issues. A cloud-managed LAN simplifies governance in heterogeneous networked environments, making it suitable for enterprise use.
Differences among LAN, WAN and MAN
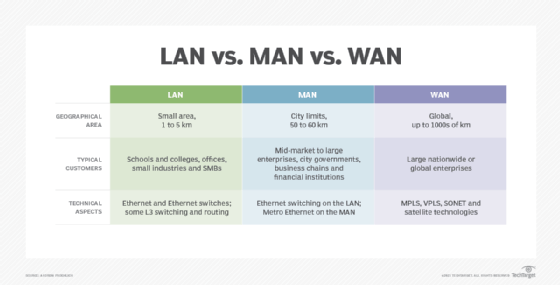
While LAN, WAN and metropolitan area network (MAN) all are networking technologies, there are some distinct differences in terms of technologies, geographical sizes and management responsibilities:
- LAN. A LAN connects devices within relatively close proximity. A LAN can be deployed inside a home, office suite, building or corporate campus. The organization typically owns and maintains the network hardware and cabling. Ethernet -- 1 gigabit per second to 100 Gbps -- is often used and can consist of twisted-pair copper cabling, as well as single- or multimode fiber interconnects.
- WAN. A WAN connects business locations that are dispersed throughout a state, country or even the globe. The organization purchases WAN services from a telecommunications provider that manages the operational status of each WAN link. In most cases, only network traffic that must be transported back and forth between business locations is moved over the WAN. Due to potential latency issues, geographically dispersed locations typically are built with their own internet connection. That way, internet-bound data can be directly sent to and from a branch office, instead of having it backhauled to a central office. The technologies used to build WANs can include Multiprotocol Label Switching (MPLS), Virtual Private LAN Service, Ethernet over Synchronous Optical Network, satellite-based technologies and microwaves. Since the carrier typically handles the underlying technologies, to the end customer, the WAN is just a standard Ethernet connection between locations.
- MAN. A MAN is most often used when an organization maintains multiple buildings or locations within a city or municipality. Buildings are typically connected using fiber optic cabling. In most cases, the organization partners with a telecommunications company to provide and manage the MAN service on the client's behalf. Alternatively, the company can choose to lease dark fiber and own or manage the MAN equipment in-house. Modern MANs are built using Metro Ethernet, MPLS, and point-to-point or point-to-multipoint wireless technologies.
LAN security
Various security risks can threaten the confidentiality, integrity and availability of a LAN. Common threats to a LAN include the following:
- Insider threats. Sometimes employees with access to sensitive data may inadvertently jeopardize the security of a LAN. For example, they can fall prey to phishing attacks, which can lead to unauthorized devices connecting to the network.
- Vulnerable LAN sockets. Public spaces, such as corridors and reception areas, inside an organization may include LAN outlets, which could pose security risks if left unattended. For instance, it's possible for outsiders, including visitors, to connect to a LAN socket and obtain access to the internal network.
- Viruses and malware. Viruses and malware don't pose an immediate threat to a LAN's security, but they can lead to data loss, unpredictable computer behavior and the possibility of spreading to other networked users. Removable media and email attachments are common ways that viruses and malware spread.
- Open ports. LANs link to the internet through a central router, and the open ports on the router can be exploited by cybercriminals to gain access to the network. To mitigate these risks, router admin credentials should be changed regularly.
- Rogue APs. Attackers may be able to intercept network traffic through unauthorized APs and ad hoc networks that are sometimes created by trustworthy users without taking the necessary security precautions.
To prevent security threats, once a network has been set up, it must be secured. This can be done through security settings in the L2/L3 switches and any existing routers. The use of administration authentication mechanisms, device logs and frequent software updates help to keep LAN equipment secure. Hardware-based security, such as fingerprint recognition, security tokens and full disk encryption, can also be used to enhance network security.
Additional security packages for protecting and maintaining the network perimeter can be installed locally or purchased through a software-as-a-service delivery model.
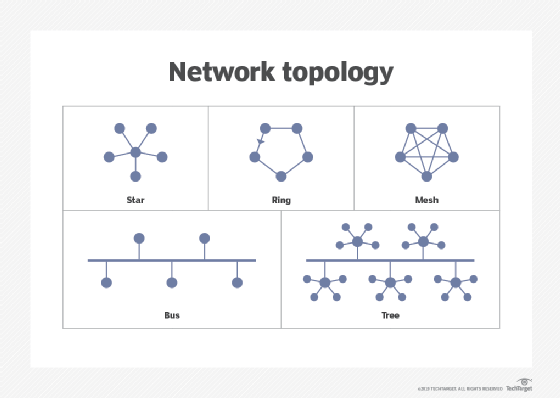
5 popular LAN topologies
Network topologies outline how devices in a LAN are connected, as well as how data is transmitted from one node to another. Popular topologies include the following:
- Star. This is the most common network topology found in most offices and home network configurations. All computers are connected to a central device, which enables the network to continue functioning even if a single node or cable fails.
- Ring. Every device is linked to two other devices, creating a ring-shaped network in which data can only go in one direction. Although less frequent in LANs, this topology is still considered a valid network topology.
- Mesh. Every device is connected to every other device in a mesh topology. This increases fault tolerance by providing data with redundant pathways to follow. However, because so many connections are needed, it can be expensive to set up.
- Bus. In a bus topology, all devices are connected to a single communication line or the backbone. The traffic generated by any device on the network travels across the backbone and is received by all workstations. This topology works well in small networks but can lead to decreased performance and available bandwidth as the number of computers increases.
- Tree. A tree topology is a hierarchical structure where nodes connect and organize themselves in a treelike fashion. Larger networks can benefit from its deployment, which usually includes the core, distribution and access layers.
Network topology plays a crucial role in network configuration. Explore the frequently used network topologies, and learn how they operate.