
Fotolia
How to troubleshoot iPhone and iPad connection problems
As iPhone and iPad Wi-Fi clients proliferate in the enterprise, IT must troubleshoot Wi-Fi connection problems. Here's how to solve basic iPhone and iPad connection problems.
Apple iOS is an increasingly common enterprise mobility platform, elevating the frequency and importance of iPhone and iPad connection problems.
In part one of our wireless network troubleshooting series, we explained how to debug physical, access point (AP), router and Windows connection problems. But if you're having iPhone or iPad connection problems, the following step-by-step iOS Wi-Fi connection troubleshooting tips will help.
Step 1: Verify AP or router connection
Start by verifying that a wireless access point or router is nearby and actively offering Wi-Fi service. Always start here, using another Wi-Fi client to determine whether the network or the client is the likely culprit.
If multiple clients are unable to connect, then follow these steps to debug AP or router or upstream network problems:
- Verify devices at both ends of each Ethernet cable are powered on and the ports are enabled. (For example, the modem might be off.)
- Swap Ethernet cables to see if one is damaged.
- Make sure you're using the right type of cable. (Check the AP or router manual.)
- Connect another Ethernet device, like a laptop, to the affected AP or router. If link status LEDs change, your device may be failing link auto-negotiation. Check port configurations at both ends and reconfigure as needed.
If there is an active wireless AP or router available, then proceed to Step 2 to debug the affected iOS client.
Step 2: Verify Wi-Fi adapter
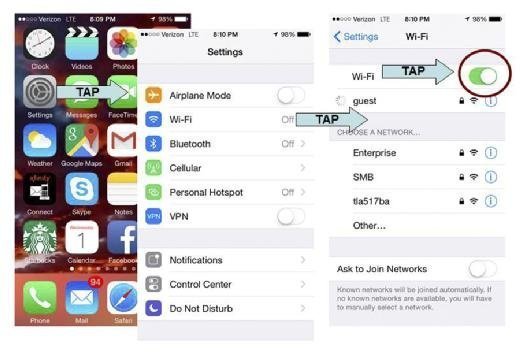
If you are still having iPhone or iPad connection problems verify your iPad or iPhone Wi-Fi adapter is enabled. Use the Settings app to verify your iPhone's or iPad's Wi-Fi is on and ready to connect. Be sure Airplane Mode is off and Wi-Fi is on by tapping the sliders as shown in the screenshot below. When Wi-Fi is on, a Wi-Fi signal strength indicator will appear at the top left corner of your iOS client's screen.
Step 3: Verify SSID and IP address
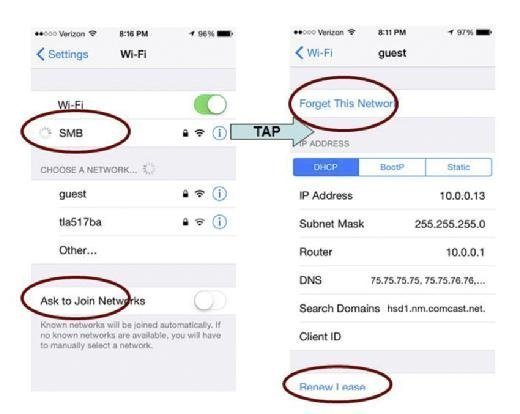
Verify your iOS client's connected service set identifier (SSID) and IP address. Return to Settings > Wi-Fi on your iPhone or iPad and find your network's name -- SSID -- on the "Choose a Network" list.
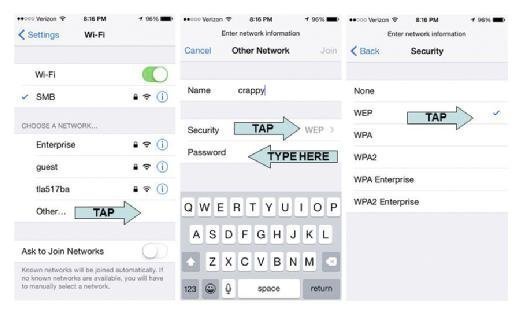
- If your network's name is not listed, the AP or router may be hiding its SSID. Click "Other" and enter your network's name manually.
- If your network is listed but does not appear immediately beneath the Wi-Fi slider, your iOS Wi-Fi client is not connected. Tap your network's name to try to connect. You may be prompted for a password; enter it and tap "Join." If this fails, go to Step 7.
- If your network appears immediately beneath the Wi-Fi slider, continue.
Note that whenever you're trying to connect an iOS Wi-Fi client to any network name, a spinning wheel appears to the right of that network's name. When the wheel disappears, tap the right-facing arrow after the network's name to view the client's assigned IP address.
- If a connected client's IP address is "Static" but not in the correct subnet, tap "DHCP" to set an IP automatically and tap "Renew Lease."
- If a connected client's IP address remains blank or the client repeatedly connects but then quickly disconnects, go to Step 7.
- If a connected client's IP address is in the correct subnet, continue.
Step 4: Verify network connection with Ping
Once your iOS Wi-Fi client has a valid IP address, use "ping" to verify network connectivity. Apple iOS does not include a user-accessible "ping" app, but you can verify network connectivity as follows:
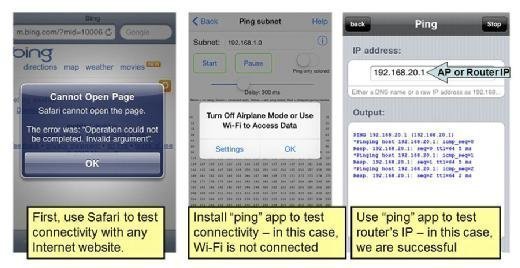
- Use Safari to check Internet access. For example, open your favorite search engine website. If you can successfully open or reload that webpage, congratulations; You are connected!
- If you get the error message "Cannot Open Page," you'll need to do more digging. Try browsing your wireless AP or router's Web admin utility (e.g., http://192.168.1.1). If you can open that page, you are connected to the network, but the network itself has a connectivity problem. Refer to Step 5 in our wireless network troubleshooting tip to address this issue.
- If you cannot browse your AP or router's Web admin utility or another Web-enabled device connected to your wireless LAN, you will need to troubleshoot connectivity another way. Use the Apple App Store to download and install a free "ping" app, such as Fing or Ping Lite. Use that app to ping your AP or router's LAN IP address as shown below. If pinging your AP or router repeatedly fails, skip to Step 5 below.
- If pinging your AP or router succeeds, ping any other wired or wireless LAN client that you wish to communicate with. If that ping fails, AP isolation may be enabled or the destination may be using a firewall to block incoming messages. Disable the destination's firewall, then ping again. If ping is now successful, then the firewall you disabled may also be blocking Windows network protocols. Reconfigure the firewall to permit the traffic you want to exchange between LAN clients. For example, re-enable the firewall and permit inbound file and printer sharing.
Step 5: Check wireless network specific issues
If your iOS Wi-Fi client still cannot connect, get a valid IP address or ping any other system connected to the same subnet, it's time to look for wireless-specific problems. The router and client must use compatible 802.11 standards:
- Newer iPhones and iPads have integrated single-stream 802.11ac network adapters. These iOS Wi-Fi clients can be connected to 802.11ac, dual-band 802.11n, or 802.11a APs or routers -- all of which use channels from the 5 GHz band.
- Older iOS Wi-Fi clients that have integrated 802.11bg or single-band 802.11n network adapters can be connected to an 802.11b, 802.11g or 802.11n AP or router -- all of which use channels from the 2.4 GHz band.
To determine which 802.11 standards your wireless network's AP or router supports, look for the following "Wi-Fi certified" logos, or search for Wi-Fi-certified products at the Wi-Fi Alliance website. In general, newer APs and routers are required to provide backwards compatibility with older generations of Wi-Fi, but data rate settings must still match.
Looking for more troubleshooting tips?
See Lisa Phifer's step-by-step instructions on how to fix Android Wi-Fi connection problems and wireless connection problems.
Once you have confirmed your AP or router and client should be compatible, debug wireless radio settings, as follows:
- Use your AP or router's admin GUI to view WLAN settings and compare them to your client's wireless connection parameters.
- If your SSID does not appear in the Client's Available Networks list, enable SSID broadcasts on your AP or router. Alternatively, add the SSID to your client's Wireless Networks list, allowing devices to connect even if the SSID is hidden. Be sure to match the SSID exactly, including capitalization.
- 802.11ac, dual-band 802.11n and older 802.11a clients can connect to 802.11ac or 802.11n APs or routers using channels in the 5 GHz band.
- 802.11n and older 802.11b/g clients can also connect to 802.11n APs or routers using channels in the 2.4 GHz band.
- To connect older 802.11a or 802.11b/g clients, enable Mixed Mode and slower modulation and coding scheme rates on your AP or router. For example, to connect to 802.11b clients, at least the 11 Mbps rate must be enabled. To connect to 802.11g clients, at least the 54 Mbps rate must be supported. Even slow rates are needed to connect to old clients over longer distances.
Step 6: Verify security settings
If a compatible wireless client and router can "hear" each other but still cannot connect or exchange traffic, look for a security setting mismatch. The client must support the security mode required by the AP or router: Open, WEP, WPA or WPA2. Unless the WLAN is open (unsecured), both endpoints must be configured with (or dynamically receive) identical keys to encrypt traffic between them. Compare security settings on your AP/router and iOS Wi-Fi client and attempt to match them.
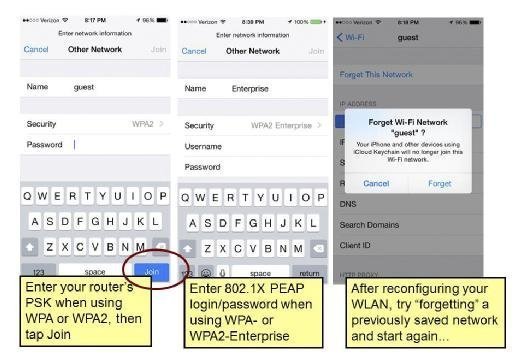
- To reconfigure the security parameters for a network you are connected to, tap the right-facing arrow after the network's name and then tap "Forget this Network."
- To reconfigure the security parameters for any other network, select the name of the desired network (or tap "Other" and enter the network name manually).
- If your router uses WEP, set the client's Security to WEP and copy the router's first WEP key into the client's "Password" field.
- If your router uses WPA-Personal, set the client's Security to WPA and copy the router's passphrase into the client's "Password" field. Remember: Capitalization counts!
- If your router uses WPA2-Personal, set the client's Security to WPA2 and copy the router's passphrase into the client's "Password" field; again, capitalization counts!
- If your router uses WPA or WPA2-Enterprise, set the client's Security to WPA-Enterprise or WPA2-Enterprise and continue 802.1X setup in Step 7.
If you choose the wrong security type or enter the wrong password, tapping "Join" will cause an error message, not create a new saved network. However, mismatches can occur when an AP or router to which you've previously connected is later reconfigured. In that case, it is often best to "Forget this Network" and start fresh.
Step 7: Verify RADIUS is working
If you still encounter iPhone or iPad connection problems ensure RADIUS is working. WPA and WPA2-Enterprise log the iOS Wi-Fi client into the network and deliver encryption keys using an 802.1X-capable RADIUS server.
To see if RADIUS is working, try the following:
- Reconfigure your AP or router and server with a matching RADIUS secret.
- Reconfigure your RADIUS server to accept requests from your AP or router.
- Use ping to verify AP or router-to-RADIUS server network reachability.
- Watch LAN packet counters to verify RADIUS is being sent, or use a LAN analyzer to debug RADIUS protocol issues.
Step 8: Check 802.1X EAP settings
If RADIUS is working but your iOS Wi-Fi client's connect requests are rejected, look for an 802.1X Extensible Authentication Protocol (EAP) problem. Your client must support one of the EAP types required by your RADIUS server and must supply a valid login.
- If your RADIUS server requires PEAP, just set the client's Security to WPA-Enterprise or WPA2-Enterprise and enter your assigned username and password.
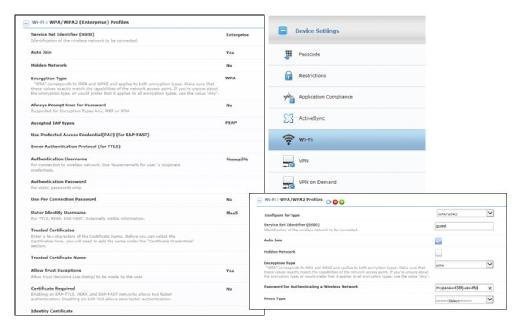
- If your RADIUS server requires any other EAP type, you must complete WPA2-Enterprise/802.1X setup using a configuration utility or configuration profiles. To learn more, consult this Apple iPhone in Business guide.
- Alternatively, use an iOS-compatible Mobile Device Manager (MDM) to create a configuration profile to configure a wireless network connection with the appropriate matching settings. When using WPA or WPA2-Enterprise, this includes not just adding a wireless connection, but adding a RADIUS server certificate to the Wi-Fi client.
Step 9: Check for intermittent network connection issues
If your iOS Wi-Fi client still cannot seem to connect to the network, seems very slow all the time, or disconnects frequently, you may be experiencing lower-level wireless problems. Finally, to facilitate debugging, you may also want to install a few more free apps. For example:
- Ookla SpeedTest: Handy for measuring slow connections
- Fing and LAN Scan: Try to reach other Wi-Fi clients on your own network


