
Getty Images/iStockphoto
Map physical GPUs to VMs with this GPU passthrough guide
Learn how to set up GPU passthrough -- a useful technique to support graphically intensive apps and machine learning models -- with a step-by-step tutorial for VMware environments.

GPU passthrough maps a physical GPU to a VM. The VM's operating system can then use the GPU just as it would if it were running on a physical machine equipped with a hardware GPU.
In a VMware environment, GPU passthrough maps a VM to a Peripheral Component Interconnect (PCI) device physically installed in the host server. To make a GPU available to a VM, one or more PCI-based GPUs must be installed in the host, and VMware ESXi must be able to recognize the presence of the GPU devices.
Why use GPU passthrough?
GPU passthrough can be useful for several reasons in DevOps environments. However, most real-world deployments fall into one of two use cases:
- Running graphically intensive workloads on VMs. Suppose an organization is developing gaming software or a computer-aided design application. Given the graphically intensive nature of these types of applications, a standard VM would have a difficult time running them. Dedicating a physical GPU to the VM with GPU passthrough gives the VM the hardware resources it needs to operate smoothly.
- Offloading tasks to VMs when developing machine learning models. Machine learning is computationally intensive. To reduce the load on a computer's CPU, many AI and machine learning systems offload tasks to a GPU, freeing up the CPU for other tasks. Organizations that develop machine learning applications might use GPU passthrough to make GPU hardware available to VMs.
How to enable GPU passthrough mode in VMware ESXi
The exact steps for enabling GPU passthrough for a VM vary slightly depending on the version of VMware ESXi you're using. The steps below are valid in newer versions of VMware ESXi.
1. Toggle on GPU passthrough for the selected device
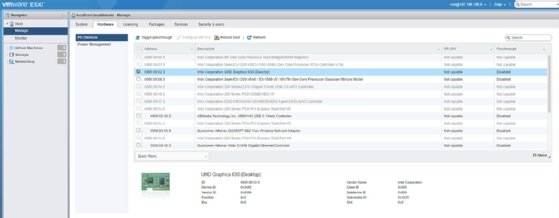
After logging in to the ESXi web client, expand the listing for your host and select the Manage node. Then select the Hardware tab at the top of the screen to see a list of the hardware devices installed in the host.
Next, select the checkbox corresponding to the device for which you want to enable GPU passthrough, then click the Toggle Passthrough button, shown in Figure 1.
2. Reboot the host
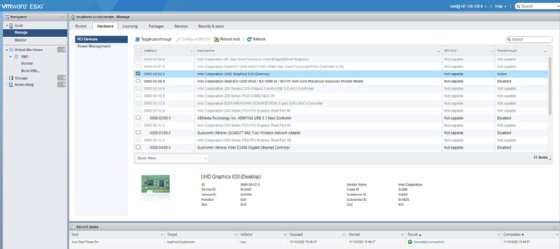
At this point, you'll see an error message stating that passthrough cannot be enabled until the host is rebooted. After rebooting the host, select the GPU that you want to share, then click the Toggle Passthrough button again.
When the reboot completes, sign back in to the web client and verify that GPU passthrough has been enabled for the device you selected. The Passthrough column should be set to Active, as shown in Figure 2, confirming that you have successfully enabled passthrough for the GPU.
3. Assign the GPU hardware to a VM
The next step is to assign the GPU hardware to a VM. To do so, select the console's Virtual Machines node, then select the VM where you plan to use the GPU.
Click the Edit button to bring up the Edit Settings window for the VM. Click Add Other Device and then select PCI Device. Select your GPU from the list of available PCI devices, shown in Figure 3, and choose the option to add a PCI device.

In addition to selecting a PCI device, you'll also need to set up a memory reservation for the device; otherwise, you won't be able to power up the VM. Click the Reserve All Memory button to create the necessary memory reservation.
4. Configure parameters to initialize the GPU
Next, select the dialog box's VM Options tab, expand the Advanced section and click the Edit Configuration button to display the Configuration Parameters dialog box.
Click the Add Parameter button and create a new parameter named hypervisor.cpuid.v0. Set its value to FALSE, making sure to use all uppercase letters, as shown in Figure 4.

Click OK and then Save to complete the process. You should now be able to boot the VM, install any necessary device drivers and begin using the GPU.