everythingpossible - Fotolia
Follow this Terraform and AWS tutorial to create a VPC
As an infrastructure-as-code tool, Terraform simplifies and streamlines resource deployments. Follow along with this example, which features Amazon VPCs, to get started.
DevOps practitioners need tools that enable them to build application hosting environments quickly and effectively on a cloud platform. This tutorial walks through that process, using AWS -- specifically, an Amazon Virtual Private Cloud -- and Terraform.
Amazon VPCs provide configurable, fault-tolerant and isolated network infrastructures onto which developers can deploy software and binaries. Setting up an Amazon VPC, however, can be a complicated task that slows down an IT operations team.
HashiCorp's Terraform is an open source infrastructure-as-code tool that provides an abstraction layer on top of cloud services, such as Amazon VPCs. Terraform enables developers to interact with the cloud service, record the state of the infrastructure and manage it through version control. This abstraction layer also simplifies infrastructure builds and other complicated ops tasks.
In this Terraform and AWS tutorial, you'll create the deployment using the following resources in Terraform: a VPC, an internet gateway, subnets, route tables and a security group.
Tutorial prerequisites
This tutorial requires an AWS account; to begin, obtain your security credentials. Keep your access ID and secret key available for programmatic access during the Terraform tutorial. Terraform defines and automates infrastructure components and deployments via a domain-specific language. The tool stores the last-known state of infrastructure in a file with extensions .tfstate and .tfstate.backup, to which IT admins can restore in case of failure.
Install Terraform, and issue the command terraform -version to ensure that it installed properly and that your machine is ready for cloud infrastructure automation via Terraform scripts. The output should look like Figure 1 below.

Create Terraform scripts for Amazon VPC deployment
Create a folder to store Terraform files with the *.tf extension in one place; Terraform scans recursively any subfolders to collect all .tf files and create a deployment plan.
Next, create a variables.tf file, where you will declare all global variables with a short description and a default value, as in the following example:
variable "access_key" {
     description = "Access key to AWS console"
 }
 variable "secret_key" {
     description = "Secret key to AWS console"
 }
 variable "region" {
     description = "Region of AWS VPC"
 }
Then, create a terraform.tfvars file with the dynamic variables declared in the variables.tf file, such as your AWS credentials and Amazon Machine Image IDs.
region = "eu-west-1"
 access_key = "YOUR AWS CONSOLE ACCESS ID"
 secret_key = "YOUR AWS CONSOLE SECRET KEY"
With these core documents established, build the main Terraform script for this AWS project, and name it vpc.tf. Write a deployment plan to provision the Amazon VPC with the two supporting files described above.
Within the vpc.tf file, define the provider as aws, to which we will pass the AWS credentials and deployment region. Then, create an aws_vpc resource with the Classless Inter-Domain Routing -- sometimes called supernetting -- block of your choice.
provider "aws" {
      region     = "${var.region}"
      access_key = "${var.access_key}"
      secret_key = "${var.secret_key}"
 }
 resource "aws_vpc" "vpc" {
     cidr_block = "10.0.0.0/16"
 }
Next, define an internet gateway, a route table and subnets in all availability zones for the VPC.
resource "aws_internet_gateway" "gateway" {
     vpc_id = "${aws_vpc.vpc.id}"
 }
 resource "aws_route" "route" {
     route_table_id         = "${aws_vpc.vpc.main_route_table_id}"
     destination_cidr_block = "0.0.0.0/0"
     gateway_id             = "${aws_internet_gateway.gateway.id}
 }
 data "aws_availability_zones" "available" {}

 resource "aws_subnet" "main" {
    count                   = "${length(data.aws_availability_zones.available.names)}"
    vpc_id                  = "${aws_vpc.vpc.id}"
    cidr_block              = "10.0.${count.index}.0/24"
    map_public_ip_on_launch = true
    availability_zone       = "${element(data.aws_availability_zones.available.names, count.index)}"
 }
To complete the vpc.tf file, define a security group. The inbound rule on the Amazon VPC in this example is to allow connection requests on port 80 and 443.
resource "aws_security_group" "default" {
     name        = "http-https-allow"
     description = "Allow incoming HTTP and HTTPS and Connections"
     vpc_id      = "${aws_vpc.vpc.id}"
     ingress {
         from_port = 80
         to_port = 80
         protocol = "tcp"
         cidr_blocks = ["0.0.0.0/0"]
    }
     ingress {
         from_port = 443
         to_port = 443
         protocol = "tcp"
         cidr_blocks = ["0.0.0.0/0"]
    }
}
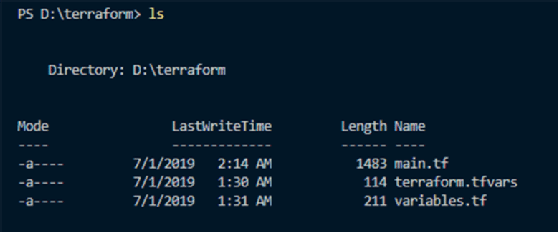
After we create these files, the directory structure should look as it does in Figure 2 below.
Apply Terraform configuration
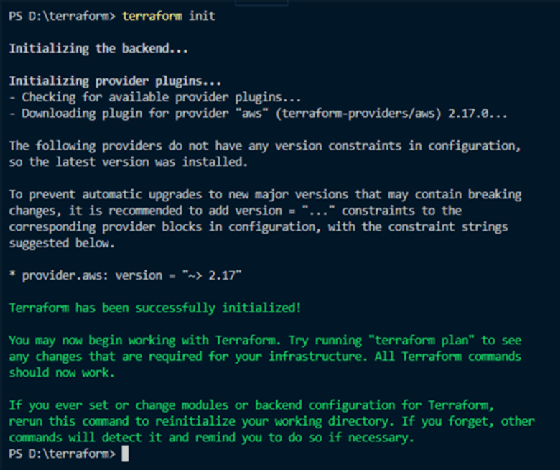
The next step in this AWS and Terraform tutorial is to initialize the configuration. This checks for any plugin dependencies and downloads the plugins or modules required for the Terraform deployment plan. Run the terraform init command to initialize Terraform. The output should look as it does in Figure 3 below.
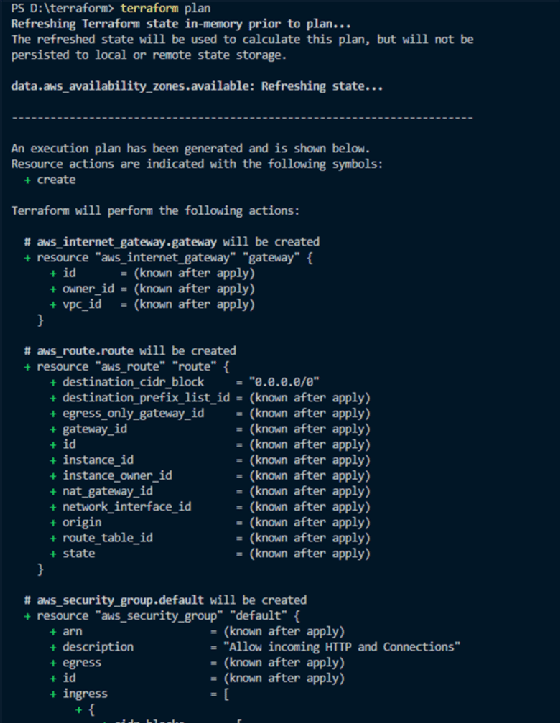
Run the terraform plan command to generate an action plan, as shown in Figure 4, according to the infrastructure definitions in the Terraform scripts. This validates the configuration that will apply to the cloud provider.
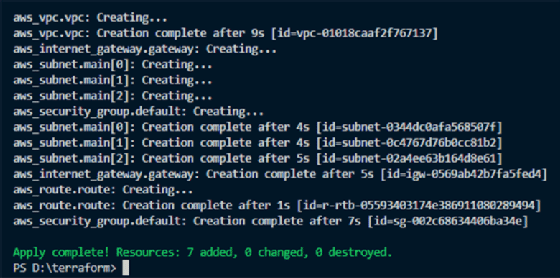
If you are comfortable with the deployment plan, apply the configuration with the terraform apply command.
This command deploys infrastructure components defined in Terraform scripts on AWS. As shown in Figure 5 below, it will return a status message that shows which resources have been added, changed or destroyed. By completing this Terraform and AWS tutorial, we created an Amazon VPC and configured the internet gateway, subnets and security group successfully.
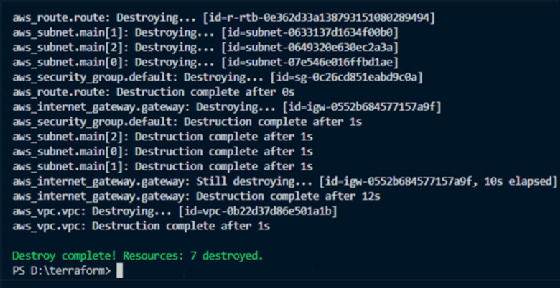
But tutorials don't have to end when you successfully make something. If you no longer require the Amazon VPC infrastructure, run the terraform destroy command, as shown in Figure 6, to delete the existing AWS infrastructure attached to this Terraform deployment plan.
