
Getty Images/iStockphoto
Deploy Azure landing zones using Terraform
Azure landing zones are well-managed environments that provide a way to run workloads. Deploying them using Terraform lets users build a solid foundation.

Azure landing zones are well-architected environments that adhere to Microsoft's best practices for Azure cloud architecture. They provide scalability and facilitate cloud adoption by providing a well-managed foundation for teams to run their workloads.
If you are interested in deploying Azure landing zones, Terraform is a good tool to use. The steps outlined in this tutorial, including setting up and authenticating Terraform for Azure, will help you build a well-managed foundation on which to deploy your workloads. Reading and understanding the module will allow you to build a deploy and complex but well-managed landing zone.
What are Azure landing zones?
Azure landing zones provide scalability and facilitate cloud adoption. They provide a well-managed foundation for teams to run their workloads. A landing zone includes a standard set of resources and configurations for security, governance and compliance.
Azure landing zones have several key benefits you can take advantage of:
- Scalability. Azure landing zones are designed to scale with your organization's needs. This allows for easy expansion and adaptation as your cloud footprint grows.
- Security and compliance. Built-in security controls and compliance policies protect workloads and ensure they meet regulatory requirements.
- Operational efficiency. Azure landing zones provide a standardized environment, which reduces the complexity and operational overhead associated with managing multiple cloud environments.
- Integration and connectivity. Resources for management and connectivity landing zones provide integration between resources, improved user experience and assured policy compliance.
Prerequisites
Before you start deploying Azure landing zones using Terraform, you need to set Terraform up and authenticate it.
Install Terraform
To install Terraform, find the appropriate download for your operating system on their download page and extract the executable from the ZIP. From there, open your favorite terminal to the directory where it is downloaded. Test this by running the following command.
.\terraform --version
This example is running version 1.8.5 on Windows.
Authenticating Terraform
This example uses Terraform's AzureRM provider to configure resources in Azure. Create a service principal and use that to authenticate to Azure using PowerShell.
Connect-AzAccount
$sp = New-AzADServicePrincipal -DisplayName tf-demo -Role "Contributor"
Then, export several environment variables in the syntax of your shell for authentication. The following is the syntax for PowerShell.
$env:ARM_CLIENT_ID       = $sp.AppId
$env:ARM_SUBSCRIPTION_ID = (Get-AzContext).Subscription.Id
$env:ARM_TENANT_ID       = (Get-AzContext).Tenant.Id
$env:ARM_CLIENT_SECRET   = $sp.PasswordCredentials.SecretText
If you are working in a pipeline, such as GitHub Actions, store these values as secrets and export them as environment variables using the appropriate syntax.
With those values stored in environment variables, the AzureRM provider will find and use them to authenticate to Azure.
Setting up a development environment
To develop Terraform configurations, Visual Studio Code is the recommended editor. Download and install the appropriate installer for your operating system. Then, open the extensions marketplace and search for Terraform. For the best Azure experience, install both the official HashiCorp extension and Microsoft's Azure Terraform extension.

Benefits of using Terraform
Using Terraform or any infrastructure-as-code tool has several advantages over a graphical user interface like the Azure Portal:
- Git integration. Terraform allows for version control, collaboration and automation of your infrastructure deployments within a hosted Git and CI/CD delivery.
- Repeatability. Terraform configurations can be reused across different environments. This ensures consistency and reduces the chance of errors.
- Extensibility. Terraform's modular architecture allows for integration with other tools and services, which extends its functionality.
Using Terraform also allows you to scale and standardize complex resources:
- IAM controls. Terraform lets you define and enforce IAM controls programmatically, providing scalable security governance and compliance across your entire Azure tenant.
- Policy enforcement. By using Terraform, you can enforce policies across many subscriptions and management groups, ensuring consistent security and compliance practices.
- Managed resources. Terraform simplifies the management of resources for connectivity landing zones, providing better integration, improved user experience and assured policy compliance.
Writing the Terraform Configuration
To deploy an Azure Landing Zone using Terraform, use the official Microsoft Terraform module for Azure Landing Zones and complete the following steps.
Step 1
Open an empty folder in VS Code.
Step 2
Create a new file named main.tf. This is the default file name for Terraform configurations, though you can use any file name that uses the TF extension.
Step 3
Define the terraform block in the main.tf file. You must use the AzureRM provider at a minimum version of 3.74, since that is the minimum for the landing zone module.
terraform {
  required_providers {
    azurerm = {
      source  = "hashicorp/azurerm"
      version = ">= 3.74.0"
    }
  }
}
The >= syntax is a version constraint that means "greater-than or equal to." This indicates that you are requesting version 3.74.0 or later.
Step 4
Declare the provider itself with a provider block.
provider "azurerm" {
  features {}
}
If you need to set any provider-specific settings, this is where you would do it. However, for this configuration, you don't need to make any changes.
Step 5
Define a data block.
data "azurerm_client_config" "core" {}A data block in Terraform lets you dynamically retrieve data from the specified resource. In this case, you get information about the provider configuration which you will use later.
Step 6
Call the landing zone module. For this example, use the default configuration to get an idea of what it will look like.
module "enterprise_scale" {
  source  = "Azure/caf-enterprise-scale/azurerm"
  version = "~> 5.2"

  default_location = "West US"

  providers = {
    azurerm              = azurerm
    azurerm.connectivity = azurerm
    azurerm.management   = azurerm
  }

  root_parent_id = data.azurerm_client_config.core.tenant_id
  root_id        = "myorg"
  root_name      = "My Organization"
}
This example is calling the module and specifying the version with source and version. In this case, the version constraint is telling Terraform to only use version 5.2 or anything newer that is version 5.x but not version 6.
It sets the default location to West US, passing the required information about the providers and then setting basic metadata with the root_parent_id, root_id, and root_name. It is recommended to use more meaningful names than these examples.
Deploying the Terraform Configuration
Now that you have your configuration set up, you need to deploy it.
Step 1
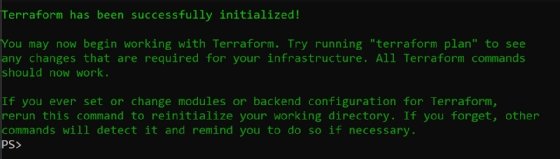
Initialize Terraform with terraform init.

You will get a lot of output indicating that Terraform is initializing the environment. It should end with the following.
Step 2
Run terraform validate to do some pre-deployment tests on the configuration. This step is not required, but it will give you confidence before running a plan.

Step 3
Run terraform plan, which will show you what it intends to create. Because this module is so complex, there are going to be a lot of resources created. The following is the last item listed.
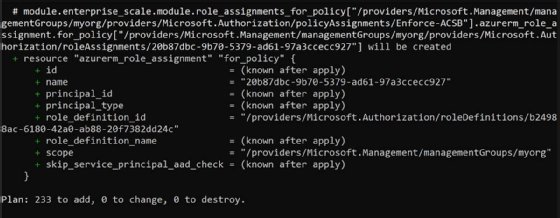
Notice that for each resource being created, a plus sign is displayed next to it.
The last line indicates that it will create 233 items, change 0 and destroy 0. If you are running this plan again after deploying it and then editing the config, you will likely see resources being changed.
Step 4
Run terraform apply, and type in "yes" when prompted to confirm the plan to apply this configuration.
Be patient for the deployment -- it will take some time.
Once the deploy has completed, you should see the following message.

View the resources in Azure
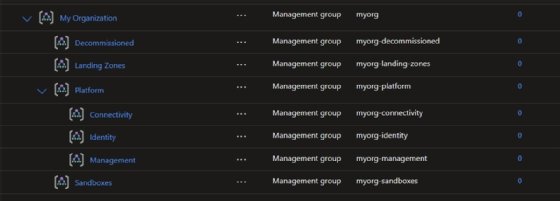
You can find the set of management groups and policies by going to the Management Group section in the Azure Portal.
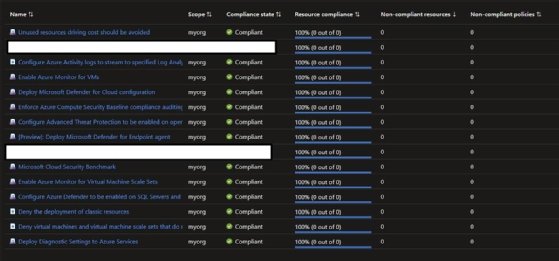
Click on the My Organization link, expand the Governance section on the left and then click on Policy. From the Policy screen, go to Compliance.
Here you will see the policies applied by the default configuration of the landing zone. The following shows the location of the censored policies.
Making changes to the configuration
The default configuration won't likely make sense to use for your production workload. Be sure to read through the module's documentation to deploy the landing zone exactly how you would like.
They have extensive examples that include deploying connectivity resources, custom policies and identity resources. Since this is a fully featured module, many of these resources are as simple as a single additional line in your configuration and then rerunning Terraform.
Delete the resources
If you are deploying these resources as a test and you are done evaluating the deployment, you can destroy the deployed resources with terraform destroy. This will destroy only the resources you created.
Anthony Howell is an IT expert who is well-versed in multiple infrastructure and automation technologies, including PowerShell, DevOps, cloud computing, and the Windows and Linux operating systems.