Sikov - stock.adobe.com
Create an SSH key with GitHub for network access
SSH keys are a network security method that verifies the identity of the user or application seeking access to a system or other application. Create and store yours in GitHub.
Public and private keys are the most secure way to access servers. When key-based access is done right, there is no way an intruder can get in. The downside is that Linux and Windows administrators must manage these keys. While it's not complex, key management can be tiresome to repeat for every use. GitHub's version control capabilities can help.
To securely and properly create, use and install keys, first, you must understand what an SSH key is. Then, follow this approach to create and upload keys to GitHub and roll them into Ubuntu and Windows deployments.
SSH key basics
SSH stands for Secure Shell Protocol -- or Secure Socket Shell -- and is a security method that enables a secure connection on an unsecured network. This method is a client-server style of communication, where an SSH client communicates with an SSH server. It provides an array of utilities, including password and public access key authentication, as well as encryption, remote systems management and the creation of secure tunnels for other protocols.
Public and private key pairs are encryption methods that interact to control system or application access. The public key is provided via a certificate authority, such as Comodo SSL, DigiCert and Entrust Datacard, and disallows unauthorized access to the network or application. Conversely, the private key, which is sometimes also called a secret key, is a string of random -- or pseudo-random -- characters that identify the user or application seeking access.
Create credentials in Linux
Linux and Microsoft Windows handle key creation differently. In this example, we use the Ubuntu Linux distribution.
If you are using Ubuntu to create a public/private key pair, use the command:
ssh-keygen -t rsa
This command generates a hidden directory called .ssh that contains two files: id_rsa and id_rsa.pub. The PUB extension denotes it as the public key.
On Windows, it's a bit different. Download and install the PuTTY installer, which includes the PuTTYgen file.
Create credentials in PuTTYgen
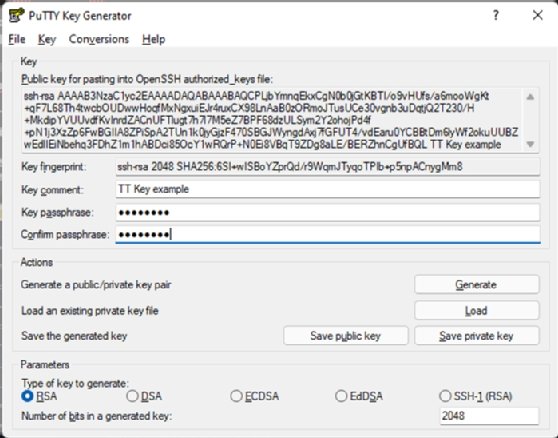
Open PuTTYgen and click Generate from the actions items, as seen in Figure 1.

Once running, it should look like the screen in Figure 2.

The PuTTY key generator requests a key comment. Use something practical and meaningful. Protect the private key with a password.
At this point, Windows administrators must do three things:
- Copy the OpenSSH authorized key files. This information won't appear again, and you need a copy to upload to GitHub. Keep a copy of the OpenSSH key because PuTTY doesn't use the same format as Linux.
- Click Save public key. This is for use by PuTTY, as PuTTY doesn't adhere to the standard public key formats.
- Save the private key. Keep it somewhere accessible but safe. The private key unlocks server access.
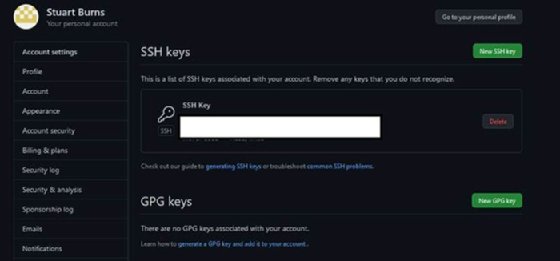
Once you have the public/private key pair, upload the public key to GitHub. Log in to GitHub in a web browser, and navigate to settings in the top-right corner.
Windows with WSL installed
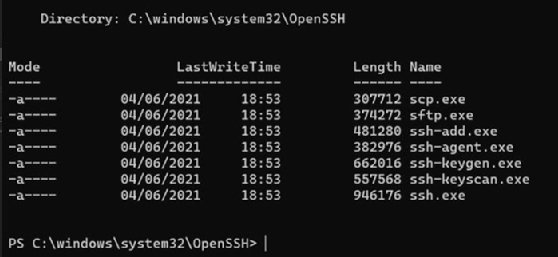
While the Windows option might seem cumbersome, if you have Windows Subsystem for Linux (WSL) installed, the same tools are available as for a Linux administrator, such as OpenSSL.exe. All the files are located in \Windows\System32\OpenSSH, as shown in Figure 3. To use this version, follow the Linux steps listed above.

To add a new key, click the New SSH key, give it a name -- be short and descriptive -- and paste in the whole public key. This can either be id_rsa.pub or a copy of the OpenSSH text copied from the one generated in PuTTYgen. Then, click Save.

Linux users can find a copy of the OpenSSH file in the .ssh directory in their home folder called id_rsa.pub.
With the public key uploaded, the administrator must deploy the key to both current and new servers. The following is a walk-through on how.
Import the SSH key from GitHub into the Ubuntu install
To install Ubuntu servers from scratch, the installer process presents a page titled SSH Setup. To use the import function, select the option Install OpenSSH server. The installer enables you to import the keys for use, as shown in Figure 5. Select Import from GitHub, fill in the username and verify the key.

It is also possible to do this retrospectively. For example, to import SSH keys that are stored on GitHub into an existing Ubuntu server or desktop, log in as the relevant user, and use the following command, which will produce the same result as if it was done at the install:
ssh-import-id-gh <github_id>
This implementation enables key import from GitHub. The admin can use a single key to log in. To access these new servers, use standard SSH on Linux, and it should pass the key to the server automatically.
However, PuTTY on Windows doesn't save the key in the standard, human-readable format. Instead, it uses its own file layout to store the PPK keys, which can only be read by PuTTY. When the key pairs are generated via PuTTYgen, part of the interface appears that holds the standard digital key. Copy this text, which Linux and just about every other system expects, and paste it into the Linux server in question. Without a copy, administrators must repeat the generation process. Keys generated in WSL are standard digital key pairs.
Debug login issues
If there are issues with the login process, use the following command on Linux:
ssh -vvv user@server
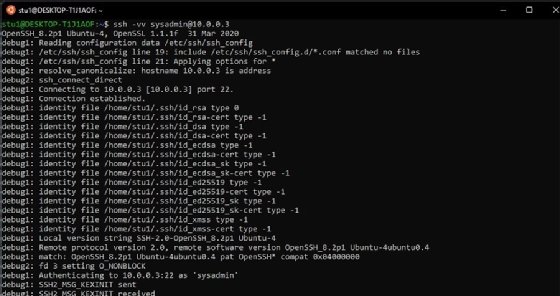
This -v switch produces an output that is an in-depth, real-time account of what occurs during the login attempt, as seen in Figure 6.

With the -v switch, the output shows a warning message if, for example, someone copied the key they created incorrectly or lacks the appropriate permissions. Without -v, it either fails or produces a semigeneric error message. To access deeper levels -- some deeper than what the average admin could use -- add extra v's on the debug.


