Sergey Nivens - Fotolia
A Kubernetes namespaces tutorial to manage cluster resources
Namespaces in Kubernetes serve several purposes -- from allowing teams to share a single cluster to enforcing resource quotas. Use this tutorial to get started with this important Kubernetes feature.
Kubernetes namespaces partition a Kubernetes cluster into logical isolations. This enables IT teams to organize Kubernetes infrastructure resources so that various users and teams can collaborate, while maintaining clear and isolated boundaries.
For example, with Kubernetes namespaces, IT teams can logically isolate development, test and production environments. Namespaces also provide administrative control over resources, via resource quotas and limits.
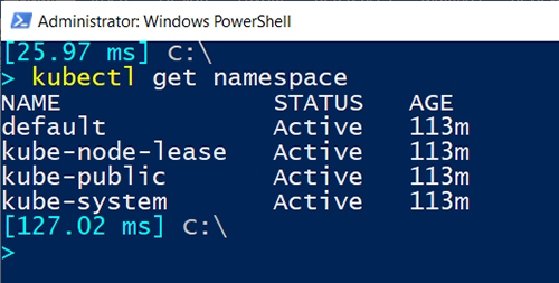
When an IT admin first sets up a Kubernetes cluster, four namespaces are automatically created:
- Default. All the resource deployments without a namespace are deployed under this namespace.
- kube-system. This namespace holds Kubernetes system configurations and deployments crucial to the Kubernetes cluster.
- kube-public. This namespace is open to all users with read-only access, but reserved for system usage.
- kube-node-lease. All nodes have an associated Lease object in this namespace. A Lease boosts the performance of the node heartbeats -- messages that nodes send to the node controller to indicate availability -- as the Kubernetes cluster scales.
Let's dig deeper and understand how to work with namespaces. As a prerequisite, have a Kubernetes cluster up and running before attempting the commands.
Query namespaces
Run the following commands to receive the list of all namespaces, or a specific namespace in Kubernetes:
kubectl get namespaces
kubectl get namespaces <name of namespace>
This will produce an output similar to Figure 1.
For more detailed information about a namespace, use the describe command:
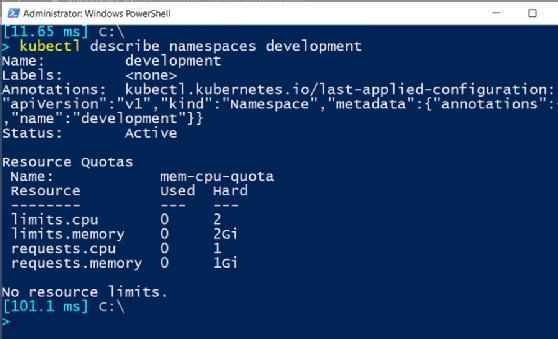
kubectl describe namespaces <name of namespace>
This adds more verbosity to the output, with annotations, labels and resource quotas and limits.
Create resources in namespaces
To create a resource in a specific namespace that already exists, pass the name of the namespace as an argument to the -n or --namespace parameter in the command:
kubectl create deployment my-nginx --image nginx --namespace webserver
The output should look similar to Figure 3.

List resources from all namespaces
The --all-namespaces switch parameter will list any resources in all the namespaces, as in the following command:
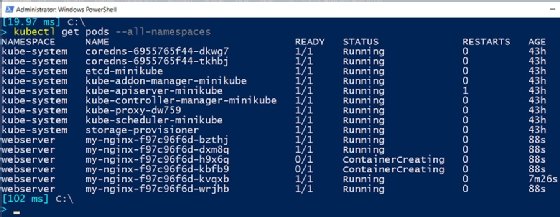
kubectl get pods --all-namespaces
This lists all the pods running in all namespaces in Kubernetes.
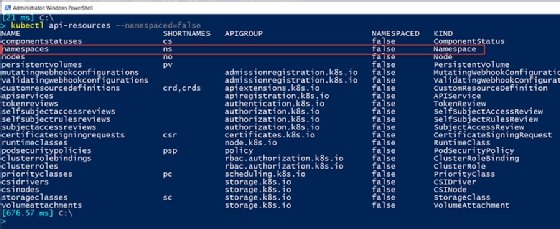
However, this method doesn't provide the exact list of all the resources in Kubernetes, because not all resources are organized in a namespace -- for example, low-level resources, such as nodes, cluster roles and persistent volumes, are not in any namespace. Issue the command below to list all such resources without a namespace:
kubectl api-resources --namespaced=false
The output should look similar to the screen in Figure 5, which also demonstrates that namespaces are -- themselves -- not in any namespace, either.
Set namespace preference
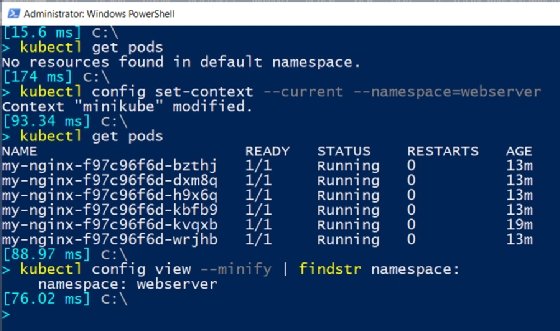
IT admins can set a namespace preference for all subsequently executed commands to remember. This eliminates the need to explicitly define namespace names with all kubectl commands:
kubectl config set-context --current --namespace=<name of namespace>
For example, see Figure 6, which features a webserver namespace.
Create a new namespace
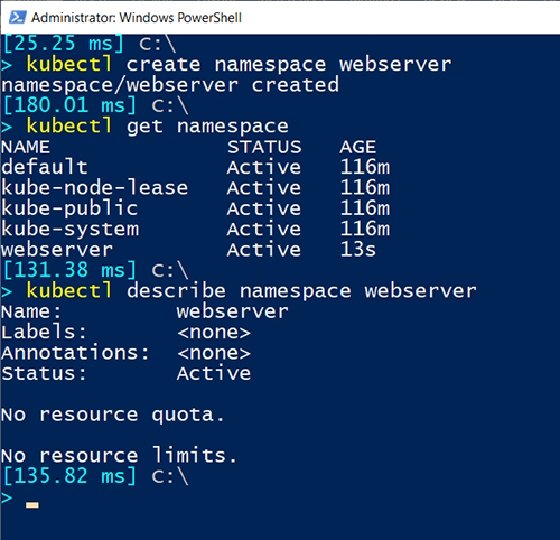
Namespace creation is simple: Run the kubectl create namespace <name of namespace> command, and insert the name of the namespace you want to create, as shown in Figure 7. Note that namespaces are non-hierarchal; you cannot create a namespace within another namespace.
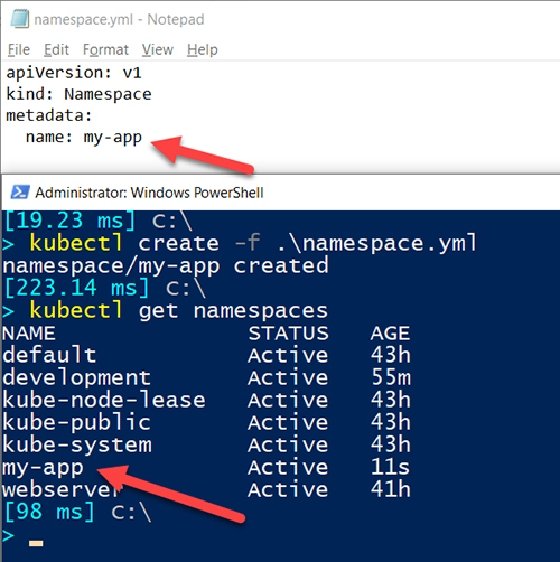
Alternatively, admins can use a YAML file to create a namespace. Set up a namespace.yml file with the following declarations.
Delete a namespace
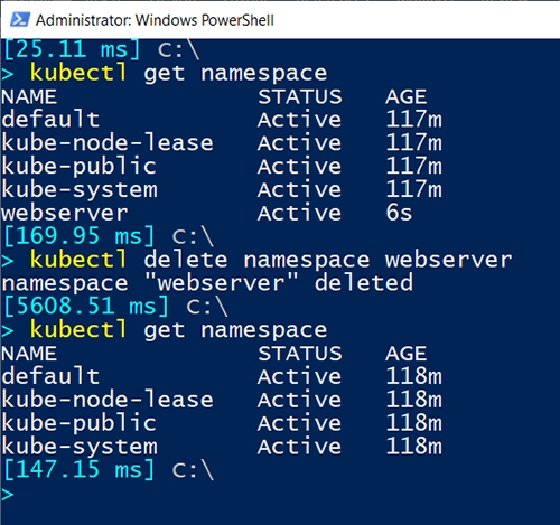
A namespace can be deleted asynchronously using the kubectl delete namespaces <name of namespace> command, which will also delete any Kubernetes resources under the namespace.
Configure resource quotas on namespaces
Kubernetes administrators can use namespaces to control resource allocation, such as to set hard limits on the number of pods that can be created in a namespace, or to enforce limits on the volume of memory and CPU that users can request. To configure a resource quota on a namespace, first create a YAML file, like the one below, and define hard limits to requests under the target namespace and maximum resource allocation of memory and CPU.
apiVersion: v1
kind: ResourceQuota
metadata:
  name: mem-cpu-quota
spec:
  hard:
    requests.cpu: "1"
    requests.memory: 1Gi
    limits.cpu: "2"
    limits.memory: 2Gi
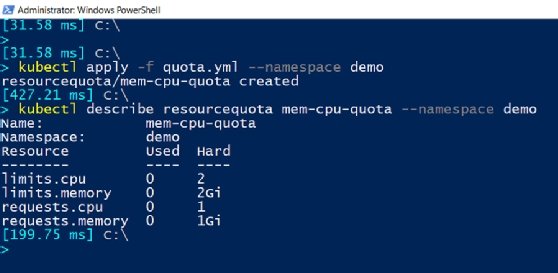
Then, apply this resource quota configuration to the namespace, using the following command:
kubectl apply -f quota.yml --namespace demo
kubectl describe resourcequota mem-cpu-quota --namespace demo
The output should look as seen in Figure 10.
Now, to create a pod in this demo namespace and assign some resources, create a YAML file called pods.yml with the following configurations:
apiVersion: v1
kind: Pod
metadata:
  name: demo-pod
spec:
  containers:
  - name: demo-container-1
    image: nginx
    resources:
      limits:
        memory: "900Mi"
        cpu: "900m"
      requests:
        memory: "700Mi"
        cpu: "600m"
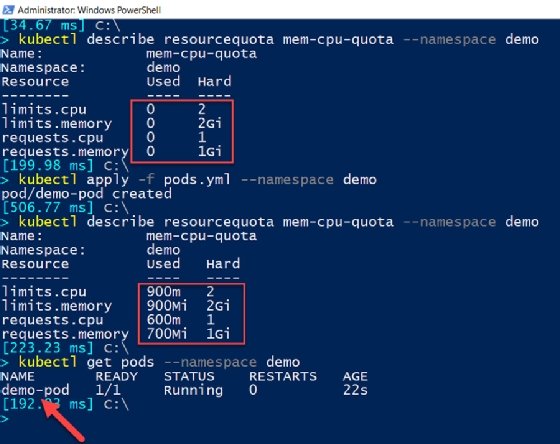
To apply this pod configuration, run the following commands:
kubectl apply -f pods.yml --namespace demo
kubectl describe resourcequota mem-cpu-quota --namespace demo
Some of the resources from the quota we defined are already allocated to the newly created pod.
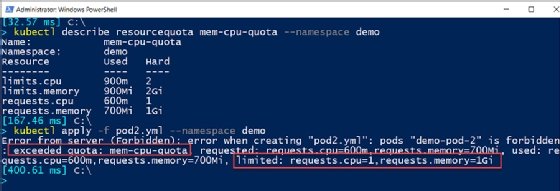
After we set the resource quota on a namespace and create the nodes that consume most of the resources under that quota, we attempt to create another pod with a resource that exceeds the possible limit, using the pod2.yml file below:
apiVersion: v1
kind: Pod
metadata:
  name: demo-pod-2
spec:
  containers:
  - name: demo-container-1
    image: nginx
    resources:
      limits:
        memory: "900Mi"
        cpu: "900m"
      requests:
        memory: "700Mi"
        cpu: "600m"
As you can see, the request will fail, with the message "exceeded quota."
