Getty Images/iStockphoto
Tips to launch VirtualBox nested virtualization
Nested VMs make it easy to expand VM capacity without additional hardware. Take a look at the process to avoid any major issues and get these VMs up and running.
Nested virtualization is the practice of running a hypervisor inside of a VM. It is useful in lab environments for employee training or code development testing. Some organizations also use nested virtualization when they let certain users create their own VMs with limits on what those users can do.
VirtualBox is a free, open source hypervisor from Oracle that runs on a variety of VMs and supports nested virtualization. VirtualBox users can virtualize Oracle VM Server or KVM within its VMs. To set up VirtualBox nested virtualization, you install VirtualBox onto the OS, create a VM and then install a copy of VirtualBox on that VM.
With nested virtualization, you can give a user access to a VM that runs a nested copy of VirtualBox. Then the user can create VMs on an as-needed basis but cannot consume more resources than what you allocate to the VM with the nested VirtualBox copy. This strategy protects the virtual environment from VMs that overwhelm memory or other resources.
To use VirtualBox nested virtualization, run version 6.1 or higher. Oracle supports nested virtualization on a limited basis in version 6.0 but only for certain AMD CPUs. Version 6.1 adds support for Intel processors.
Set up VirtualBox nested virtualization
Generally, admins launch nested virtualization in VirtualBox on a per-VM basis. You must create a VM before you can enable nested virtualization.
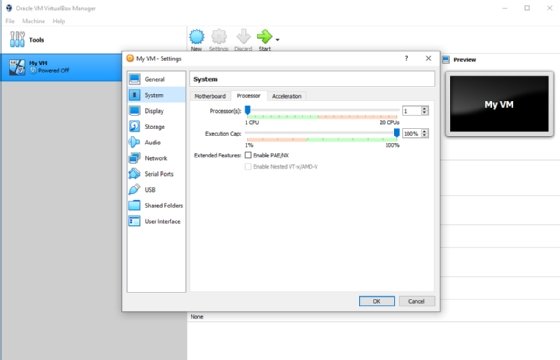
Once you create the VM to host the nested copy of VirtualBox, open the VirtualBox Manager, right-click on the VM and then choose the Settings command from the shortcut menu.
The Settings dialog box contains a series of icons that run along the left side of the window. Click on the System icon, and the dialog box displays the VM's system settings.
The system settings are divided into a series of tabs. Select the Processor tab, then the Enable Nested VT-x/AMD-V checkbox and click OK. Now the VM is ready for nested virtualization.
Grayed-out checkbox for nested virtualization
VirtualBox users sometimes encounter a grayed-out Enable VT-x/AMD-V checkbox, as shown in Figure 1. If this happens, here is how to fix it.

Disable hypervisors. First, verify that the system has no other hypervisors enabled. Nested virtualization will not work if VirtualBox is on a Windows system with Hyper-V activated. If you must disable Hyper-V then open a PowerShell session with elevated permissions, then enter the following command:
Remove-WindowsFeature Hyper-V
If you use Hyper-V to run Docker containers, then you may need to open an elevated Command Prompt window and run some alternative commands:
DISM /Online /Disable-Feature:Microsoft-Hyper-V

PowerShell Disable-WindowsOptionalFeature -Online -FeatureName Microsoft-Hyper-V-Hypervisor -All

bcdedit /set hypervisorlaunchtype off
Go manual. If you confirm there are no other hypervisors installed, but still encounter issues, then manually enable nested virtualization at the command line.
On a Linux system, the command to enable nested virtualization is:
$ VBoxManage modifyvm <virtual machine name> --nested-hw-virt on
If you run VirtualBox on a Windows OS, execute the command without the dollar sign. Be sure to execute the command in the same folder where VirtualBox is installed. This command is case-sensitive.
Overall, the setup for VirtualBox nested virtualization is a fairly simple process. For any additional help, use VirtualBox's documentation.


