Setting up and controlling resources on a Proxmox cluster
You're learned how to create Proxmox hosts and group them into a cluster. Now it's time to add resources to your cluster and assign access rights to them.
In previous articles, we've discussed how to set up and use Proxmox. Now that we've covered the basics, it's time to learn more complex processes, starting with setting up and controlling access to resources within a Proxmox environment.
Out-of-the-box Proxmox comes with local authentication set up as default; Proxmox also supports Lightweight Direct Access Protocol (LDAP) and Active Directory (AD). Note that if you use local authentication, login is limited to that specific Proxmox host. Any user accounts added to a host are not replicated to other hosts in the Proxmox cluster. There is no such issue with AD or LDAP.
Setting up AD integration for a Proxmox cluster
To set up the AD integration for your Proxmox cluster, go to the Authentication tab. From the menu ribbon immediately below select Add and choose Active Directory Server. This should show you a menu similar to the one shown in Figure A.
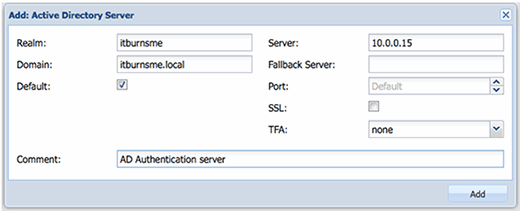
Fill in Realm and Domain boxes -- for reference, your realm is the same as the AD forest that was set up when the AD system was installed. To make AD the default authentication mode for Proxmox, place a tick in the Default box.
The server name can take either an IP address or the fully qualified domain name of the AD server you are authenticating. Use the name of the fallback server for the secondary AD server. Leave the Secure Socket Layer and Two-Factor Authentication components as they are.
In the comment field, use a comment such as "Corporate AD server" or something similar. The reason for this is that the comment content will appear on the drop-down authentication list as a selector for the AD server currently being configured.
Once you've reached this point, the authentication mechanism should be fully set up, but the users, groups and access rights still need to be added to the system.
Creating groups and setting access rights
The next thing we need to do is create appropriate groups on the Proxmox cluster. Setting up groups and assigning rights to groups makes managing the environment much easier. As an example, appropriate use of groups would be users, administrators and network service accounts.
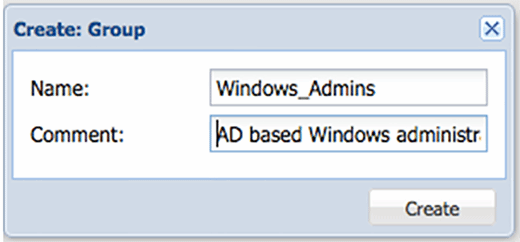
To create groups in Proxmox, select the Groups tab at the Datacenter level, and then the Create button. The form itself is relatively straightforward with just a group name and comment. Create as many groups as you think you will need. We'll assign rights and roles next.
To add permissions, select the Add hyperlink from the Permission tab and select Group from the drop-down menu. As shown in Figure C, a pop-up window should appear with a few blank fields that need to be filled out.
Path refers to the location with "/" being the root folder. As we add administrators, Proxmox assumes that you intend to give AD administrators full rights at the top level. Select the group created in the previous step from the drop-down menu, then select an appropriate role from the drop-down menu. You can find a more descriptive list of roles on the Proxmox website.
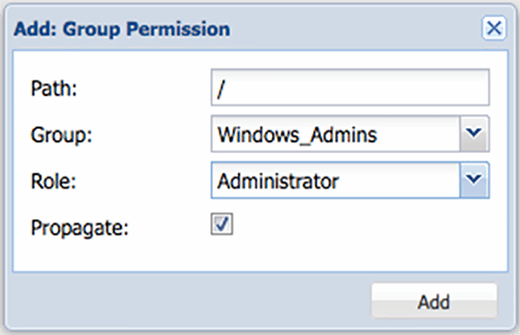
Make sure you've selected Propagate so that the rights assigned flow down. At this point, you can populate the Windows_Admins or whichever group you chose to use.
You can also add alternative rights by creating resource pools and adding VMs and rights to them. To create a resource pool, go to the top Datacenter level, select Pools and then Create from the tool ribbon below, as shown in Figure D.
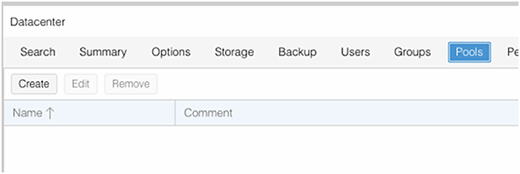
You should see the newly-created pool appear. To add rights to it, click the Permissions tab and repeat the process we performed earlier to assign rights to groups.
Adding users to groups
The last step is to add users to the groups we've created. Fortunately, this is a simple process.
Start by selecting Users from the tabbed menu at the Datacenter level and then select Add from the ribbon below. To add AD users, type in the username to add from AD and ensure the realm for the AD server is selected. This is usually where people go wrong. There is no need to add the domain or realm because the information will be provided via the AD realm configuration we set up before.
From the next drop-down, select the user group you want to add the user to. These groups are the ones that we created earlier in the tutorial. Although it isn't required, it's generally considered best practice to fill in the user's first name and surname.
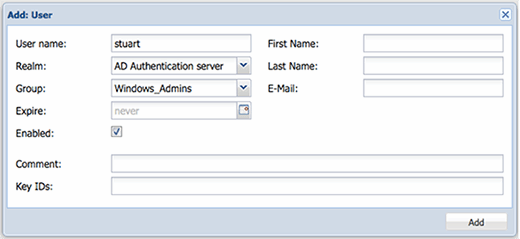
Since there is no verification of the accounts being added, it would be wise to double-check everything prior to pressing OK. Note that all these settings are independent and are only used within Proxmox; none of it is fed back into AD. For example, the account expire date is independent from the AD expire date field, if set.
Troubleshooting
If you encounter issues while trying to log in, you can find out what's going on behind the scenes to remedy the issue. To do so, start by using PuTTY or another Secure Shell client to log in to the Proxmox node. Change the directory to the log folder by the cd /var/log command, followed by the tail -f syslog command. You should see a more useful description now when you try to log in.
Although you can apply these rights directly, it's advisable to create resource pools, since you can't create sub folders within the setup. Create a resource pool by clicking the pool menu at the Datacenter level followed by Create, giving it a name and a description in the comment field.
It's also pretty easy to log in using the Proxmox credentials. To get into Proxmox, use your local credentials and select Linux PAN standard authentication, as seen in Figure F.
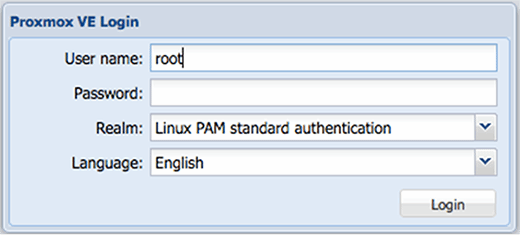
By this point you should have the components set up to allow a basic Proxmox cluster to run with AD authentication. The way accounts work in Proxmox take some getting used to, but once you understand them they are simple.


