Sergey Nivens - Fotolia
Enable and disable Hyper-V secure boot with PowerShell
The manual process of enabling secure boot is time-consuming, so use PowerShell cmdlets and scripts to make it efficient to use secure boot in Hyper-V.
With only a few steps, you can use PowerShell cmdlets to enable or disable Hyper-V secure boot on select VMs and use a PowerShell script to generate a secure boot status report.
Microsoft introduced the secure boot feature for both Windows and Linux VMs in Windows Server 2012 R2 Hyper-V. Secure boot enhances security by ensuring only approved components load during boot up.
Hyper-V provides the necessary PowerShell cmdlets to manage Hyper-V secure boot for VMs. You can use Hyper-V Manager or System Center Virtual Machine Manager to manage the secure boot settings for one or more Hyper-V VMs, but this takes a considerable amount of time to do manually. It’s especially time-consuming to manually prepare a report to ensure all production VMs have the secure boot option enabled. You can save time by using PowerShell cmdlets to manage Hyper-V secure boot settings and a PowerShell script to generate a report on secure boot settings for all your VMs.
There are two main PowerShell cmdlets to use when you interact with Hyper-V secure boot settings. They are Get-VMFirmware and Set-VMFirmware. As the names suggest, Get-VMFirmware collects the secure boot settings and Set-VMFirmware modifies the secure boot settings.
To check whether a VM has the Hyper-V secure boot setting enabled, execute the following command:
Get-VMFirmware –VM "SQLVM"
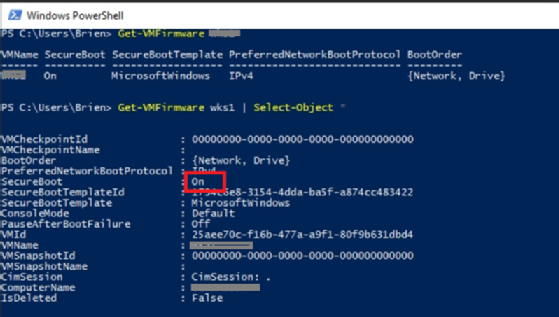
After you execute the above command, PowerShell will show the secure boot configuration for the VM.

The SecureBoot property returns On, which indicates that secure boot is enabled for the VM.
To enable Hyper-V secure boot settings for a particular VM, execute the following command:
Set-VMFirmware –VM "SQLVM" –EnableSecureBoot On
The Set-VMFirmware cmdlet can also set the boot order for the VMs. To set the boot order, you must get the virtual network card name and virtual hard disk objects with the following PowerShell commands:
$ThisNic = Get-VMNetworkAdapter "SQLVM" -VMNetwork
$ThisHardDisk = Get-VM -Name "SQLVM" | Get-VMHardDiskDrive -ControllerType IDE -ControllerNumber 1
Set-VMFirmware "SQLVM" -BootOrder $ThisNic, $ThisHardDisk
Generate a Hyper-V secure boot report
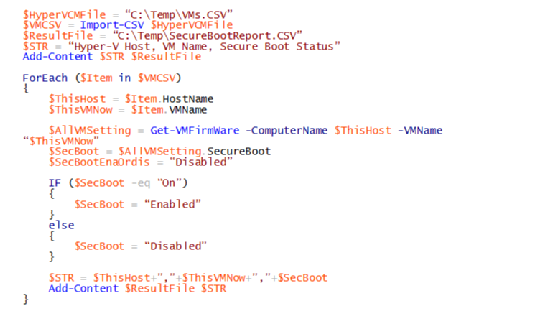
If you have many Hyper-V hosts running in your environment, you can use the following PowerShell script to generate a report on Hyper-V secure boot settings:


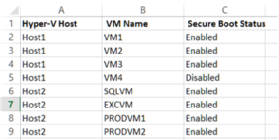
The above PowerShell script retrieves the Hyper-V host name and VM name stored in the C:\Temp\VMs.CSV file, executes the Get-VMFirmware command remotely, collects the secure boot setting for the VM in question and saves the data in C:\Temp\SecureBootReport.CSV.


