Fotolia
Copy files from the host to a Hyper-V machine
There are many ways to copy files from the host to a Hyper-V machine, including Enhanced Session Mode and the Copy-VMFile PowerShell cmdlet. Follow these steps for each method.
In earlier versions of Hyper-V running on Windows Server 2008 and R2, virtualization administrators had to use a Windows Remote Desktop Session or a working network connection if they wanted to copy files to VMs.
In Hyper-V running on Windows Server 2012 R2 and later OSes, Microsoft developers improved the way local resources from the Hyper-V host are shared with VM OSes. Now, there are multiple ways to copy files from the host to a Hyper-V machine.
Copy files using Enhanced Session Mode
Microsoft introduced Enhanced Session Mode in Windows Server 2012 R2 Hyper-V, which enables you to take local Hyper-V host resources and share them with VMs.
The Enhanced Session Mode feature of Hyper-V uses Remote Desktop Protocol and provides two ways to share files with Hyper-V VMs; the first enables users to simply copy files from the host to a Hyper-V machine, and the second enables local resources, such as the printer, drives and removable flash drives, to be shared with VMs.
However, before you can perform copy and paste operations or share local resources, you need to meet the requirements listed below:
- Enable Enhanced Session Mode policy on the Hyper-V host.
- Enable guest Integration Services on the VM.
- Use the VMConnect tool to perform copy and paste operations. VMConnect must be executed from Windows Server 2012 R2, Windows 8.1 or later OSes.
- The VM must have Remote Desktop Service enabled, and the guest OS must be running Windows Server 2012 R2, Windows 8 or later OSes.
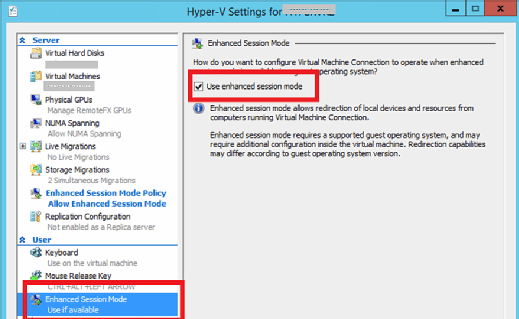
To enable Enhanced Session Mode, go to Hyper-V Settings, navigate to the Enhanced Session Mode section, and then select the Use enhanced session mode option, as shown in Figure A below:

Once you enable Enhanced Session Mode on Hyper-V and guest Integration Services, use the VM Connect tool to connect to the VM, and then either simply copy and paste operations or redirect local drives to VMs to copy the files.
Copy files using a PowerShell cmdlet
Not many Hyper-V administrators are aware that Hyper-V provides a PowerShell cmdlet that can be used to copy files from the host to a Hyper-V machine. If you need to copy files to multiple VMs, this is the best method. Use the Copy-VMFile PowerShell cmdlet to copy files to a single or multiple VMs as shown in the example below:
Copy-VMFile "SQLVM" -SourcePath "C:\LABFiles\LAB.ISO" -DestinationPath "C:\LABFiles\LAB.ISO" -CreateFullPath -FileSource Host
As you can see, Copy-VMFile copies the file C:\LABFiles\LAB.ISO to VM SQLVM under the C:\LABFiles folder. The -CreateFullPath parameter creates the folder if it doesn't already exist.
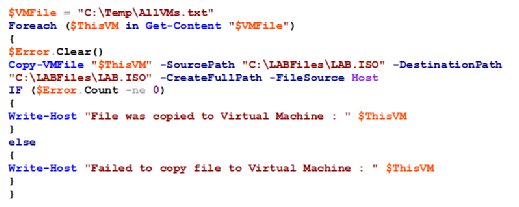
If you want to copy the same file from the local Hyper-V host to multiple VMs, create a file with VM names and use a ForEach loop to process each VM. Then, copy the file as it's shown in the PowerShell script below:

This PowerShell script copies the C:\LABFiles\LAB.ISO file to the VMs specified in the C:\Temp\AllVMs.TXT file and provides the copy status for each VM.
Before you use Copy-VMFile to copy files from the host to a Hyper-V machine, make sure guest Integration Services is enabled on the destination VMs.


