Edelweiss - Fotolia
Add Elasticsearch nodes to a cluster in simple steps
Elasticsearch, part of the Elastic Stack with Logstash and Kibana, uses YAML for configuration scripting. Follow these steps to configure an Elasticsearch cluster with two nodes.
IT organizations must set up management and monitoring tools for high performance and uptime. The more reliable IT tools are, the more reliable IT can make the hosting environment for business applications. A common approach for resiliency is multinode clusters.
This tutorial sets up a two-node cluster to run Elasticsearch. Follow along to install Elasticsearch on two Ubuntu systems and connect these Elasticsearch nodes to each other to run in a cluster.
Elasticsearch provides search functionality for IT systems management and monitoring. It is mostly associated with the Elastic stack, formerly called the ELK Stack, of Elasticsearch, Logstash data processing and Kibana visualization. Elasticsearch provides data storage and retrieval and supports diverse search types.
To create an Elasticsearch cluster, first, prepare the hosting setup, and install the search tool. Then, configure an Elasticsearch cluster, and run it to ensure the nodes function properly.
Prepare the deployment
To set up Elasticsearch nodes, open TCP ports 9200 and 9300. Port 9200 is the REST interface, which is where you send curl commands. The curl command-line tool is how you communicate with Elasticsearch. The tool uses Port 9300 for node-to-node communications. With these ports open, the two nodes hosting Elasticsearch can talk to each other, and the administrator can manage the Elasticsearch cluster.
Add the key to the repository, and then install Elasticsearch with apt-get:
 wget -qO - https://artifacts.elastic.co/GPG-KEY-elasticsearch | sudo apt-key add -
sudo apt-get update
sudo apt-get install elasticsearch
Next, install the File-Based Discovery plugin, which directs Elasticsearch to look to the file /etc/elasticsearch/discovery-file/unicast_hosts.txt for the IP addresses for other nodes in the cluster. To install the plugin, use cd to point to the correct directory:
cd /usr/share/elasticsearch/
 sudo bin/elasticsearch-plugin install discovery-file
AWS users can rely on an Elastic Compute Cloud (EC2) Discovery plugin, if preferred. While you don't need to configure special user policies, these do enable granular user control.
Use vim to edit the discovery file unicast_hosts.txt, and enter the IP addresses of each server that will host Elasticsearch, as shown in the code below. These servers are the nodes that must communicate with each other. On AWS EC2 servers, the servers have a 172.* IP address when you run ifconfig to configure the network interfaces. This address is different than the public IP address assigned to each server.
sudo vim /etc/elasticsearch/discovery-file/unicast_hosts.txt

#10.10.10.5:10005
 172.31.46.15
 172.31.47.43
Configure the Elasticsearch cluster
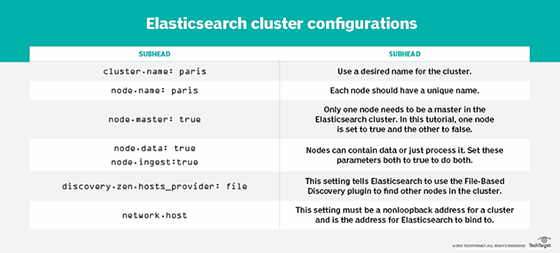
With the environment set up for two Elasticsearch nodes, edit the elasticsearch.yml file with the cluster information, again with the vim command.
In this tutorial, we add a cluster name, node name and information about the node's role and how it handles data (see the table).

Run Elasticsearch
With the cluster configured and nodes set up to talk to each other, start Elasticsearch on each server:
sudo service elasticsearch start
Check the log for any errors. The name of the log file is the name of the server -- paris, as shown above, for this node -- with the suffix .log. The tail command outputs information from a file:
sudo tail -f /var/log/elasticsearch/paris.log
Run the curl command below to see that both servers set up as Elasticsearch nodes show up in the cluster state query:
curl -XGET http://(IP address):9200/_cluster/state
The resulting output should show two nodes:

Elasticsearch is now configured to run on a two-node cluster. There are additional elements to learn to effectively manage Elasticsearch, such as how to work with shards and index types, as well as shard allocation, to be covered in future tutorials.


