Optimizing Windows 7 application performance
Reading these application performance optimization tips will help you launch and install applications efficiently while optimizing Windows 7 to run programs more effectively.
Running applications is the reason we use Windows 7, so it's a rare user who doesn't want his applications to run as fast as possible. The next few sections offer some pointers for improving the performance of applications under Windows 7.
|
||||
Adding More Memory
All applications run in RAM, of course, so the more RAM you have, the less likely it is that Windows 7 will have to store excess program or document data in the page file on the hard disk, which is a real performance killer. Use one of the following Windows 7 monitoring tools to watch the available memory value:
Task Manager—Display the Performance tab and watch the Physical Memory: Available value.
- Resource Monitor—Display the Memory tab and watch the Available to Programs value.
- Performance Monitor—Start a new counter, open the Memory category, and then select the Available Mbytes counter.
If the amount of available memory starts to get low, you should consider adding RAM to your system.
Installing to the Fastest Hard Drive
If your system has multiple hard drives that have different performance ratings, install your applications on the fastest drive. (See "Examining Hard Drive Performance Specifications" later in this chapter.) This enables Windows 7 to access the application's data and documents faster.
Optimizing Application Launching
As I mentioned earlier in this chapter (see "Configuring the Prefetcher"), Windows 7's fetching components can optimize disk files for booting, application launching, or both. It probably won't make much difference, but experiment with setting the Registry's EnablePrefetcher and EnableSuperfetch values to 1 to optimize application launching.
Getting the Latest Device Drivers
If your application works with a device, check with the manufacturer or Windows Update to see whether a newer version of the device driver is available. In general, the newer the driver, the faster its performance. I show you how to update device drivers in Chapter 22.
Optimizing Windows 7 for Programs
You can set up Windows 7 so that it's optimized to run programs. This involves adjusting the processor scheduling, which determines how much time the processor allocates to the computer's activities. In particular, processor scheduling differentiates between the foreground program (the program in which you are currently working) and background programs (programs that perform tasks, such as printing or backing up, while you work in another program).
Optimizing programs means configuring Windows 7 so that it gives more CPU time to your programs. This is the default in Windows 7, but it's worth your time to make sure that this default configuration is still the case on your system. Here are the steps to follow:
Select Start, type advanced system, and then press Enter to select View Advanced System Settings in the search results. This opens the System Properties dialog box with the Advanced tab displayed.
- In the Performance group, click Settings to display the Performance Options dialog box.
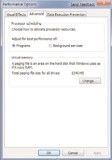
- Display the Advanced tab, shown in Figure 6.7.
- In the Processor Scheduling group, activate the Programs option.
- Click OK.
- When Windows 7 tells you the changes require a restart, click OK to return to the System Properties dialog box.
- Click OK. Windows 7 asks whether you want to restart your system.
- Click Yes.
FIGURE 6.7 In the Performance Options dialog box, use the Advanced tab to optimize Windows 7 for programs.
Setting the Program Priority in Task Manager
You can improve the performance of a program by adjusting the priority given to the program by your computer's processor. The processor enables programs to run by doling out thin slivers of its computing time to each program. These time slivers are called cycles because they are given to programs cyclically. For example, if you have three programs running—A, B, and C—the processor gives a cycle to A, one to B, another to C, and then another to A again. This cycling happens quickly, appearing seamless when you work with each program.
|
||||
The base priority is the ranking that determines the relative frequency with which a program gets processor cycles. A program given a higher frequency gets more cycles, which improves the program's performance. For example, suppose that you raise the priority of program A. The processor might give a cycle to A, one to B, another to A, one to C, another to A, and so on.
Follow these steps to change a program's priority:
Launch the program you want to work with.
- Open Task Manager, as described earlier in this chapter (refer to "Monitoring Performance with Task Manager").
- Display the Processes tab.
- Right-click your application's process to display its shortcut menu.
- Click Set Priority, and then click (from highest priority to lowest) Realtime, High, or AboveNormal.
TIP
After you've changed the priority of one or more programs, you might forget the values that you have assigned to each one. To help, you can view the priority for all the items in the Processes tab. Click View and then click Select Columns to display the Select Columns dialog box. Activate the Base Priority check box and click OK. This adds a Base Priority column to the Processes list.
Printed with permission from Sams Publishing. Copyright 2009. Microsoft Windows 7 Unleashed by Paul McFedries. For more information about this title and other similar books, please visit www.pearson.com.


