Creation of virtual machines utilizing command-line tools
Creating virtual machines for your customers is useful for them and lucrative for you. This excerpt outlines VMware ESX Server's creation and cloning tools.
Creation of Virtual Machines Utilizing Command-Line Tools
VMware ESX Server has tools available for command-line creation and cloning of virtual machines.These tools are available via the service console and require that you access the service console with root-level privileges.
Three main steps are involved to create a virtual machine utilizing the command-line tools.
- Creation of a virtual machine configuration file
- Creation of a virtual machine disk file
- Registering the virtual machine with ESX Server
We accomplish the preceding tasks by utilizing the following tools:
- text editor such as VI
- vmkfstools
- vmware-cmd
Virtual machine configurations are stored as files with a .vmx extension.The VMX file is just a text file with specific fields that define the virtual machine's configuration.A very short vmx file only needs 14 lines to support a virtual machine that encompasses one CPU, one hard drive, and one network adapter.You could create a VMX file with just three lines but it would be of minimalvalue. Code Listings 4.1 and 4.2 show sample VMX configurations.
Code Listing 4.1 ESX 2.x VMX Code
guestOS = "winnetenterprise"
config.version = "6"
virtualHW.version = "3"
scsi0.present = "true"
scsi0.sharedBus = "none"
scsi0.virtualDev = "lsilogic"
memsize = "512"
scsi0:0.present = "true"
scsi0:0.fileName = "ESX Created VM.vmdk"
scsi0:0.deviceType = "scsi-hardDisk"
ethernet0.present = "true"
ethernet0.allowGuestConnectionControl = "false"
ethernet0.networkName = "VM Network"
ethernet0.addressType = "vpx"
Code Listing 4.2 ESX 3.x VMX Code
guestOS = "winnetenterprise"
config.version = "8"
virtualHW.version = "4"
scsi0.present = "true"
scsi0.sharedBus = "none"
scsi0.virtualDev = "lsilogic"
memsize = "512"
scsi0:0.present = "true"
scsi0:0.fileName = "ESX Created VM.vmdk"
scsi0:0.deviceType = "scsi-hardDisk"
ethernet0.present = "true"
ethernet0.allowGuestConnectionControl = "false"
ethernet0.networkName = "VM Network"
ethernet0.addressType = "vpx"
As you can tell from Code Listings 4.1 and 4.2, the only difference is in the values of the config.version and virtualHW.version entries.These values relate to the version of ESX Server you are running.To check the values for these fields, open up an existing virtual machine's configuration file in a text editor.
Code Listing 4.3 VMware Autogenerated VMX Entry Examples
uuid.bios = "56 4d ee 3c 52 06 a3 de-be 4a 73 9c cc 79 25 2b "
ethernet0.generatedAddress = "00:50:56:a7:42:e2"
powerType.powerOff = "default"
powerType.powerOn = "default"
powerType.suspend = "default"
powerType.reset = "default"
Creating Your Virtual Machine Configuration File
You now have a basic understanding of how a virtual machine configuration file is constructed and are ready to build your own.The steps that follow detail how to create a new virtual machine configuration file.
- Log in locally or connect to your ESX server remotely.
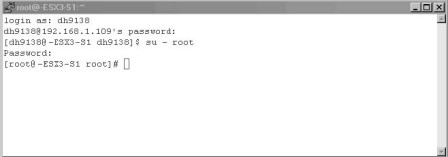
- Log in with an ID that has root privileges (see the Tip in the previous section), as shown in Figure 4.1.
Figure 4.1 Gaining Root Level Access on ESX Server
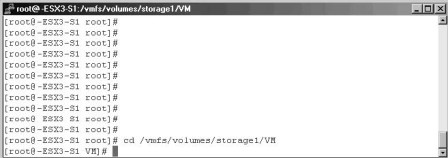
- Change to the location of where you want to put your new virtual machine.Virtual machine configuration files (VMX) have to be stored in the same location as the other virtual machine files (VSWP, VMDK, and so on). See Figure 4.2.
Figure 4.2 Virtual Machine Storage Location
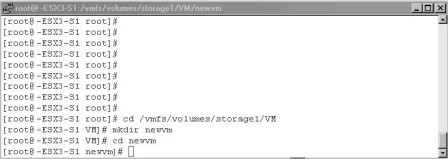
- Create a new directory to store your new virtual machine in newvm and change to that directory (see Figure 4.3).
Figure 4.3Virtual Machine Working Directory
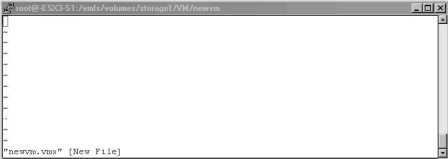
- You are now ready to create your new virtual machine configuration file.We are going to use the built-in text editor VI to create our configuration file.Type vi newvm.vmx and press Enter (see Figure 4.4).
Figure 4.4 Creating a New Virtual Machine Configuration File in VI
- Press I to turn on inserting (you will see the word insert at the bottom of the screen).
- Type in the following example virtual machine configuration file (see Code Listing 4.4).
Code Listing 4.4 Example Virtual Machine Configuration File
config.version = "6"
virtualHW.version = "3"
memsize = "256"
floppy0.present = "false"
displayName = "newVM"
guestOS = "winNetStandard"
ide0:0.present = "TRUE"
ide0:0.deviceType = "cdrom-raw"
ide:0.startConnected = "false"
floppy0.startConnected = "FALSE"
floppy0.fileName = "/dev/fd0"
Ethernet0.present = "TRUE"
Ethernet0.connectionType = "monitor_dev"
Ethernet0.networkName = "VM Network"
Ethernet0.addressType = "vpx"
scsi0.present = "true"
scsi0.sharedBus = "none"
scsi0.virtualDev = "lsilogic"
scsi0:0.present = "true"
scsi0:0.fileName = "newvm.vmdk"
scsi0:0.deviceType = "scsi-hardDisk"
- Press the Esc key to exit the insert mode, then press and hold Shift and press ZZ to save and exit (see Figure 4.5).
Figure 4.5 Saving the VMX File in VI
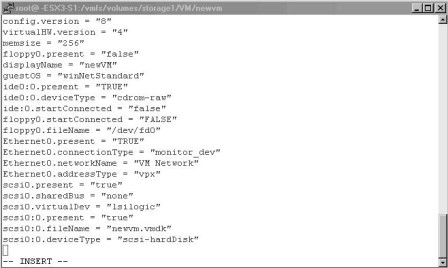
- Type ls –l to get a directory listing.You should now see your new virtual machine configuration file (see Figure 4.6).
Figure 4.6 Completed Creation of VMX File
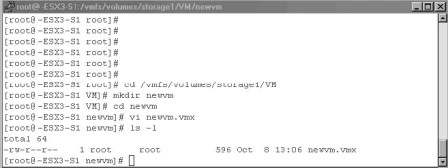
You are now ready to go on to the next section to create the virtual disk newvm.vmdk that you will be referencing in your configuration file.
Creation of a Virtual Machine Disk File
VMware has a command-line utility, called vmkfstools, which can be used for the creation of VMFS file systems and virtual machine disk files. In this chapter, we will only focus on the options that pertain to virtual disks. For a full listing of command options, type vmkfstools in a console session or man vmkfstools. Code Listing 4.5 lists the vmkfstools options that pertain to virtual disks.
Code Listing 4.5 vmkfstools Command Options for Virtual Disks
vmkfstools OPTIONS FOR VIRTUAL DISKS: vmkfstools -c --createvirtualdisk #[gGmMkK] -d --diskformat [zeroedthick| eagerzeroedthick| thick| thin] -a --adapterType [buslogic|lsilogic] -w --writezeros -j --inflatedisk -U --deletevirtualdisk -E --renamevirtualdisk srcDisk -i --clonevirtualdisk srcDisk -d --diskformat [rdm:|rdmp: | raw: |thin|2gbsparse] -X --extendvirtualdisk #[gGmMkK] -M --migratevirtualdisk -r --createrdm /vmfs/devices/disks/... -q --queryrdm -z --createrdmpassthru /vmfs/devices/disks/... -Q --createrawdevice /vmfs/devices/generic/... -v --verbose # -g --geometry vmfsPath
In our example, we will create a 4GB virtual disk called newvm.vmdk and assign it a SCSI LSI Logic adapter. In the console, type the following: vmkfstools –c 4g newvm.vmdk –a lsilogic.Then, press Enter (see Figure 4.7).
Figure 4.7 Creating the Virtual Disk

We have now created a virtual disk file newvm.vmdk in the same location as our virtual machine configuration file.The last step is to register this new virtual machine with ESX Server.
Registering Virtual Machines with ESX Server
VMware includes the vmware-cmd command tool for performing various operations on virtual machines and the server. In this chapter, we will focus on the virtual machine registration option of this tool -s register. For more information on all available tool options, type vmware-cmd at the console command prompt.
Type the following all on one line in the console window to register the new virtual machine with the ESX server:
vmware-cmd -s register "Your Path"/newvm/newvm.vmx
"Your Path" should be in a similar format to /vmfs/volumes/storage1/ (see Figure 4.8).
Figure 4.8 Registering a Virtual Machine with ESX
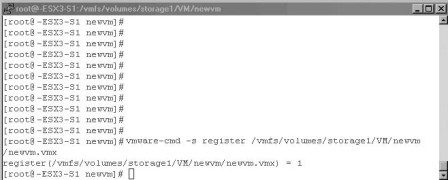
A returned value of "1" after running this command indicates a successful registration of the virtual machine. Open up the GUI of your ESX server to verify that the new VM is listed.At this point, you are ready to power on the virtual machine and install your operating system.You have successfully created a new virtual machine utilizing the VMware command-line tools.
Use the following table of contents to navigate to chapter excerpts, or click here to view Chapter 4 in its entirety.
![]()
![]() Building a VM
Building a VM
![]() Home: Introduction
Home: Introduction
![]() Part 1:Creation of virtual machines utilizing command line-tools
Part 1:Creation of virtual machines utilizing command line-tools
![]() Part 2: Scripting Creation of virtual machines in ESX shell
Part 2: Scripting Creation of virtual machines in ESX shell
![]() Part 3:Scripting Creation of Virtual Machines in Perl Scripts
Part 3:Scripting Creation of Virtual Machines in Perl Scripts
![]() Part 4: Cloning virtual machines utilizing ESX Shell scripts
Part 4: Cloning virtual machines utilizing ESX Shell scripts
![]() Part 5: Cloning virtual machines utilizing VmPerl Scripts
Part 5: Cloning virtual machines utilizing VmPerl Scripts
| ABOUT THE BOOK: |
| Scripting VMware Power Tools shows readers scripting techniques using both ESX and Linux commands to automate administrative tasks of ESX Server. It covers VMware ESX Server native tools and discusses in detail the different scripting APIs and how they can be used to provide some very useful, practical, and time-saving tools to manage a virtual infrastructure. From virtual server provisioning to backups, and everything in between, this book is a one-stop shop for virtual tools!Purchase the book from Syngress Publishing |
| ABOUT THE AUTHOR: |
| Lead author Al Muller is a consultant for Callisma, a wholly owned subsidiary of AT&T. He has been in the IT field since 1995, getting his start as a database administrator in the Navy. In 2002 he began using VMware's GSX Server and within a year was involved in his first virtualization project. Since then, he has been an eager proponent of virtualization technology and has worked on a number of different server consolidation and virtualization projects. |


