Common SQL Server Integration Services (SSIS) package management scenarios
Whether connecting to SQL Server Integration Services (SSIS), running packages or viewing package summaries, these scenarios will answer basic SSIS package management questions, from the book "Inside Server SQL Tools."
Common package management scenarios
SQL Server Management Studio is the SQL Server 2005 studio for managing Integration Services packages.
The following sections teach you:
- How to connect to Integration Services
- How to modify the service configuration file to connect to a named instance of SQL Server
- How to add and change top-level folders in the Stored Packages folder
- How to customize the structure of subfolders within the top-level folders
- How to add folders to the package store
- How to assign read and write permissions to packages
- How to import or export packages
- How to run packages using the package execution utility
- How to run packages using the dtexec command prompt utility
- How to manage packages using the dtutil command prompt utility
- How to view summaries of package properties
Each of these tasks is covered in the following sections.
How to connect to Integration Services
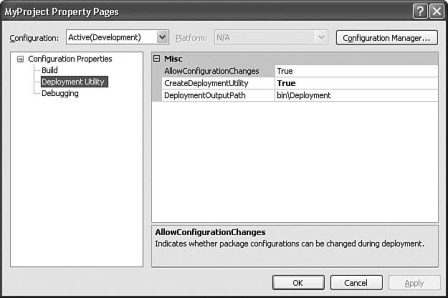
In contrast to Business Intelligence Studio, the first step to use SQL Server Management Studio is to log on to a server. In the Connect to Server dialog box (see Figure 16-45), you select Integration Services and specify a server. Integration Services supports only Windows Authentication and by default uses the NT AUTHORITYNetworkService account.
After you have connected to Integration Services, you can work with packages from SQL Server Management Studio in the Object Explorer window.
How to Modify the Service Configuration File to Connect to a Named Instance of SQL Server
To connect to a named instance of SQL Server, you must modify the service configuration file, MsDtsSrvr.ini.xml. By default, the file is located in C:Program FilesMicrosoft SQL Server90DTSBinn. The following XML code is the content of the default configuration file.
‹?xml version="1.0" encoding="utf-8"?› ‹DtsServiceConfiguration
xmlns:xsd="https://www.w3.org/2001/XMLSchema"
Âxmlns:xsi="https://www.w3.org/2001/XMLSchema-instance"› ‹StopExecutingPackagesOnShutdown›true‹/
ÂStopExecutingPackagesOnShutdown› ‹TopLevelFolders› ‹Folder xsi:type="SqlServerFolder"›
‹Name›MSDB‹/Name› ‹ServerName›ServerName‹/ServerName› ‹/Folder› ‹Folder
xsi:type="FileSystemFolder"› ‹Name›File System‹/Name› ‹StorePath›..Packages‹/StorePath› ‹/Folder›
‹/TopLevelFolders› ‹/DtsServiceConfiguration›
Open the file in any text editor, change the ‹ ServerName›element from‹ServerName›ServerName‹/ServerName› to‹ServerName›ServerNameInstanceName‹/ServerName›, and save the file. You must restart the Integration Services service to use the updated service configuration file.
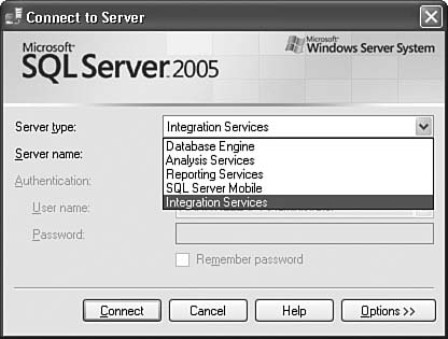
Integration Services contains the two root-level folders: Running Packages and Stored Packages. Running Packages lists packages that are currently executing. Stored Packages contains the sub-folders that list the packages saved to the package store (the msdb SQL Server database or the file system). Integration Services can save packages to the file system or the sysdtspackages90 table in the msdb. You can save packages to any folder in the file system, but Integration Services service monitors only packages that you save to the folders that are specified in the service configuration file, MsDtsSrvr.ini.xml. By default, the configuration file, located in C:Program FilesMicrosoft SQL Server90DTSBinn, specifies the subfolders: File System and MSDB (see Figure 16-46).
You cannot modify the root-level folders, nor can you delete them; however, you can modify the sub-folders within Stored Packages and extend their structure to meet your needs. For example, you might want to organize your packages by the department that uses them or by the types of tasks they perform.
To add or delete top-level folders or change the names of top level folders, you must modify the service configuration file, MsDtsSrvr.ini.xml. The following XML code is the content of the default configuration file.
‹?xml version="1.0" encoding="utf-8"?› ‹DtsServiceConfiguration
xmlns:xsd="https://www.w3.org/2001/XMLSchema"
Âxmlns:xsi="https://www.w3.org/2001/XMLSchema-instance"› ‹StopExecutingPackagesOnShutdown›true‹/
ÂStopExecutingPackagesOnShutdown› ‹TopLevelFolders› ‹Folder xsi:type="SqlServerFolder"›
‹Name›MSDB‹/Name› ‹ServerName›ServerName‹/ServerName› ‹/Folder› ‹Folder
xsi:type="FileSystemFolder"› ‹Name›File System‹/Name› ‹StorePath›..Packages‹/StorePath› ‹/Folder›
‹/TopLevelFolders› ‹/DtsServiceConfiguration›
The elements ‹Name›MSDB‹/Name› and ‹Name›File System‹/Name› specify the top-level folders within the Stored Packages folder.
To add, delete, and modify the folders, open MsDtsSrvr.ini.xml in any text editor and then edit the file. Before you begin to add folders, you need to choose the type of folder you want to add. You will notice the file has two types of Folder elements: One specifies "SqlServerFolder" and the other "FileSystemFolder". To add a folder for packages stored in msdb, copy and paste the Folder element that specifies "SqlServerFolder," and for packages saved to the file system use the one that specifies "FileSystemFolder." In the new XML Folder block, update the Name element. If you copied the Folder element that specifies "FileSystemFolder," you can also update the location and folder name of the file system folder that Integration Services service monitors and add more folders to monitor. By default, the configuration file specifies the Packages folder, (..Packages), a folder that is created when you install Integration Services. The following Folder element specifies a folder named Finance and the folder path, C:MyPackages. A folder can monitor only one location.
‹Folder xsi:type="FileSystemFolder"› ‹Name›Finance‹/Name› ‹StorePath›C:MyPackages‹/StorePath›
‹/Folder›
The Integration Services service must be restarted to use the updated service configuration file.
How to Customize the Structure of Subfolders within the Top-Level Folders
Unlike the top-level folders within the Stored Packages folder, you do not modify the Integration Services service configuration file to add subfolders within the top-level folders. Instead, you use the user interface that SQL Server Management Studio provides.
To add a new folder,
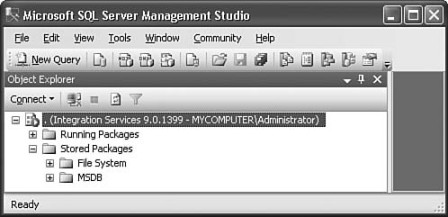
- Right-click the folder to which you want to add a subfolder and click New Folder.
-
In the Create New Folder dialog box, type the name of the folder (see Figure 16-47).
- Click OK.
How to assign read and write permissions to packages
You can protect packages that are saved to the msdb SQL Server database by assigning Integration Services database-level roles that specify read and write permissions on packages. Integration Services provides the three fixed database-level roles for controlling access to packages: db_dtsadmin, db_dtsltduser, and db_dtsoperator. Table 16-4 presents the read and write permissions for each of the roles.
Table 16-4 Role Read and Write Permissions
| Role | Read Permissions | Write Permissions |
| db_dtsadmin | Enumerate all packages | Import packages |
| View all packages | Delete all packages | |
| Run all packages | Change all package roles | |
| Export all packages | ||
| Run all packages in SQL Server Agent jobs | ||
| db_dtsltduser | Enumerate all packages | Import packages |
| View own packages | Delete own* packages | |
| Run own packages | Change own* package roles | |
| Export own packages | ||
| db_dtsoperator | Enumerate all packages | None |
| View all packages | ||
| Run all packages | ||
| Export all packages | ||
| Run all packages in SQL Server Agent |
*The package owner is identified by the value in the ownersid column in the sysdtspackages90 table in the msdb database.
To set read and write permissions follow these steps:
- Right-click a package that is saved to msdb and click Package Roles.
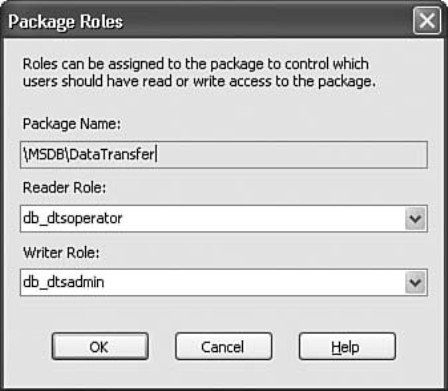
- In the Package Roles dialog box (see Figure 16-48), replace the default reader and write roles with the ones that you want to use.
- Click OK.
You can import packages saved to SQL Server, the package store, or the file system into SQL Server or the package store. The destination of the imported package is specified by the type of folder from which you invoke the import process. If you import packages from a folder that manages packages stored in SQL Server, the package is imported into the sysdtspackages90 table in the msdb SQL Server database; likewise, if you import packages from a folder that manages packages in the file system, the packages are imported into the folder specified in the Integration Services service file; otherwise, the packages are imported into the nonmanaged file system folder.
To import a package follow these steps:
- Right-click the folder to which you want to import a package.
- In the Import Package dialog box, select the storage type of the package that you want to import in the Package location drop-down list.
- Depending on the storage type selected, provide a server name and, if applicable, a username and password.
- Click the browse button (…) for the Package path option and then locate the package to import.
- Optionally, modify the name of the imported package.
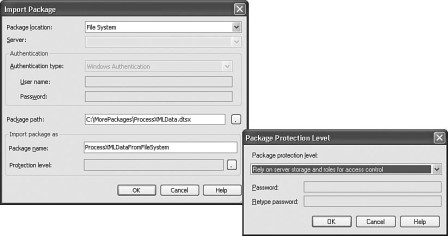
- Optionally, click the browse button (…) for the Protection level option, and then update the protection level of the package (see Figure 16-49).
Integration Services provides a variety of protection levels. You first set the protection level when you develop a package. However, you might want to apply a different protection level to your imported packages. For example, if you import your packages to SQL Server, you may choose to rely on the built-in security features of SQL Server to keep packages safe and update the package to use the protection level, Rely on server storage and roles for access control.
To learn more about package protection levels, see the section, "How to Set User Properties to Secure Packages," earlier in this chapter.
Importing packages is a quick and easy way to install packages and to change the storage format of packages. However, you should be aware that the import feature does not include package dependencies. If your packages have dependencies, or they rely on ancillary files that you have added to the Integration Services project to deploy with the packages, then you should consider building a deployment utility and importing the packages by using the Package Installation Wizard.
The export process is the reverse of the import process described previously. Import brings in packages; export sends out packages.
The steps to export a package are very similar to the steps to import a package. You can export packages to SQL Server, the package store, or the file system. If you export to SQL Server, you can export to the top-level folder for the msdb database or one of its subfolders.
If you export to the package store, you can specify any of the folders that Integration Services manages. The service manages two types of storage: the msdb SQL Server database and the folder that the configuration file for Integration Services specifies. If you export a package to the top-level folder for msdb or its subfolders, the package is exported to msdb. Likewise, if you export a package to the top-level folder that the service specifies or its subfolders, the package is exported to the file system.
If you export to the file system, you can specify any local or remote folder. The Integration Services service does not manage or monitor these packages.
To export a package follow these steps:
- Right-click the package that you want to export.
- In the Export Package -
- Depending on the storage type selected, provide a server name and, if applicable, a user name and password.
- Click the browse button (…) for the Package path option and then locate the location to which you want to export the package.
- Optionally, modify the name of the exported package.
- Optionally, click the browse button (…) for the Protection level option, and then update the protection level of the package.
How to run packages using the Package Execution Utility
In SQL Server Management Studio, you can run packages immediately by using the Execute Package Utility or schedule the package to run in a step in a SQL Server Agent job. This chapter focuses on the Execute Package utility. To learn more about running packages in a job, see Chapter 8, "Inside Scheduling Tools."
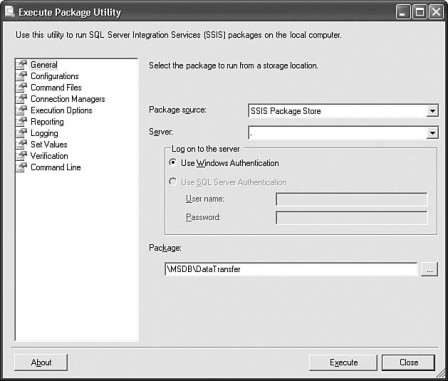
The Execute Package Utility (see Figure 16-50) is a graphical interface on the dtexec command prompt utility; it includes the richness of the dtexec command line options, but it is more intuitive to use. The dtexec command prompt utility configures and runs packages that are saved to SQL Server, the package store, or the file system in a command prompt window. The utility provides access to package configuration and execution features. For example, you can set the values of properties, add logging capability, and specify a different package configuration file. If you are not comfortable running packages from the command prompt or you want to run packages without leaving SQL Server Management Studio, the Execute Package Utility is the tool of choice.
In the Execute Package Utility you can run the packages as they are, or you can use the pages in the user interface to modify the command line options that dtexec uses to run the package. The changes that you make apply only to the current execution instance; they are not saved.
To run a package using Execute Package Utility, right-click the package that you want to run and click Run Package.
Execute Package Utility has separate pages for different categories of options that you might want to configure. For example, the options for modifying all logging features are on the Logging page. You can run the package from any page. Table 16-5 presents a run-down of the pages and options you can set.
Table 16-5 Execute Package Utility Pages
| Page | Options to Set |
| General | Specify the location type, server, authentication mode, and the package to run. |
| Configurations | Add existing configurations files to the list of configurations to use, remove configurations, and modify the order in which configurations load. Remember, the order is important because in the case of multiple configurations updating the same property, the configuration loaded last wins, and in those cases, the configurations simply do not work if their order is not correct. For example, if an indirect configuration points to the location of the configuration file, then the indirect configuration must be loaded before the file. |
| Command files | Add existing command files to the list of command files to use, remove command files, and modify the order in which command files load. Remember that the order is important because in the case of multiple command files, loading the files in the wrong order may create an invalid command line. |
| Connection | Modify the connection strings that the connection managers Managers use. To make the connection string editable, select the check box to the left of the connection manager, and then edit the value in the Connection String column. |
| Execution Options | Specify how to handle package validation errors, modify the maximum number of concurrent executables within the package and choose whether to enable checkpoints. If you enable checkpoints, you can specify the file to which checkpoint information is written and the checkpoint restart option. Before you choose to enable checkpoints and select a restart option, you should read the section, How to Implement Checkpoints in Packages, in this chapter about configuring a package to use checkpoints. Another useful option on this page is the option to only validate the package. For example, you might want to validate the package to ensure changes in the runtime environment do not affect the package. Likewise, if you are changing a significant number of runtime options in the Package Execution Utility, you might want to make sure the package is still valid. |
| Page | Options to Set . |
| Reporting | Select the events, package information, and level of information to report to the console. |
| Logging | Add, modify, or remove the logs to which the package writes. In the Log Provider column, select the type of log provider to use, and in the Configuration String list, select the existing connection manager that points to the location of the log. |
| Set Values | Add, modify, or remove the list of properties of the package or package objects to modify at runtime (in this context, "run time" is usually two words. Runtime does not refer to when, but what. For example, the runtime does this or the runtime does that). In the Package Path column, type the path of the property to set, and in the Value column type the value. |
| The path notation lists the executables, delimited by backslashes, on the path to the object in the package. On the object on which you want to set a property, add ".Properties" and then in brackets, specify the name of the property. | |
| the following sample paths show the paths for package properties and properties on an Execute SQL task in the package, named Run SQL Statement | |
| Package.Properties[Name] | |
| Package.Properties[DelayValidation] | |
| PackageRun SQL Statement.Properties[SqlStatementSourceType] | |
| PackageRun SQL Statement.Properties[SqlStatementSource] | |
| PackageRun SQL Statement.Properties[ResultSetType] | |
| PackageRun SQL Statement.Properties[MaximumErrorCount] | |
| PackageRun SQL Statement.Properties[DelayValidation] | |
| Verification | Specify the attributes to verify to allow the package to run. You can specify the package version to run, the package GUID to run, and the package version GUID to run. You can also specify whether only a signed package can be run. |
| Command Line | View and optionally edit the command line that dtexec will use to run the package. It is important to remember that the edited command line is not validated. If you edit the command line, it is not revalidated prior to package execution. DataTransfer: /DTS "MSDBDataTransfer" /SERVER "." /MAXCONCURRENT " -1 " /CHECKPOINTING OFF /REPORTING V The package is stored in the msdb folder in the package store (the DTS ption and the "MSDBDataTransfer" argument), on the local computer (the SERVER option and the "." argument), without checkpoints (the CHEKPOINTING option and the OFF argument), and reporting is verbose (the REPORTING option and the V argument). Notice that some arguments are enclosed in quotation marks and some are not. If an argument has no white space, it need not be enclosed in quotation marks. If a quoted string contains single quotation marks, you need to escape them by using double quotation marks. Also, in this command line all options begin with a slash (/), but minus sign (-) can be substituted |
How to run packages using the dtexec command prompt utility
You use the dtexec command prompt utility to execute Integration Services packages from the command prompt window. The dtexec command prompt utility supports access to package configuration and execution features. For example, in the command line for dtexec you can configure the package to use checkpoints, use a different configuration than the one specified when the package was designed, and specify the number of executable files that the package can run concurrently. The dtexec utility can run on packages saved to the sysdtspackages90 table in the msdb SQL Server database, the package store, or the file system.
Before taking a closer look at command lines for dtexec, let us briefly cover some basic rules for the command lines:
- Options must begin with a slash (/) or a minus sign (-). A single space delimits commands (like "/").
- The order of the options within the command line is not significant.
- Options and arguments in command lines are not case sensitive, with the exception of passwords. Variable names are case-sensitive and the name specified by the Set command must be a case-sensitive match on the variable name.
- Most options have abbreviations, which you can use instead of the full option name. However, if you are not familiar with the dtexec options, you will probably find that using abbreviations makes the command line a bit more difficult to understand.
- Arguments are strings that contain no white space or are enclosed in quotation marks (like "C:Folder Name").
- Quotes within a quoted argument must be escaped by doubled quotation marks.
In the command line for dtexec, you provide the typical options and arguments; you specify the package to run, the package location type, and the package location. If the location type requires authentication, the command line also includes any applicable password and username (not usually one word).
The following command lines run a package saved to sysdtspackages90 table in the msdb SQL Server database, the package store, and the file system.
To run a package saved to SQL Server using Windows Authentication:
dtexec /Sql MyPackage /Server MyServer
To run a package saved to the package store in the MSDB folder:
dtexec /DTS MSDBMyPackage /Server MyServer
To run a package saved to the file system:
dtexec /File c:MyPackage.dtsx
A few more command line examples should prove useful. To run a package saved to the file system that uses the log file, MyLog.txt, and the XML configuration file, MyPackageConfig.dtsConfig:
dtexec /File c:MyPackage.dtsx /Logger DTS.LogProviderTextFile;c:MyLog.txt /ConfigFile
c:MyPackageConfig.dtsConfig
To run a package saved to SQL Server and set the value of the user-defined variable, MyVariable, defined in the scope of the task, MyTask:
dtexec /Sql MyPackage /Server MyServer /SET ÂpackageMyTask.Variables[User::MyVariable].Properties[Value]; ÂnewValue
To validate the package without running it:
dtexec /Sql MyPackage /Server MyServer /va
How to manage packages using the dtutil command prompt utility
You use the dtutilcommand prompt utility to manage Integration Services packages. The utility can copy, move, delete, or verify the existence of a package. You can run the utility to perform these actions on packages saved to the sysdtspackages90 table in the msdb SQL Server database, the package store, or the file system. The dtutil command prompt utility does not support command files or redirection.
Before taking a closer look at command lines for dutil, let us briefly cover some basic rules for the command lines.
- Options must begin with a slash (/) or a minus sign (-). A single space delimits commands (like " /").
- The order of the options within the command line is not significant.
- Options and arguments in command lines are not case sensitive, with the exception of passwords.
- Most options have abbreviations, which you can use instead of the full option name. However, if you are not familiar with the
dtutiloptions, you will probably find that using abbreviations makes the command line a bit more difficult to understand. - Arguments are strings that contain no white space or are enclosed in quotation marks (like "C:Folder Name").
- Quotes within a quoted argument must be escaped by doubled quotation marks.
When forming the command line for dtutil
You use the En[crypt] option to encrypt the package with the specified package protection level. The syntax is: /En[crypt] {SQL | FILE}; Path;ProtectionLevel[;password]. The first argument indicates the package location type, the second the package path, and the third the package protection level. Depending on the protection level, you may need to include a fourth argument: the password with which the package was encrypted.
To encrypt a package saved to the file system using the password @fIH1K9, you would use the following command:
dtutil /Encrypt File; C:MyEncryptedPackagesMyEncryptedPackage.dtsx;2;
Â@fIH1K9
The dtutil command prompt utility uses numeric values to indicate the protection level. Table 16-6 describes the package protection levels.
Table 16-6 Package Protection Levels
| Level | Description |
| 0 | Removes sensitive information from the package. |
| 1 | Encrypts sensitive information, using the credentials of the local user. |
| 2 | Encrypts sensitive information, using a user-defined password. |
| 3 | Encrypts the package, using the credentials of the local user. |
| 4 | Encrypts the package information, using a user-defined password. |
| 5 | Relies on SQL Server security features to protect the package. |
You use the /I[DRegenerate] option create a new GUID for a package and update the package ID property. When you copy a package, the package ID remains the same and it is impossible to differentiate log entries of the original package and the package copy. If you plan on running both the original and the copy, it's a good idea to regenerate the ID in the copied package. The IDRegenerate option takes no arguments.
To copy and generate a new package ID for a package saved in the file system, you would run the following command:
dtutil /File c:MyFolderMyPackage.dtsx /Copy ÂFILE;c:MyCopyFolderMyCopiedPackage.dtsx
/I
The capability to sign packages is another Integration Services security feature. You can use the /Si[gn] option to sign a package using a digital signature. The Sign option takes three arguments, which are separated by semicolon. The syntax is: /Si[gn] {SQL | File | DTS}; path; hash. The first argument indicates the package location type, the second the package path, and the third the certificate identifier, expressed as a hexadecimal string. The command line uses a sample hash.
To copy and sign a package saved in the file system you would use this command:
dtutil /File c:MyFolderMyPackage.dtsx /Copy ÂFILE;c:MyCopyFolderMyCopiedPackage.dtsx /Sign
ÂFILE;c:MyCopyFolderMyCopiedPackage.dtsx;0x68DE0F55C5E86B70530
ÂD484A39E12CDE13F4741
How to view summaries of package properties
SQL Server Management Studio includes the Summary tab, which can display information about Integration Services folders and packages. If the Summary tab is not visible, press F7 or click Summary on the View menu. You can view information in a list or report format. Figure 16-52 displays the report format. Depending on whether a folder of package is selected, the list and report formats provide different types of information. Lists and reports on folders provide information about the subfolders and packages in the folder, and on packages, lists, and reports they provide information about the selected package. The report on the Running Packages folder lists the running packages.
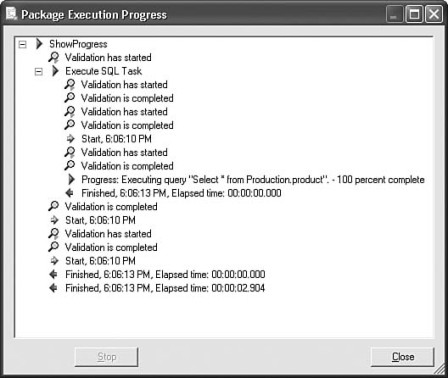
If you run packages by using the Execute Package Utility, you can specify the package version and build version you want to permit to run. The report on the Summary tab lists this information.
Summary
Now you are familiar with the SQL Server 2005 Integration Services concepts and the tools that you use to create, configure, and deploy the packages that are part of an Integration Services solution.
First, this chapter covered Business Intelligence Development Studio, the IDE, in which you create Integration Services projects to manage your Integration Services solutions. You learned about the tools that Business Intelligence Studio provides for building packages, the SQL Server Import and Export Wizard that provides a great way to build simple data transfer packages and to get a head start on complex packages, and SSIS Designer to create enterprise-level packages from the ground up. We delved into SSIS Designer and discussed the design surfaces within SSIS Designer and the package functionality that you build on each surface. Integration Services provides tools for implementing more advanced features in packages, and we covered the tools that are available from SSIS Designer to implement logging, configurations, and variables. Next you explored the tools to create a deployment bundle (a deployment utility, packages, and package dependencies) to use to deploy packages to a test or production environment. After packages are deployed, they can be run and managed in SQL Server Management Studio, and you saw the tools that this environment provides to perform tasks such as importing and exporting packages and setting the roles that control package access. To complete the tools discussion, we talked about the command prompt utilities that you can use to run or manage packages.
After the discussion of concepts and tools, this chapter provided examples of commonly occurring scenarios in each phase of the life cycle of an Integration Services solution, including detailed information about how to configure and use Business Intelligence Development Studio and how to do tasks related to the development, deployment, and management of Integration Services packages.
This chapter did not cover all the individual tools that Integration Services provides to configure connections and the control flow and data flow elements in packages. For example, we touched only on the tools for the control flow elements that implement looping, the For Loop and Foreach Loop containers that are new in Integration Services. Books Online, the documentation, provided with SQL Server 2005, contains information about the many tools that you can use to configure the tasks, sources, transformations, destinations, and connection managers that Integration Services includes.
Use the following table of contents to navigate to chapter excerpts, or click here to view Inside Integration Service Tools in its entirety.
About the book
Microsoft SQL Server 2005's high-powered management tools can dramatically improve DBA productivity and effectiveness. Now there's a comprehensive guide to SQL Server 2005's toolset, straight from the Microsoft team that created it. This book covers the entire toolset in unprecedented depth, guides database professionals in choosing the right tools, and shows them how to use various tools collectively to solve real-world problems. Purchase Inside SQL Server 2005 Tools from Addison-Wesley.
About the author
Lead author Michael Raheem is a senior product manager in the SQL Server Marketing team at Microsoft. Michael currently leads the SQL Server enterprise marketing efforts, including high availability, scalability, performance, and SQL Server Always On Technologies. Prior to joining the marketing team, he led the design and implementation of several SQL Server 2005 tools such as Management Studio, Upgrade Advisor, Database Mail and Surface Area Configuration. Michael has spoken at several conferences, including TechEd, TechReady, PASS and SQL Connections. Additionally, he has contributed to the Answers from Microsoft column in SQL Server Magazine and has over 13 years of experience in designing and developing solutions with Microsoft SQL Server. Follow him on Twitter @msraheem.


