Sergey Nivens - Fotolia
How to perform a Windows Subsystem for Linux install
Want to run Linux on a Windows desktop? Take these steps to perform a Windows Subsystem for Linux install, which includes downloading a distribution and providing authentication.
The Microsoft Windows Subsystem for Linux is a tool that allows users to access a GNU/Linux environment natively on a Windows desktop. This environment executes natively within the Windows operating system, so you don't need a virtual machine or Hyper-V.
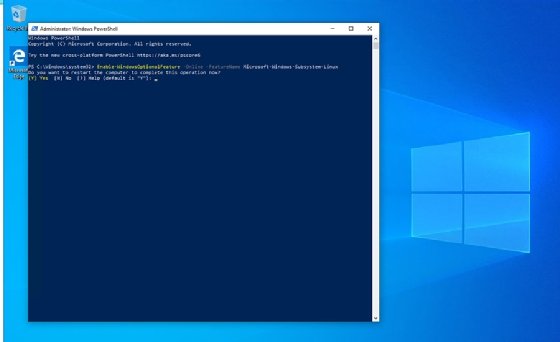
The Windows Subsystem for Linux install is a relatively simple process, but it does require Windows PowerShell. To complete the Windows Subsystem for Linux install, open an administrative PowerShell session and execute the following command: Enable-WindowsOptionalFeature -Online -FeatureName Microsoft-Windows-Subsystem-Linux.
Once you install the Linux subsystem (Figure 1), you will need to reboot the system.
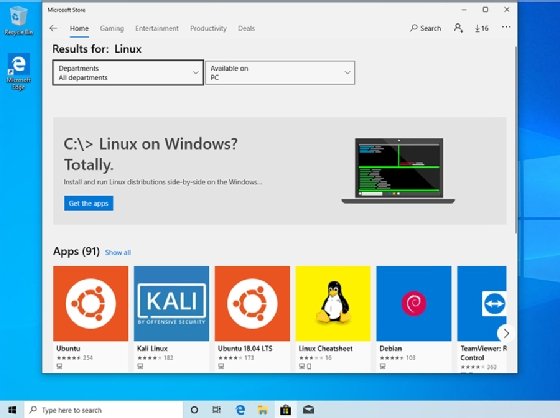
Although the previously discussed PowerShell command performs the Windows Subsystem for Linux install, you must perform an additional step. Before you will be able to run Linux commands on Windows, you will need to install a Linux distribution. The easiest way to do this is to open the Microsoft Store, and then enter the word "Linux" into the search box. Upon doing so, you will see a Linux on Windows prompt (Figure 2).

Click the Get the Apps button, and you will be taken to a screen that allows you to download one of several free Linux distributions. The distributions that are currently available include:
- Ubuntu
- OpenSUSE Leap 15.1
- Kali Linux
- Debian
- Alpine WSL
- SUSE Linux Enterprise Server

If you are in doubt as to which Linux distribution to install, click on each one individually and read the descriptions. Each build has its own unique features, capabilities and intended use. Ubuntu, for example, allows you to run native Linux commands in Windows and includes the Ubuntu Terminal. Likewise, openSUSE Leap 15.1 is geared toward developers, while Kali is intended for use in penetration testing applications.
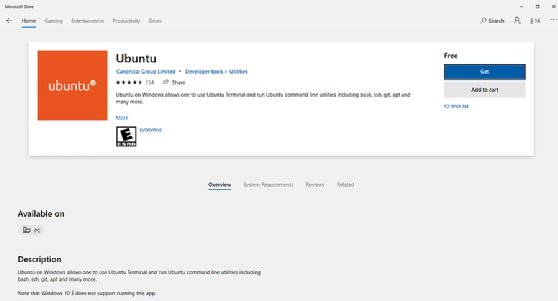
Once you select a Linux distribution, click on the store's Get button (Figure 3). This will cause Windows to begin downloading and installing the distribution that you have selected.

The process of launching the Linux distribution varies depending on which distribution you have chosen to install. If you look back at Figure 3, you will notice that there is a Description section at the bottom of the screen. Although it is not shown in the screen capture, scrolling through the description will usually reveal instructions for launching the Linux distribution. In the case of Ubuntu, for example, the description indicates that you can either type Ubuntu into a Command Prompt window, or you can launch Ubuntu from the Start menu.
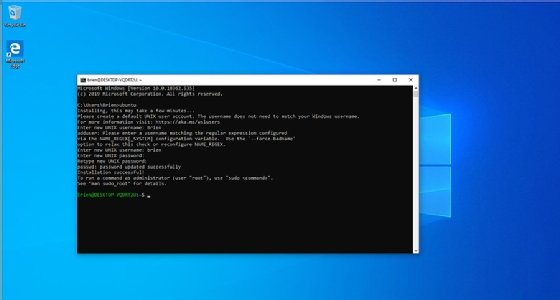
When the Linux distribution starts for the first time, it may ask you to provide a username and password. The Linux distribution maintains its own authentication system that is separate from the one that Windows uses. This means that you won't be able to use your Active Directory credentials to log into the Windows Subsystem for Linux. It also means that your username and password do not have to match the one used to log into Windows (Figure 4).

You can deploy the Microsoft Windows Subsystem for Linux to an individual machine in the above method, but there are ways that you can deploy this feature in bulk. One option is to use Microsoft Intune or a similar utility to push the Windows Subsystem for Linux to managed clients.
If you prefer to perform a bulk deployment using only native tools, then the easiest thing to do is to create a PowerShell script and then execute the script when a user logs on to their machine. Here is what such a script might look like:
Enable-WindowsOptionalFeature -Online -FeatureName Microsoft-Windows-Subsystem-Linux
Invoke-WebRequest -Uri https://aka.ms/wsl-ubuntu-1604 -OutFile Ubuntu.appx -UseBasicParsing
Add-AppxPackage .\Ubuntu.appx


