
filo/DigitalVision Vectors via G
How to repair Windows 11 with an ISO file
Wiping and reinstalling with a clean install is the simplest way to fix a broken Windows 11 desktop, but an ISO file repair can help save some of the desktop's settings and files.

Windows 11 desktops might experience problems to the point that IT has little choice but to reinstall Windows. In some of these instances, an ISO file is the best option.
Determining how and when to use the ISO repair can be a bit more complicated. As a Windows administrator, you should learn about the benefits of using an ISO file to repair a desktop and how to properly apply the ISO install.
Why use an ISO file to repair a Windows desktop?
There are several options for repairing a Windows 11 installation. Enterprise IT departments often resort to automatically reimaging the OS rather than attempting to repair it. Large organizations find this approach to be quicker and more cost-effective than repairing an ailing Windows system. However, if an organization lacks the infrastructure required to push a deployment image to a Windows 11 machine, repairing Windows 11 might be the best option.
It's possible to repair a Windows 11 installation without having to resort to using an ISO file. To do so, click on Settings in the local desktop, and then make sure that the System option is selected. Next, click on Recovery, and then click the Reset PC button. From there, you can follow the prompts to complete the Windows reset process.
Although this is often the preferred technique for repairing Windows 11, it does have one major shortcoming. If the problems that are occurring within the Windows 11 OS are happening as a result of hard disk corruption, it's entirely possible that the files used to reset and repair Windows might also be corrupt. The same also holds true if the system was damaged by a malware attack. In these cases, there are no guarantees that the files needed to repair the OS are still functioning.
Using an ISO file to repair Windows enables you to fix the problem using known-functional copies of the Windows system files.
How does an ISO repair install differ from a normal install?
An ISO file is essentially just a DVD image file. At one time, it was common practice to install Windows from an installation DVD. However, it's now somewhat rare for PCs to be equipped with DVD drives. An ISO file can take the place of a DVD, thereby negating the need for physical installation media. To use an ISO file to repair Windows 11, the faulty machine must be at least somewhat functional. In extreme cases where the desktop's issues prevent you from completing the repair process, you might be able to boot Windows 11 into Safe Mode prior to attempting the repair.
Regardless of whether you're installing Windows 11 from a physical DVD or from an ISO file, there's a significant difference between a normal installation and a repair installation. Typically, installing Windows results in a clean installation. Unless you're upgrading a prior version of Windows, the new Windows installation runs a default installation.
In contrast, performing a repair installation reinstalls Windows 11 without overwriting anything important in the process. In other words, the Setup program does not format the system's hard disk. Windows 11 Setup also makes a concerted effort to preserve all the files, apps and settings that are present on the system. You should keep in mind that existing files, apps or settings could be what's causing the problem, so a repair install from an ISO file is not guaranteed to fix the problem.
Using an ISO file to repair Windows 11
The first step of using an ISO file to repair Windows 11 is to find an ISO file that meets your requirements. Many organizations maintain a collection of ISO files that are readily available for such situations. However, if you do not have an ISO file at your disposal, you can download a Windows 11 ISO file directly from Microsoft. The nice thing about using the Windows 11 download site is that the ISO is based on the current Windows 11 release, meaning there probably aren't many updates that you need to install when you finish repairing Windows.
As a best practice, it's a good idea to create a backup before attempting to repair Windows. Even though Windows 11 Setup is designed to preserve files, settings and apps, things can and occasionally do go wrong. It's also possible that the Setup process could end up deactivating your Windows license or other software licenses. As such, you might have to perform various cleanup tasks, such as entering a product key, when you're done.
To get started, copy the ISO file to an empty folder on the computer that needs to be repaired. Next, right-click on the ISO file, and select the Mount command from the resulting shortcut menu. This causes the ISO file to be mounted as a virtual DVD drive. Windows assigns a drive letter to the virtual DVD drive, and all of the files contained within the ISO file are accessible through the drive mapping.
With the ISO file mounted, double-click on the Setup.exe file. This causes Windows to launch Windows 11 Setup. Click Next, and Setup then performs a quick update check. When this check is completed, a prompt asking you to accept the Windows 11 licensing terms should appear. At this point, an additional, more time-consuming update check might occur.
It's possible to skip the update check to save time, but this is generally a bad idea. Skipping the update check can lead to a situation in which the ISO file is older than the version of Windows that is installed on the PC. When that happens, the only option is to either restart Setup and download the updates or to perform a clean Windows installation rather than repair the system.
At this point, the computer should show a screen confirming the action that Setup is about to take (Figure 1).
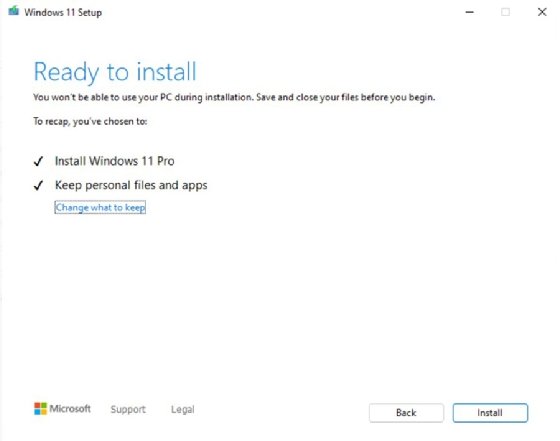
Notice that Setup is indicating that it installs Windows 11 Pro and keeps personal files and apps. This means that Setup is going to attempt to repair the Windows OS, but it will also try to preserve all the files, settings and apps that presently exist. If you decide that you don't want to preserve anything and prefer to simply overwrite the old copy of Windows with a clean install, you can click on the Change what to keep link and select the Nothing option from the screen that appears (Figure 2).
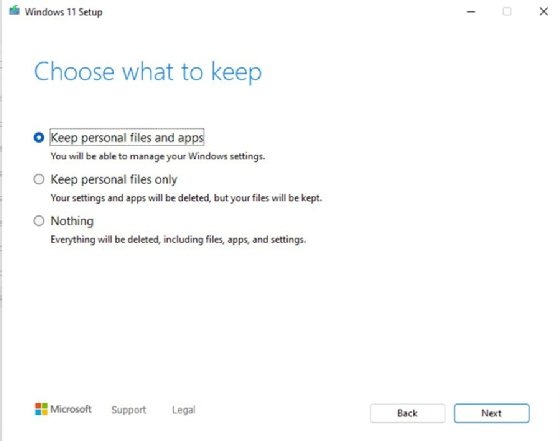
There's also an option to keep only personal files but not applications or settings. All you have to do is make your selection and click Next, followed by Install. Setup does the rest.
Many organizations rely on distributed workforces, diverse hardware fleets and limited on‑site support -- all of which make traditional reimaging workflows harder to execute consistently. Having a reliable, repeatable repair method that preserves user data and minimizes downtime gives admins a useful middle ground between full redeployment and time‑consuming manual troubleshooting. As such, ISO‑based repair installs help IT maintain stability without disrupting productivity.
Brien Posey is a former 22-time Microsoft MVP and a commercial astronaut candidate. In his more than 30 years in IT, he has served as a lead network engineer for the U.S. Department of Defense and a network administrator for some of the largest insurance companies in America.