
Getty Images/iStockphoto
How to fix Windows 11 desktops after CrowdStrike outage
IT administrators had to jump into action after the CrowdStrike outage to recover faulty desktops. Learn how to use the Microsoft Recovery Tool to fix Windows 11 issues.

The July 19, 2024, CrowdStrike outage was one of the most consequential IT incidents in history, affecting approximately 8.5 million systems worldwide, and it left IT administrators with the difficult task of recovering affected Windows desktops.
The incident caused severe disruptions for the airlines, but also caused major problems for many other industries including healthcare, banking and retail, just to name a few.
CrowdStrike's software is designed to help organizations protect their systems against cyberattacks and is widely used by organizations around the world. This incident occurred as a result of CrowdStrike pushing a faulty update that caused affected Windows PCs to suffer an out-of-bounds memory read error, which in turn triggered an invalid page fault error. The infamous blue screen of death was displayed on most of these machines.
CrowdStrike has taken steps to fix the problem. Additionally, Microsoft released a tool designed to help affected customers bring their Windows PCs back online -- even though Microsoft had nothing to do with this particular outage.
How to use the Microsoft Recovery Tool to fix issues related to the CrowdStrike outage and others
These steps explain how to fix a Windows desktop affected by the CrowdStrike outage, but they can help fix many different Windows 11 issues.
To get started with the Microsoft Recovery Tool to repair a PC as a Windows administrator, you will need to use a functional PC to download Microsoft's recovery tool. This download consists of a zip file that you should extract to a folder on your computer. Once you have done so, open an elevated PowerShell session and then launch the PowerShell script that is contained within the zip file. The name of the script is MsftRecoveryToolForCSv21.ps1.

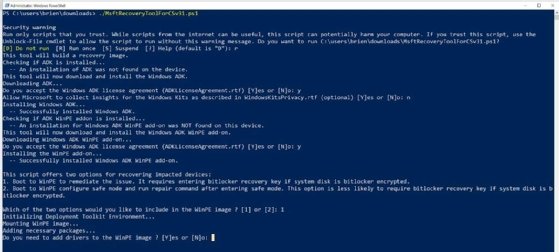
The script begins by checking to see if your computer has the Windows Assessment and Deployment Kit, better known as Windows ADK, installed. If the tool is not found on the system, then the script will prompt you to accept the Windows ADK license and download the Windows ADK tool, as shown in Figure 1.
When the Windows ADK installation process finishes, the PowerShell script will check to see if the Windows ADK WinPE add-on is installed. If this add-on is not found, you will be prompted to accept the license agreement and install the add-on.
You will be prompted to install the Windows ADK WinPE add-on, unless it is already on your system.
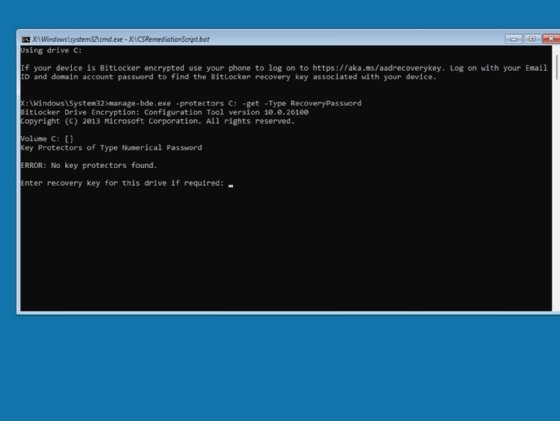
Once Windows ADK and the Windows ADK WinPE add-on have been installed, the script asks you which of two options you would like to use in recovering your PCs. The first option, shown in Figure 2, is to boot affected machines to WinPE. The second option involves booting machines into Safe Mode.

Either option will work, but there are a few things to consider. First, keep in mind whether your Windows PCs are BitLocker encrypted. If BitLocker is in use, then booting to Safe Mode is generally going to be the easier option. If you boot a BitLocker-encrypted PC into WinPE, then you will be required to manually enter the BitLocker key. That might not be a big deal if you have a small number of PCs and you actually know the keys are in use, but manually entering BitLocker keys is going to be impractical if you have to repair a large number of PCs.
Another consideration is the Windows versions that are in use. For example, if you have some PCs running 32-bit versions of Windows then you probably aren't going to be able to use a 64-bit version of WinPE to repair those PCs. You might also run into problems if you are supporting multiple Windows versions or if you have made customizations to low-level operating system files.
Whether you choose the WinPE option or the Safe Mode option, you will have the opportunity to use the WinPE image to add any additional drivers that may be required (Figure 3).
Regardless of which of the options you choose, the tool will ask you whether you want to create an ISO file or if you want to prepare a USB flash drive, as shown in Figure 4.

If you opt to use the USB flash drive option, the flash drive that you supply must be empty -- any existing data will be deleted. It's best to use a flash drive that supports USB 3.0 because it will allow for a faster recovery.
If you opted for the WinPE option, the repair process is effortless aside from entering your USB key -- if required. Just boot the machine from the media that you have prepared. Upon doing so, you will have a chance to enter your BitLocker key, as shown in Figure 5. If the machine is not BitLocker encrypted, then just press Enter.
At this point, WinPE automatically goes to work cleaning up the system. There is a chance that you may have to relicense your machine when the process is complete. This example uses WinPE recovery on a lab machine in my environment, and in this case Windows reverted to the Windows Enterprise Evaluation license.
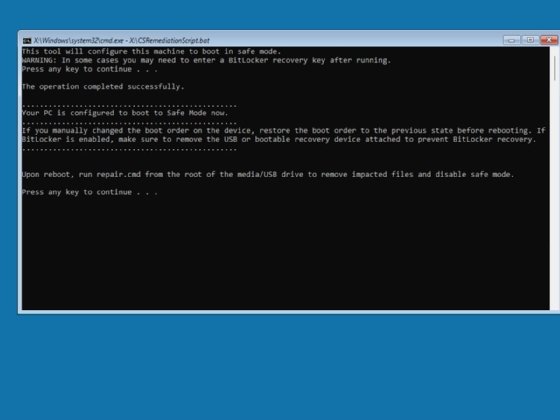
If you choose to use the Safe Mode option, then when you boot your PC from the recovery media, you will see a warning message indicating that the machine is about to be booted into Safe Mode, as shown in Figure 6. Press a key to complete the boot process.
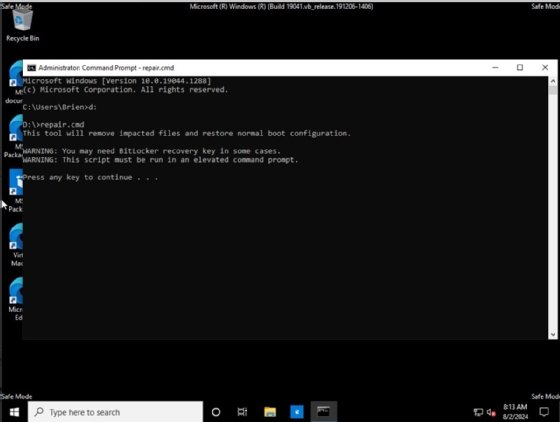
Now, allow the machine to boot and then launch an elevated Command Prompt window. Then switch to your boot media and run the Repair.cmd file, found in the media's root folder (Figure 7).
When prompted, press a key and the system will perform a cleanup and reboot. There is a chance that you may have to relicense the machine when you are done, but this is a small concern compared to the larger issue of completely unusable desktops.
Brien Posey is a 22-time Microsoft MVP and a commercial astronaut candidate. In his more than 30 years in IT, he has served as a lead network engineer for the U.S. Department of Defense and a network administrator for some of the largest insurance companies in America.