Getty Images/iStockphoto
How to deploy macOS compliance controls via Intune
Intune administrators can use many of the same mechanisms to manage compliance policies for Windows and macOS desktops alike. Learn how to create those policies for Macs.
Organizations that deploy Apple devices such as macOS desktops must ensure they all have the same security and compliance policies.
The good news is that macOS devices aren't all that different from Windows devices and management platforms such as Intune can manage multiple OSes. At a minimum, the IT team should require the device to use a password and then set some basic length and complexity requirements. Beyond that, organizations could consider encrypting the device, enabling a firewall, or preventing the use of outdated OS versions.
With the security basics in place, as an Intune administrator you might need to deploy compliance policies to ensure the Mac endpoints meet any standards of data governance, authentication requirements, software blocklists and allowlists and any other compliance rules.
How to create a Mac compliance policy with Intune
To get started, log into the Microsoft Intune Admin Center and click on Endpoint Security followed by Device Compliance. Then click on Compliance Policy Settings. The Compliance Policy Settings screen gives you the option to choose what to do when a device has no compliance policy assignment. It also lets you set the compliance status validity. As a best practice, you should assume that devices with no compliance policy assigned are noncompliant. You might also want to reduce the compliance status validity.
At this point, you can create a device compliance policy for your macOS devices. Begin by selecting the Policies tab, then click on the Create Policy icon. At this point, you will be prompted to select a platform. Choose the macOS option and then click Create.
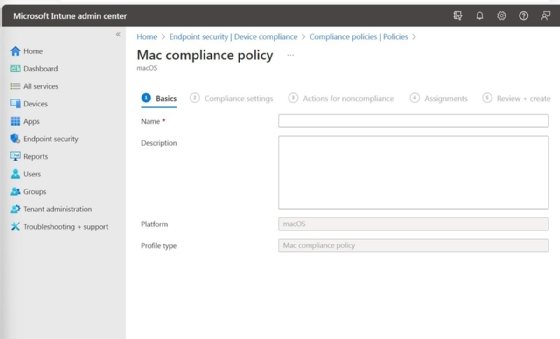
Intune will launch the Mac Compliance Policy Wizard. This wizard walks you through five tabs, starting with the Basics tab, shown in Figure 1. At a minimum, you will need to assign a name to this policy. However, Microsoft also provides a Description field that you can use to create a detailed policy description. It's always a good idea to document your policies in case another administrator needs to revise a policy in the future.

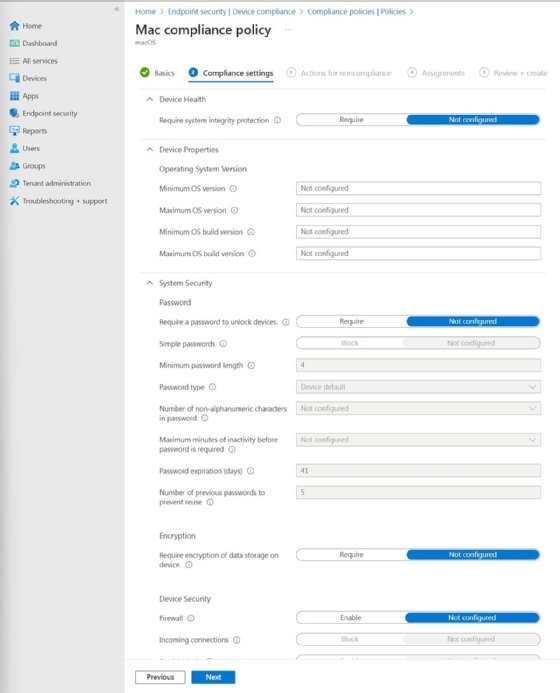
Click Next, and you will be taken to the Compliance Settings screen. This is where you define your compliance requirements. These requirements fall into three categories -- Device Health, Device Properties and System Security.
- Device Health. This section includes a single setting with only two options. You can choose whether you want to require system integrity protection to be enabled on devices.
- Device Properties. This section allows you to define some basic compliance requirements related to the OS version. You can define the minimum OS version, the maximum OS version, the minimum OS build number and the maximum OS build number that you want to allow. In this field, you should leave any fields that don't pertain to a specific policy set to Not Configured. The simpler the policy, the less likely it is to catch false positives and cause issues for compliant devices.
- System Security. This section is far more extensive than the Device Health and Device Properties sections, and contains numerous settings. You can see some of these settings in Figure 2.

Many of the System Security settings are password related. You can specify the password length, type, complexity and other password related settings. The System Security section also contains an Encryption section where you can require encryption for any data stored on the device.
Just beneath the Encryption section, you will find a Device Security section. This section allows you to require the device firewall to be enabled. You can also allow or block inbound connections to the device, and there is an option to require that Stealth Mode is enabled.
The last section is the Gatekeeper section. This section contains only a single setting pertaining to where apps can be installed from. For example, you could allow users to only install apps from the Mac App Store, or even more specifically from certain developers. Of course you can always choose to allow apps from anywhere.
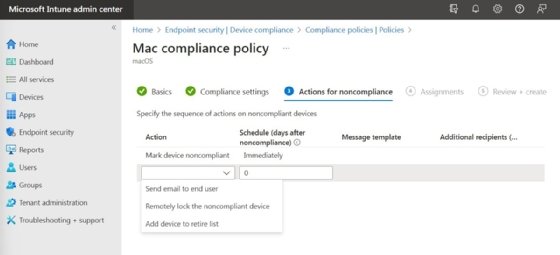
Once you have configured the compliance settings, click Next and you will be taken to the Actions for Noncompliance screen, shown in Figure 3. This screen allows you to determine what to do if a device is found to be noncompliant.

When a device is found to be out of compliance, you can choose to send an email to the user, remotely lock the device or even retire the device. There is also a schedule setting you can use to control how quickly action is taken.
Click Next, and you will see the Assignments screen. Here, you can select the users, groups or devices that the compliance policies will apply to. You also have the option to exclude groups if necessary.
Click Next, and you will see the Review + Create screen. Take a moment to thoroughly read the summary information that is displayed on this screen. If everything appears to be correct, click the Create button to create the policy.
Brien Posey is a 15-time Microsoft MVP with two decades of IT experience. He has served as a lead network engineer for the U.S. Department of Defense and as a network administrator for some of the largest insurance companies in America.


