
ArchMen - Fotolia
How to create an Windows 10 unattended installation
A Windows 10 unattended installation can help IT immensely. One of the key steps along the way is creating an answer file, which includes understanding the Windows Setup workflow.
A Windows 10 unattended installation for the Creators Update -- Version 1703 Build 15063 or later -- makes the install process more efficient. To do so, you must create an answer file with Microsoft's sysprep utility.
First, you must install the Windows Assessment and Deployment Kit (Windows ADK) then run Windows System Image Manager (Windows SIM) from Start > Windows Kits > Windows ADK > WSIM. To create a new answer file, you must first create a catalog file. To do so, copy the install.wim file from your Windows install media -- the same image file you use to install Windows 10 on a technician virtual machine -- from the Sources folder to a writable location. You cannot create a catalog if install.wim is write-protected or stored in a nonwritable form, such as an ISO file.
When you copy install.wim to your host desktop, select File > New Answer File. Then, browse to install.wim, and let Windows SIM create the catalog.
Add components to the answer file
Once Windows SIM creates the catalog, it opens an empty answer file. You must fill the answer file with components, each of which includes one or more settings from various configuration passes. To create a Windows 10 unattended installation, you must ensure that Windows Setup does not require user input. This means you must add two components to configuration pass 1:
- Microsoft-Windows-International-Core-WinPE
- Microsoft-Windows-Setup
To add a component to an answer file, expand Components in the Windows SIM Image pane. Right-click a component, and select where you'd like to add it.
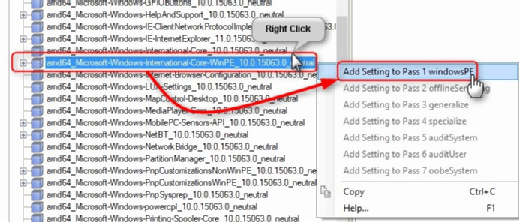
You can only use the Core-WinPE component during pass 1. Repeat the preceding steps to add Microsoft-Windows-Setup to pass 1.
Add properties to the various settings with Windows SIM
You must select a component in the Answer File pane, then add or change properties of related settings in the corresponding Properties pane:
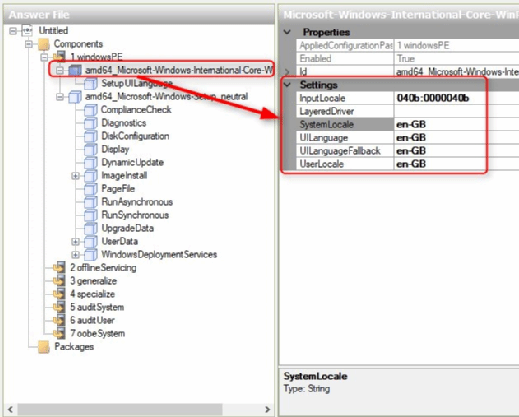
In Figure B, the computer and user location are set for the United Kingdom -- en-GB for answer file.
Expand International-Core-WindowsPE, enter OS language for setting SetupUILanguage:

This takes care of the inception of Windows Setup. That's when Setup prompts you to select a region, an OS language and a preferred keyboard layout.
The Windows Setup workflow
By default, Windows Setup prompts you to accept the End-User License Agreement (EULA), to enter a product key and to select a disk where you will install the OS. For the disk, you may use existing partitions, wipe out existing disk partitioning and create a custom partition scheme, or let Windows create system partitions and use the rest of the disk for the OS partition.
To create a Windows 10 unattended installation, first accept the EULA. To do that, expand the Setup component, and select UserData. Then, click the AcceptEula properties box to open a drop-down list with a value named true (Figure D):
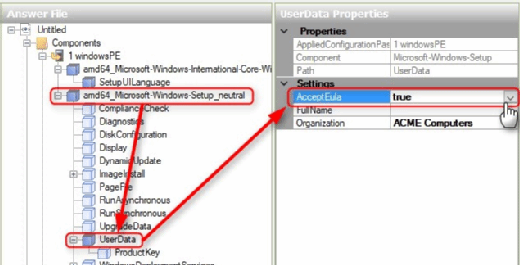
Selecting true in this case means the answer file provides the desired value and the installer doesn't have to wait for a human response to the question, "Do you accept the software license?"
To skip the product key prompt and activate Windows later, expand UserData, select ProductKey and enter a generic Windows 10 key. Generic keys are valid only when installing Windows. You cannot use them to activate Windows. If you use this image to install Windows 10 on a PC that already has the same edition activated, Windows automatically activates based on its digital license, derived from the device's hardware signature.
With digital licenses, you can install and activate Home, Pro and Education editions on a single laptop, for example. Then, you can select any of those editions when you reinstall, skip the product key and automatically activate Windows, because the laptop has a unique digital license for all three editions.
Activating the Enterprise edition requires a volume license or subscription-based Enterprise E3 or E5 license. You can use either the Volume Licensing Service Center or your subscriptions to obtain such keys, after which you can activate paid-for licenses.
Disk configuration and partitioning
You configure a single hard disk for GPT partitioning on a Unified Extensible Firmware Interface (UEFI)-based PC. You should use default Windows system partition sizes and convey all remaining free space available after you set up system partitions to the Windows partition.
To add additional disks and configure a Master Boot Record (MBR)-partitioned disk on a basic input/output system (BIOS)-based machine, disk configuration and partitioning require you to prepare the autounattended.xml file and install media separately for MBR and GPT. The customized and captured Windows image can be the same, but when you create an ISO image for a Windows 10 unattended installation, you must do so separately for MBR and GPT installs.
Right-click the component named DiskConfiguration, then select Insert New Disk:
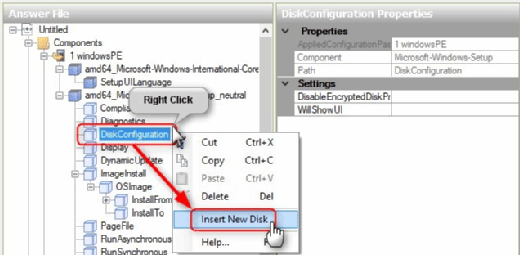
Select a newly added disk component. On its Properties pane, set DiskID = 0 and WillWipeDisk = True to wipe the disk drive before creating new partitions:

To expand the new disk, right-click CreatePartitions, and select Insert New CreatePartition:
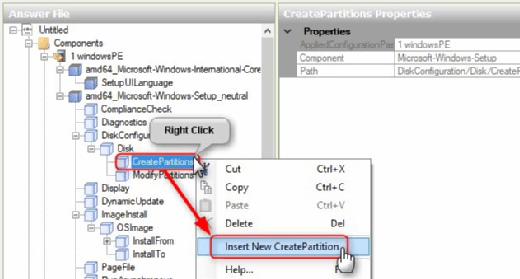
A GPT-partitioned Windows 10 disk needs a minimum of four partitions for a Windows 10 installation --namely:
- Windows Recovery Environment (WinRE): 450 MB;
- EFI System: 100 MB;
- Microsoft reserved partition (MSR): 16 MB; and
- OS: At least 20 GB
If you want to configure additional hard disks, add new disks in the same way you already did.
Additional UEFI/GPT disks need two or more partitions -- a 16 MB MSR partition and a normal New Technology File System (NTFS) partition. You can also divide the disk into multiple partitions, where formatting, drive letters and labels apply only to data partitions, not MSR.
A BIOS-based machine with an MBR-partitioned system disk needs only two partitions -- a 100 MB System Reserved partition and an OS partition with letter C. Both partitions should be formatted as NTFS, System Reserved and active. For data disks, one partition will do. Data disks get a normal NTFS partition with a drive letter assigned.
To partition UEFI/GPT, edit the properties for all four partitions. Start with the WinRE partition, where you'll set the following values:
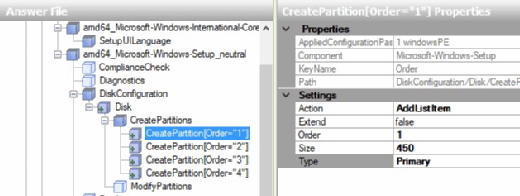
Here are values for all four CreatePartition components:
1. CreatePartition (WinRE):
- Extend = false
- Order = 1
- Size = 450
- Type = Primary
2. CreatePartition (EFI):
- Extend = false
- Order = 2
- Size = 100
- Type = EFI
3. CreatePartition (MSR):
- Extend = false
- Order = 3
- Size = 16
- Type = MSR
4. CreatePartition (OS):
- Extend = true
- Order = 4
- Size = Leave empty!
- Type = Primary
To format these partitions, label them, assign drive letters, right-click ModifyPartitions and then select Insert New ModifyPartition:
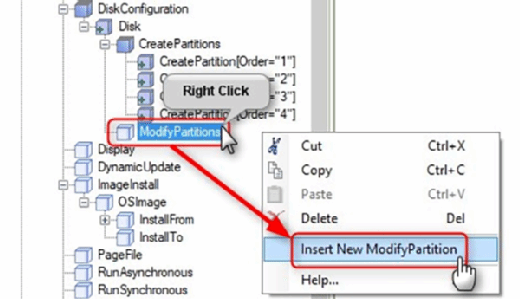
As with CreatePartitions, repeat this three more times. One by one, select the ModifyPartition component, and change its properties. Figure J shows the WinRE partition properties:
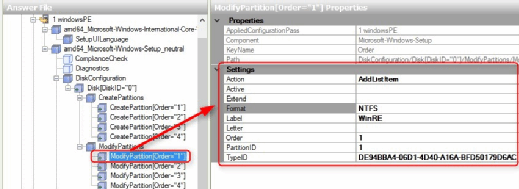
Here are values for all four of the ModifyPartition components:
1. ModifyPartition (WinRE):
- Format = NTFS
- Label = WinRE
- Order = 1
- PartitionID = 1
- TypeID = DE94BBA4-06D1-4D40-A16A-BFD50179D6AC
2. ModifyPartition (EFI):
- Format = FAT32
- Label = System
- Order = 2
- PartitionID = 2
3. ModifyPartition (MSR):
- Order = 3
- PartitionID = 3
4. ModifyPartition (OS):
- Format = NTFS
- Label = Windows
- Letter = C
- Order = 4
- PartitionID = 4
You must edit the properties of one last component. Expand the component named ImageInstall, expand OSImage, select InstallTo and enter DiskID = 0, PartitionID = 4 and DiskID = 1. This tells the installer where to put the Windows OS image.
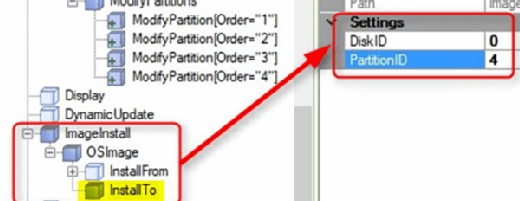
You can now remove all unused components on the Answer File pane by right-clicking them and selecting Delete. Or you can save the answer file as autounattend.xml from File > Save Answer File As, then select File > Close Answer File and reopen it with File > Open Answer File.
Reopening the answer file runs a validity check. After reopening the file, the Messages pane should read, "No warnings or errors."
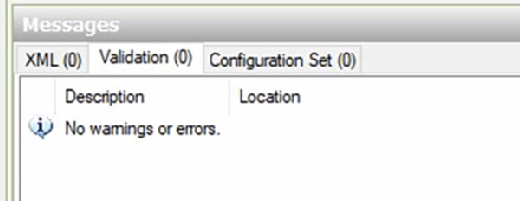
You can also validate your answer file from Tools > Validate Answer File. If there are errors, you have to start over.


