Rawpixel - Fotolia
How to add MDT applications with Chocolatey package manager
The Microsoft Deployment Toolkit allows administrators to install applications during deployment. Here's how IT can simplify the process with Chocolatey's command-line input.
IT admins can ease the Windows application installation process with two key tools: the Microsoft Deployment Toolkit and Chocolatey.
The Microsoft Deployment Toolkit (MDT) is a free program that integrates with Microsoft System Center Configuration Manager and enables IT to automate Windows desktop deployments. Microsoft releases new versions of MDT with each Windows 10 features update.
One major benefit of MDT is that IT can install applications when deploying new desktops. The simplest method to achieve this is to run a Windows command. The Chocolatey package manager is a command-line application installer that can add, update and uninstall programs in the background. Because Chocolatey uses the Windows command line, it is a perfect candidate to deploy MDT applications.
Types of MDT app installations
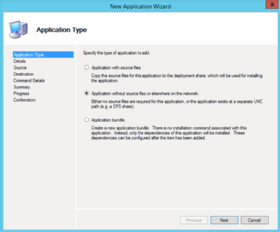
There are three types of MDT applications IT can add: an application with its source files, an application without its source files and an application bundle that only installs its dependencies.

When using the Chocolatey package manager, the application source installer will either be embedded into a NuGet file or it will be kept at a different location. Chocolatey downloads these files from the command-line input, so IT should select Application without source files or elsewhere on the network (Figure A) when installing.
Chocolatey uses software repositories to store Chocolatey packages or NuGet files. These packages can take various forms, but they usually become web servers or network shares. IT administrators typically use their own internal repositories that their Chocolatey clients point to.
Installing an application
IT pros need to install and configure the Chocolatey manager and repository in the task sequence before they add a package. They can also do this in MDT by running the following command in the application:
Set-ExecutionPolicy Bypass -Scope Process -Force; iex ((New-Object System.Net.WebClient).DownloadString('https://chocolatey.org/install.ps1'))
IT can replace https://chocolatey.org with the host name of the organization's internal repository with the latest version of the Chocolatey server package.
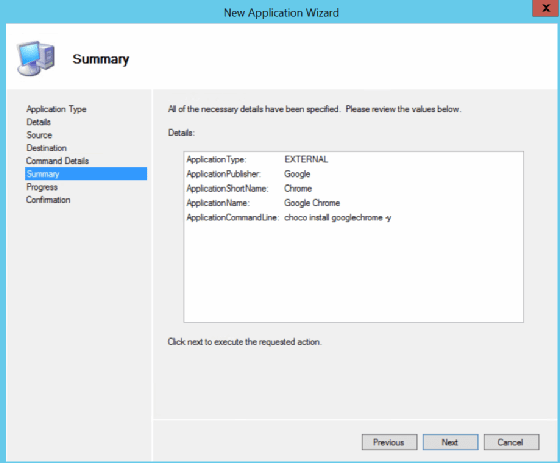
It is fairly simple to create a Chocolatey package in MDT. Under the deployment share in the MDT graphical user interface, the application summary will look like this:

The critical field is the ApplicationCommandLine (Figure B), which installs the Chocolatey package. The command line choco install googlechrome -y installs the latest version of Google Chrome in the internal Chocolatey repository. When IT uses this command during a new machine's deployment, it will install the latest version of Google Chrome.
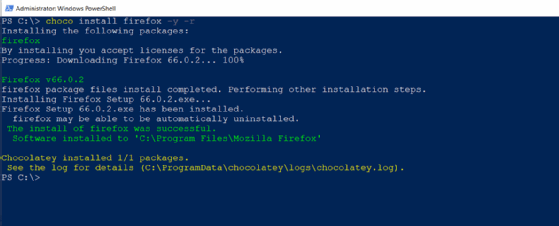
Now, IT can add that application to a task sequence. During the deployment, a command prompt will appear and Chocolatey will install the package (Figure C).

The default alternative to this is to use the native Google Chrome install command and constantly change the installer on the network to the latest version. This is much more difficult than using the internal Chocolatey repository, which recompiles Chocolatey community packages when new versions of the application release.
Chocolatey with PowerShell
For packages stored in an internal Chocolatey server, IT can add applications to MDT by running a PowerShell script. This should run on the MDT server.
The two variables here are the MDT root of the deployment share -- $MDTRoot -- and the name of the Chocolatey server from which to install software -- $NuGetServer.
$MDTRoot = E:\MDT
$NuGetServer = 'myserver'
Add-PSSnapin Microsoft.BDD.PSSnapIn
New-PSDrive -Name "MDT" -PSProvider "MDTProvider" -Root $MDTRoot
$NuGetPackages = choco list --source=$NuGetServer -r
ForEach ($NugetPkg in $NuGetPackages)
{
$PackageName = $NugetPkg.Split('|')[0]
$Version = $NugetPkg.Split('|')[1]
Import-MDTApplication -Path 'MDT:\Applications\test' -Name $PackageName -NoSource -Commandline "choco install $PackageName --source=$NuGetServer --version=$Version -y" -Shortname $PackageName -Version $Version -Enable "True"
}
In this example, the MDT applications correspond to a specific software version. This is not necessary if administrators want MDT to install the latest version. After this runs, admins can add the internal Chocolatey packages to the MDT task sequences.


