EI.cfg and PID.txt Install Windows License Info
If you frequently install Windows, here’s a trick to forestall version identification and license requests during the process. As documented in a TechNet article, you must out two files in \Sources to make this happen. The first is named EI.cfg, and stands for “Edition ID.” The second is named PID.txt, and supplies the product key for Windows. My guess is that PID stands for something like “Product ID.” Together, EI.cfg and PID.txt install Windows license info automatically, without requiring user input during the install process.
How Do EI.cfg and PID.txt Install Windows License Info?
I’ll provide basic info here. But you can consult TechNet for the details. The article is entitled “Windows Setup Edition Configuration and Product ID Files (EI.cfg and PID.txt).” And though it’s labeled as “…archived and … not being maintained,” it still works fine for Windows 10. At least, as of Version 1607 (production) and Insider Preview 15031 as I write this post.
Creating EI.cfg
Notepad or any plain text editor is what you want for both of these files, which should go into the \Sources directory on the installation media. Note: you can use the tool named UltraISO to deposit them directly inside an ISO file you may have built yourself or downloaded from MS. (Note: it costs $30 but is worth it, especially if you’re using a Volume License key which needs doing only once.)
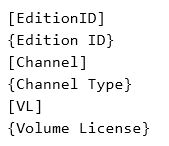
The format of the EI.cfg file is as follows:
The stuff in square brackets you leave alone, the stuff in curly braces needs replacing. For {Edition ID} use the name of the edition you’re installing (Home, Pro, Enterprise, or Education). For {Channel} the value must either be “OEM” or “Retail”. Unless you’re an OEM, that means retail. If you’re using a volume license, the value for {Volume License} must be 1, otherwise 0 (zero). That’s it!
Creating PID.txt
If you thought the EI.cfg file was easy — and it is — PID.txt is simpler yet. It contains two lines. The first reads “[PID]” (omit the quotes, they’re just there to show you what to type. The second reads “Value=XXXXX-XXXXX-XXXXX-XXXXX-XXXXX” where you’ll substitute an actual and valid 25-character Windows key for the string of X’s. And that’s that!

