DISM Export-Image Grabs Selected Image Installer
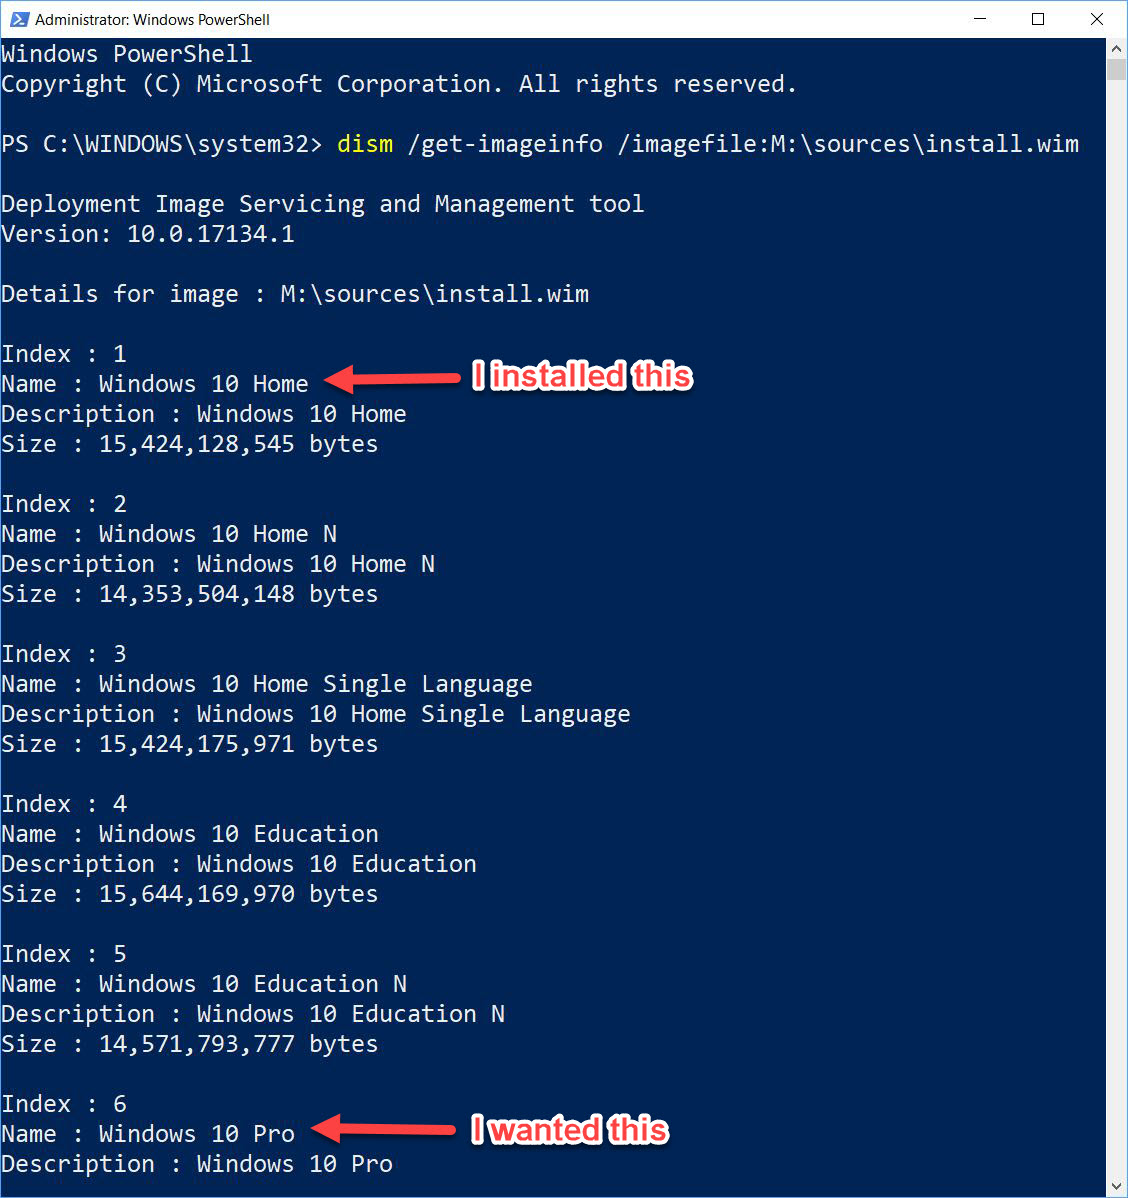
Found myself in a bit of a pickle yesterday. Downloaded the 1803 ISO using the Windows ISO Download Tool from HeiDoc.Net. Quickly learned that it includes 13 different Windows 10 images (see below). After I used Rufus 3.0 to build a bootable installer, for some odd reason it installed the first image. Athough an OS pick window should appear, none did. Instead, it installed Windows 10 Home. I fixed that by upgrading Home to Windows 10 Pro. But I also wanted to learn how to extract the right image from a portmanteau ISO. That’s how I learned that DISM Export-Image grabs selected image installer, easily used to update the bootable USB Flash Drive (UFD) that Rufus built.
Notice that Windows 10 Home appears in first place, but Windows 10 Pro in sixth (Index:6).
[Click image for full-sized view.]
Use DISM Mount-Image Grabs Selected Image Installer to Build Bootable UFD
Once I figured out that I needed the Windows Pro image from position 6 in the 1803 ISO file, I needed to do two things. First, I needed to access the install.wim file I wanted. And second, I needed to copy that image onto my prepared UFD. Both things turn out to be fairly easy.
Use DISM Export-Image to Make Its Files Accessible
This particular DISM command exports a specific image standalone. As already noted, I wanted the image with Index 6. On my system, the ISO file named Win10_1803_English_x64.iso lives in L:\MSDN. To access its WIM file, I simply mount the ISO. To do that, right-click the ISO file in File Explorer and select Mount from the resulting pop-up menu. (If that doesn’t work, click “Open with” and select File Explorer from the list of applications.)
On my system, the mounted image shows up as drive M. The file I’m after takes this specification: M:\Sources\install.wim. In my case, I created a folder named WIMTest on the I: drive to receive the desired install.wim file.
Here’s the syntax for my system, which I’ll explain in generic form, too:
DISM /Export-Image /SourceImageFile:"M:\Sources\install.wim" /SourceIndex:6
/DestinationImageFile:"I:\WIMTest\install.wim"
Note: Even though this line breaks in this blog post, it’s actually a single instruction and should be entered as such in PowerShell or Cmd.exe.
Now, let’s explore the DISM command elements involved.
/Export-Image: Tells DISM to export the designated image file.
/SourceImageFile:"M\Sources\install.wim": identifies the windows image file from which the chosen image is exported.
/Index:6: identifies the index or position of a specific image file in the overall sequence (6, in this case) for export.
/DestinationImageFile:"I:\WIMTest\install.wim": identifies the file for the exported image.
Copy the Result File Over the Old Image File
The Rufus-created UFD has the drive letter O: on my system (YMMV, replace accordingly). All I had to do now was to over-write the old install.wim in the O:\Sources folder with the newly-exported install.wim from the I:\WIMTest folder. Now, booting the installer automatically installs Windows 10 Pro instead of Windows 10 Home. Of course, even though my system is installed the UFD is useful for repairs, too. Problem solved!

