Another Worthwhile DISM Source "Trick"
In my continuing efforts to maintain the health and well-being of my Windows 10 installations, I’ve continued messing about with the built-in deployment image servicing and management tool otherwise known as DISM. When I ran into a problem with targeting the windows image (.wim) and/or electronic software download (.esd) files that can be used to provide the full panoply of Windows files and component store elements (found in the often-mysterious %windir%\WinSXS folder), I turned to the Windows Ten Forums to search for other potential sources to replace corrupted component store elements.
Understanding the Symptoms
Despite targeting the install.esd file in the sources folder on my install/recovery UFD, DISM kept coming up with a “file not found” error in its attempts to replace the single corrupt file that a /scanhealth pass over my target system identified. Understanding that this meant the tool could not find the component store element it needed, I quickly pounced on the following “trick” to point the tool at an alternative, but equally valid source for the missing materials. It seems that if you copy the %windir%\WinSXS from a running Windows 10 system that comes up clean for the following commands, you can use it as your source for DISM successfully, too:
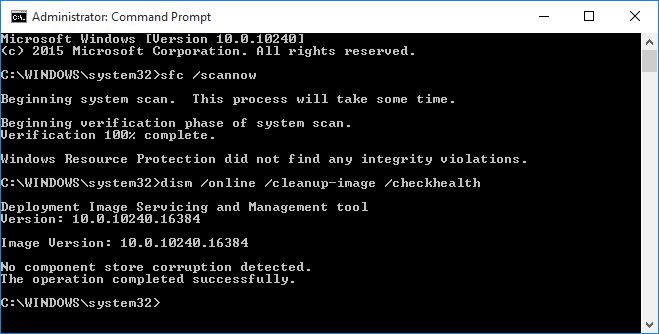
- sfc /scannow
- dism /online /cleanup-image /checkhealth
As long as cmd.exe gives you output that looks like this, you can copy the entire WinSXS folder to a UFD or other drive onto the target system, and then use that as the attribute value for the /source directive in the DISM command string that also includes the /restorehealth directive as well.
A Word of Warning
It takes a while to run the afore-cited commands, so it’s probably wise to fire them off in a window that you can cheerfully ignore for a few minutes. This sequence is entirely necessary, because the last thing you want to do is to provide one corrupt WinSXS folder as the source for repairing another corrupt WinSXS folder. Likewise, even when you succeed, it will also take some time (about 28 minutes for a USB 2.0 UFD, and 15 minutes for a USB 3.0 UFD, as per my own observations) to create the copy of that folder where and when you need it. But this technique works, as the foregoing screen capture shows, because I used it to repair the component store on the very system upon which this “component store OK” command sequence was issued.
For another discussion of working with the DISM command, please see my October 19 blog post entitled “Simple Trick Fixes DISM /source Syntax Issues.”

