
CenturionStudio.it - Fotolia
How to configure proxy settings using Group Policy
IT pros can use this labor-saving tip to manage proxy settings calls for properly configured Group Policy settings. Here are the steps to take.
In some organizations, computers access the internet through a proxy server rather than accessing the internet directly. Because Windows devices default to using a direct Internet connection through an Internet router, IT pros must configure Windows to use the organization's proxy server.
While it is possible to manually configure a Windows device to use a proxy server, manually configuring Windows is impractical except for in the smallest of organizations.
As an alternative, you as an IT pro can define the proxy server configuration settings at the Group Policy level so that you don't need to log on to each computer as the user to enter the proxy settings.
Note: This article describes how to use Group Policy to apply proxy settings to clients in a Windows environment. The directions apply to Windows 10, as well as Windows Server 2019 and Windows Server 2016.
How to specify GPO proxy settings
Group Policy Object (GPO) settings are part of the Active Directory. They allow an administrator to centrally define policy settings, and then push those policy settings to domain-joined Windows devices.
At one time, it was common practice to configure proxy settings directly through the Group Policy Object Editor. However, many of the available group policy settings are specific to Internet Explorer, which has been replaced by the Edge browser.
The best way to centrally manage GPO proxy settings is to add those settings to configure a PC to use the correct proxy settings, which in turn creates a registry value. You can then use a group policy setting to push a copy of this registry key to the other PCs on your network.
- Open the Control Panel on a Windows 10 PC by entering Control at the Windows Run prompt.
- Click Network and Internet, followed by Internet Options.
- When the Internet Properties window opens, select the Connections tab (Figure 1).
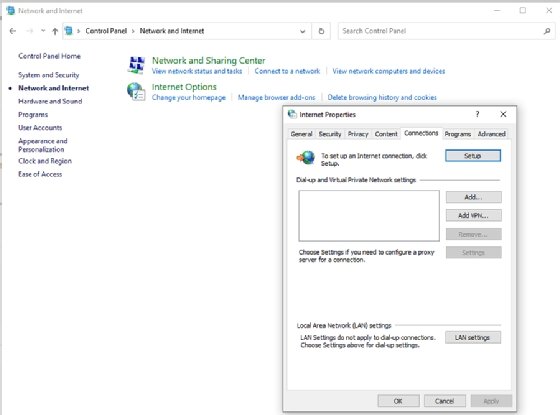
Select the Connections tab.
- Click the LAN Settings button, shown in Figure 1.
- Select the checkbox within the Proxy Server section (Figure 2).
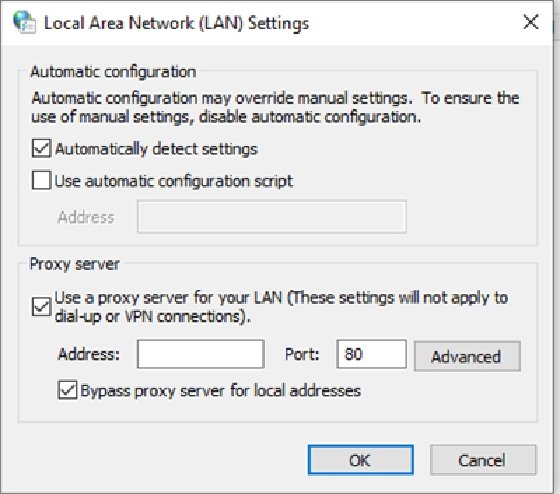
Use this dialog box to enable proxy server use.
- Enter your proxy server address and port number.
- Make sure that the Bypass Proxy Server for Local Addresses check box is selected.
- Click OK.
- Open an elevated Command Prompt
- Enter the following command to import the proxy server settings into a registry key: netsh winhttp import proxy source=ie
- Enter the following command to verify that the proxy settings have been imported: netsh winhttp show proxy
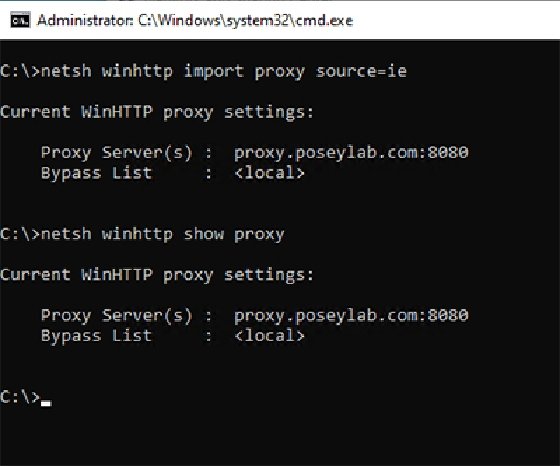
This is how you import the GPO proxy settings.
- Open the group policy that you wish to modify in the Group Policy Editor.
- Navigate to Computer Configuration > Preferences > Windows Settings > Registry, as shown in Figure 4
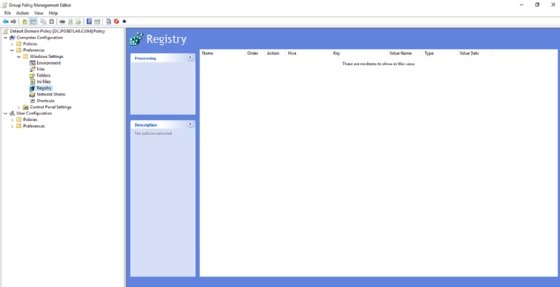
Navigate to Computer Configuration > Preferences > Windows Settings > Registry.
- Right click on Registry and choose the New | Registry Item commands from the shortcut menus.
- When the New Registry Properties dialog box appears, set the action to update.
- Set the Key Path to: HKEY_LOCAL_MACHINE\SOFTWARE\Microsoft\Windows\CurrentVersion\Internet Settings\Connections\ WinHttpSettings, as shown in Figure 5.
- Click OK.
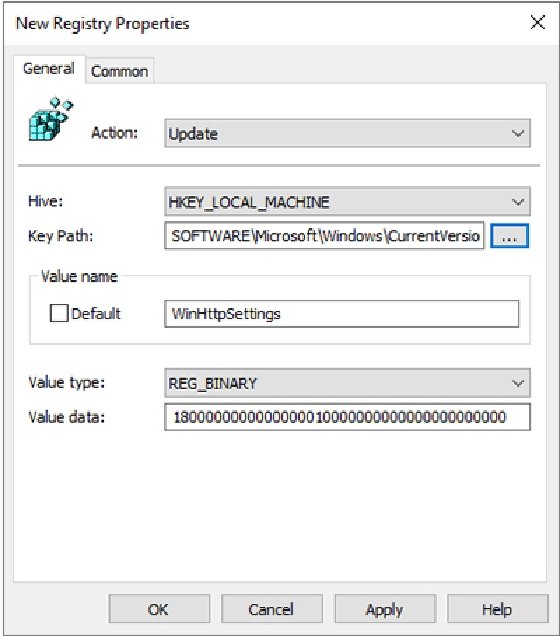
The group policy setting must reference your WinHttpSettings registry key.


