
Getty Images/iStockphoto
How to use and run Jupyter Notebook: A beginner's guide
Learn how to create your first project with Jupyter Notebook, a popular platform for presenting data science and machine learning work with interactive code, text and visuals.

Jupyter Notebook offers developers an interactive, customizable platform for displaying code and data, particularly for machine learning and data science projects.
Notebooks integrate text, code and images into a centralized, easily shareable interface, making them a highly flexible tool for organizing and sharing information. This beginner's guide covers the basics of Jupyter Notebook, including how notebooks work, why they're useful, and steps for installing and using them.
What is Jupyter Notebook?
Jupyter Notebook is a web-based interface similar to an integrated development environment (IDE) that lets users run code and display text and images. While Jupyter notebooks, like HTML pages, can be viewed in a web browser, Jupyter Notebook provides additional features not present in standard HTML, including the following:
- The ability to toggle between raw markup code and its rendered output.
- Support for displaying programming code alongside its results.
- Real-time code modification, with the ability to immediately view the output.
- Collaboration features enabling multiple people to view and interact with the same notebook at one time.
- Options for other users to add comments or feedback directly within a notebook.
These features make Jupyter Notebook a popular tool for presenting machine learning projects to stakeholders. Instead of distributing project information across various formats -- for example, HTML and Word documents for text, with separate files for sample code and data -- machine learning engineers and data scientists can consolidate everything into a single Jupyter notebook.
Jupyter Notebook vs. JupyterLab
Jupyter Notebook is developed by Project Jupyter, an open source initiative. Although Jupyter Notebook was originally the project's main product, the developers have since introduced JupyterLab, which offers a broader range of capabilities. For example, JupyterLab users can also run terminals and create traditional text files directly within their browser. It's possible to create and interact with Jupyter notebooks without using JupyterLab, but working with notebooks inside JupyterLab grants access to these additional features.
How does Jupyter Notebook work?
To create and interact with a notebook, you first need to start a Jupyter server, which operates in the background. Once the server is running, you connect to it by opening a URL associated with it in your web browser.
With your browser open to Jupyter, you can create a new notebook and insert code, text, visuals or links as needed. You can also open and create notebooks in supported IDEs, such as VS Code.
Once you've finished working on a notebook, you can save and share it in two main ways: by downloading it as a raw .ipynb file, which others can open on their own Jupyter server, or by sharing the URL directly with users who have access to the same server. To enable real-time collaboration via URL sharing, Jupyter must be run using the --collaborative flag.
Getting started with Jupyter Notebook
To begin using Jupyter Notebook, follow these steps.
1. Install the Jupyter server
First, install a Jupyter Notebook server. The installation process varies across operating systems; detailed instructions are available in the Jupyter documentation.
On systems with Python and pip (Python's package manager) already installed, the easiest method is to use the following command:
pip install notebook2. Start Jupyter
Once Jupyter is installed, start it by running the following command in a terminal:
jupyter notebookThe command might automatically open a new browser tab displaying your notebook. If it doesn't, check the terminal output for instructions on how to access the notebook. You should see output similar to the following:
To access the notebook, open this file in a browser:
    	file:///home/chris/.local/share/jupyter/runtime/nbserver-744683-open.html
This output indicates you can access Jupyter by opening the provided URL in a browser on the same system where the Jupyter server is running.
3. Create a notebook
Navigate to the Jupyter server URL in your browser if it's not already open. You'll see an interface similar to Figure 1.

To create a new notebook, click the drop-down menu labeled New on the right side of the screen and select "Python 3 (ipykernel)." This action creates a new notebook and opens it in a new tab, which should resemble Figure 2.

4. Work with your notebook
Now, you're ready to work with your notebook. To get started, try entering some simple Python code, such as the following:
print('Hello, world!')Press Ctrl + Enter to run the code. The output will appear below the code cell, as shown in Figure 3.
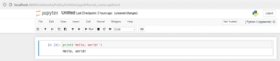
If you modify the code -- such as changing "Hello" to "Goodbye" -- the output will update automatically.

Python is the default coding language supported by Jupyter. However, it's possible to insert and run code in many other languages by installing additional kernels within your Jupyter environment. A comprehensive list of available kernels can be found on GitHub.
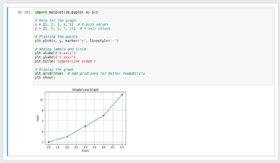
In addition to text, Jupyter Notebook also supports visual output. For example, Figure 5 shows a simple Python program that generates a graph, along with the resulting graph.
You can also enter standard text instead of code. To do this, click the drop-down menu labeled Code (the default option) and select Markdown. This mode enables you to write using the Markdown markup language.

When you save the text, Jupyter will automatically render the Markdown text.

There are many other features to explore in Jupyter Notebook. The best way to learn is by experimenting with the various options available in the interface.
Using Jupyter notebooks in an IDE
In addition to working with notebooks in a web browser, you can also launch them inside an IDE that supports Jupyter, such as VS Code. To create a notebook in VS Code, you can either run the Create: New Jupyter Notebook command from the Command Palette, or simply create a file with the extension .ipynb, which is used for Jupyter Notebooks.
Once the notebook is open in VS Code, you can interact with it just as you would in a browser. The main difference lies in the interface provided by VS Code, which offers additional integrations and code editing features that go beyond what the web-based interface offers.
Chris Tozzi is a freelance writer, research adviser, and professor of IT and society who has previously worked as a journalist and Linux systems administrator.