Torbz - Fotolia
Install Ubuntu Core successfully with these steps
An Ubuntu Core installation can often prove tricky for IT teams. Use these step-by-step instructions to properly install the platform for a more secure Docker environment.
Ubuntu Core is a platform that runs Docker and provides an extra level of security than a regular Linux distribution.
However, the process to install Ubuntu Core is different than that for other Linux distributions. For example, you can only log in to Ubuntu Core via secure shell, and you must first set up authentication with an Ubuntu single sign-on (SSO) account.
Let's walk through the process to download, install Ubuntu Core and log in -- using VirtualBox running on an Elementary OS host as an example.
Before you continue, make sure you have an account with Ubuntu's single sign-on service and a secure shell key on your host system.
Download, unpack and convert the image
Open up a terminal window on your Linux host and issue the following command to download the compressed Ubuntu Core image file:
wget http://releases.ubuntu.com/ubuntu-core/16/ubuntu-core-16-amd64.img.xz
Once that file downloads, unpack the image with the command:
unxz ubuntu-core-16-amd64.img.xz
You now have a raw disk image that can convert into a form that VirtualBox can use. To do this, issue a single command:
VBoxManage convertdd ubuntu-core-16-amd64.img ubuntu-core-16-amd64.vdi --format VDI
Although the resulting file is viable for VirtualBox, it's small. Let's resize that to a 20 GB image with the command:
VBoxManage modifyhd ubuntu-core-16-amd64.vdi --resize 20480
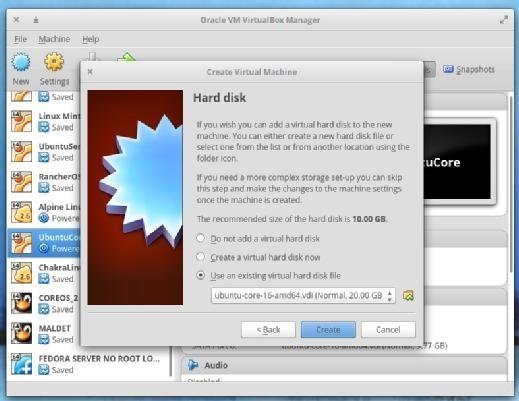
At this point, you can create the Ubuntu Core virtual machine (VM) in VirtualBox. Do this as you would create any normal VM. However, when you get to the hard disk selection, select "Use an existing virtual hard disk file" (Figure A) and then navigate to the ubuntu-core-16-amd64.vdi image created with the VBoxManage command.

The VM will be ready when you click "create." Go into the settings of the newly created VM and in the network section, set the Network Adapter to Bridged. Once you save the VM, you are almost ready to fire it up.
The login process
After you install Ubuntu Core, it's time to log in. To do this, you must have the SSO account. Before you start the VM, copy your user SSH key from your host into your Ubuntu SSO account. To do this:
- Open up a terminal on your host.
- Change into the ~/.ssh directory with the command cd ~/.ssh
- Issue the command ls id_rsa.pub and copy the contents of that file onto your desktop clipboard.
- Log in to your Ubuntu SSO account.
- Go to the SSH Keys tab.
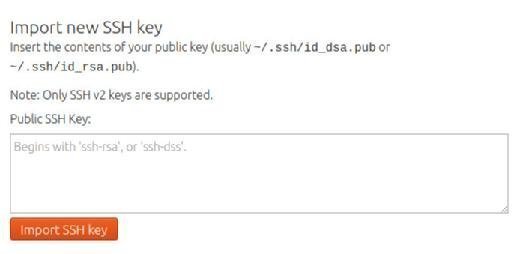
- Scroll down to Import new SSH key (Figure B).
- Copy the contents of the id_rsa.pub file into the Public SSH Key section.
- Click Import SSH key.

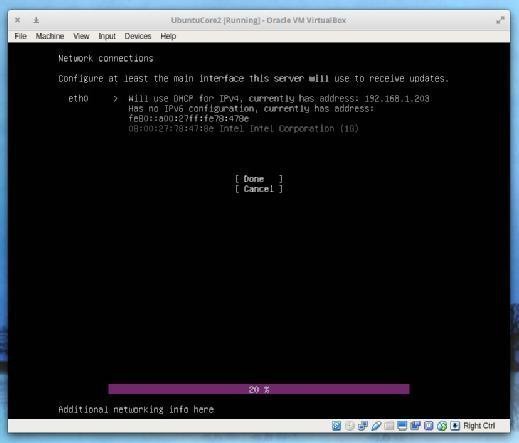
Now you're ready to fire up the Ubuntu Core VM. After it boots, click Enter on your keyboard to configure the guest operating system. When the system prompts you, click the Enter key again and then configure networking for your VM (Figure C).

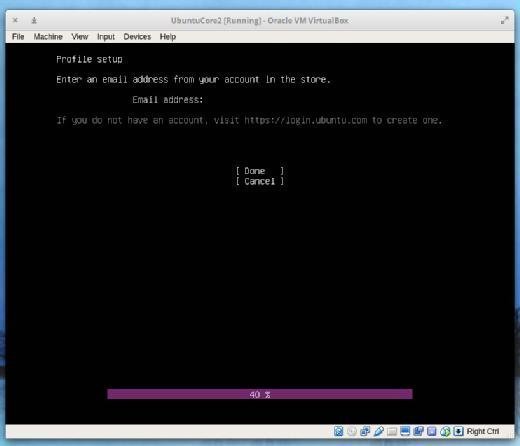
Once you've completed the networking setup, select Done and click Enter on your keyboard. The system will prompt you for an email address. Use the address that is associated with your Ubuntu SSO account (Figure D). After you type the email address, tab down to select Done.

When this completes, Ubuntu Core will present to you the SSH command necessary to log in to your VM. That command will be in the form of ssh USER@IP, with user as the username associated with your Ubuntu SSO account, and IP as the IP address of the Ubuntu Core VM. When you log in, the system will not ask you for a password because your SSH authentication keys will handle the authentication. This means that you can only log in to that Ubuntu Core VM with a machine that contains your SSH authentication key.
This is the end of the process to install Ubuntu Core. It's important to remember that Ubuntu Core is based on snap packages. To use a system like Docker, you will have to install it with the command snap install docker.


