
Getty Images/iStockphoto
Windows Server backup to the cloud: A step-by-step guide
Backups are critical when using Windows Server. While third-party cloud vendors offer protection, Windows Server admins can back up to Azure using only native Microsoft tools.

Backup to the cloud is key to modern data protection. Cloud backups ensure that a copy of data is stored securely off-site. Windows Server users are no different and use the cloud to protect critical data.
There are several ways to back up Windows Server to the cloud. Nearly all enterprise backup vendors, for example, support backing up Windows Server to Microsoft Azure, AWS and other popular cloud services. Another option is to use a backup-as-a-service vendor. However, it is also possible to perform a cloud backup using only native Microsoft tools.
With the below tutorial, learn how to conduct a Windows Server backup to Microsoft Azure.
How to back up Windows Server to Azure
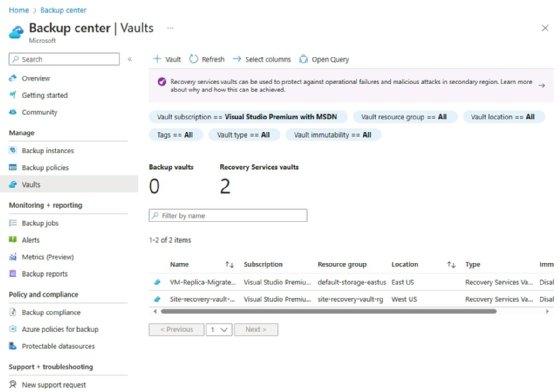
Before you can natively back up Windows Server to Azure, you will need to create a Recovery Services vault. From within the Azure portal, go to the Vaults container. Check to see if a vault already exists, as shown in Figure 1.
If not, click the + Vault button, choose the Recovery Services vault option and click Continue. From here, just follow the prompts to select your subscription, resource group and region. You will also need to provide a name for the vault that you are creating.
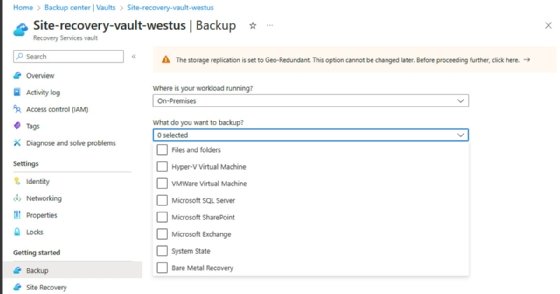
Once you have created a vault, the next step in the process is to tell Azure what you want to back up. Click on the vault that you have just created and then click the Backup tab, found in the Getting Started section. When the Backup screen appears, set the "Where is your workload running?" option to On-Premises.
Next, use the drop-down menu to tell Azure what you want to back up, as shown in Figure 2. As you can see in the figure, there are numerous options to choose from.
Once you have made your selection, click the Prepare Infrastructure button. This will take you to the Prepare Infrastructure screen, shown in Figure 3. As you can see in the figure, the first thing that you will need to do in preparation for backing up your server is download the Recovery Services Agent.

The next thing that you will need to do is to download the vault credentials. If you look back at the previous figure, you will notice that there is a Download button, but the button is grayed out.
If you find that the Download button is grayed out on your system, select the "Already downloaded or using the latest Recovery Services Agent" checkbox. This will cause the Azure portal to illuminate the Download button so that you can use it to acquire the necessary credentials.
It is worth noting that when you download the vault credentials, you should not attempt to open them. Instead, just save the vault credentials to your hard disk. Keep in mind that the vault credentials expire after 10 days, so you have a limited amount of time to finish setting up the backup.
At this point, you can install the agent onto the machine that you want to back up. The installation process is simple and only requires you to click Next a few times.
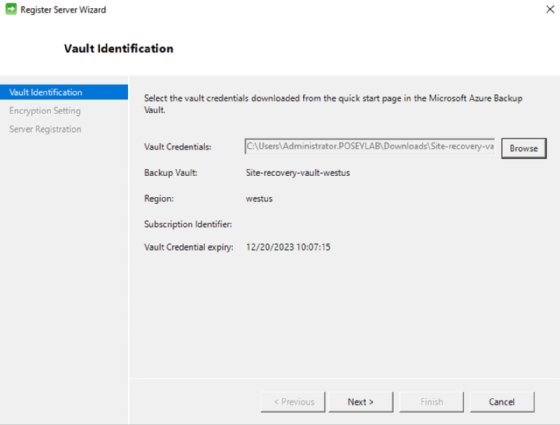
When the agent finishes installing, click on the Proceed to Registration button. This will open the Register Server Wizard. As you can see in Figure 4, you will be prompted to provide the location of your vault credentials file.
Click Next, and then click the Generate Passphrase button. This will generate a passphrase that you can use to encrypt the data that you are backing up. Be sure to save the passphrase in your key vault.
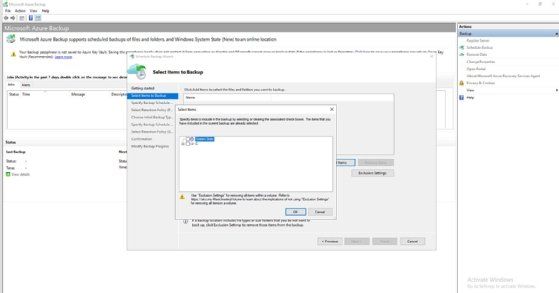
The last step in backing up Windows Server to Azure is to schedule the backup. Open Microsoft Azure Backup by choosing it from your server's Start menu. Now, choose the Schedule Backups command from the Action menu, and then follow the prompts to create a backup schedule and choose the items that you want to back up. You can see what Microsoft Azure Backup and the Schedule Backup Wizard look like in Figure 5.
Brien Posey is a 22-time Microsoft MVP and a commercial astronaut candidate. In his more than 30 years in IT, he has served as a lead network engineer for the U.S. Department of Defense and as a network administrator for some of the largest insurance companies in America.