
Getty Images/iStockphoto
How to use the Windows Server Backup tool
In this tutorial you'll learn how to install, schedule and test Windows Server Backup utility. Readers will also find out which environments the tool is best suited to.

These days, most users recognize the need for backups to properly protect critical data. Many operating systems ship with backup options, and Windows Server is no different. Microsoft provides a backup utility right out of the box to help protect the server from the usual data loss threats.
Backups help protect the system from several issues, including the following:
- Failed drives.
- Malware.
- Accidental deletion or user error.
- Data corruption.
The backup utility included with Windows Server is a purpose-specific tool. I've seen it criticized as not enterprise-ready or lacking in features. I don't think that's the case. Rather, it's a matter of using the right tool for the job and using the tool as it was designed.
Microsoft provides this backup utility to manage the data on a single server. It's a solid option for new deployments in small businesses, lab environments and isolated air-gapped environments. It's not designed as an enterprise-class backup tool, and Microsoft doesn't market it that way.
The backup tool provides plenty of useful options, from local versus remote storage to automating backup jobs with PowerShell.
Use the below tutorial to learn how to use Windows Server Backup.
Install the Windows Server Backup feature
When you check the Tools menu in Server Manager, it offers a link to Windows Server Backup. However, the tool is not actually installed with Windows by default; you must add it as a feature before using it.

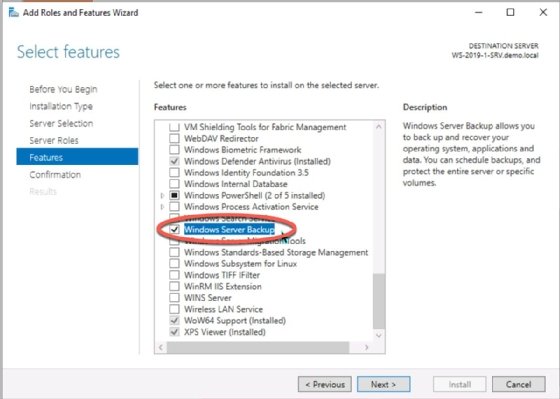
To add the backup program, open Server Manager and select Add roles and features. Click the Next button three times to accept the default settings, then choose Next one more time in the Select roles pane. In the Select Features pane, scroll to the bottom and tick the box to select Windows Server Backup.
The utility is now available the next time you select Windows Server Backup from the Server Manager > Tools menu.
If you prefer to manage your server with PowerShell, use the following cmdlet to install the backup program.
Install-WindowsFeature Windows-Server-Backup
Once the installation is complete, you can begin configuring backup jobs.
Like many Microsoft tools, Windows Server Backup is wizard-driven. Since it's a basic tool, there aren't many options to choose from. You can run backup jobs manually or automatically and select what to back up and where. When you run the tool for the first time, it analyzes the system and checks for recent backups.
Initial backup configurations
Open the Windows Server Backup console from the Server Manager > Tools menu. It takes a moment to scan the system for any current backup configuration.

Select Backup Once or Backup Schedule from the Actions menu. To run Backup Once, complete the following steps:
- Choose Backup Once to open the Backup Options window.
- Choose Different Options.
- Select Full Server or Custom. The Custom option allows you to select individual folders and files. For this demonstration, choose Custom.
- Select Add Items, then browse to the folders you want to back up. For simplicity, browse to your Documents folder.
- Select a location to store the backup job. The location may be a local drive or a remote shared folder.
- Select Local drives. Choose a drive or partition in the next window.
- Select Backup to begin the backup job.
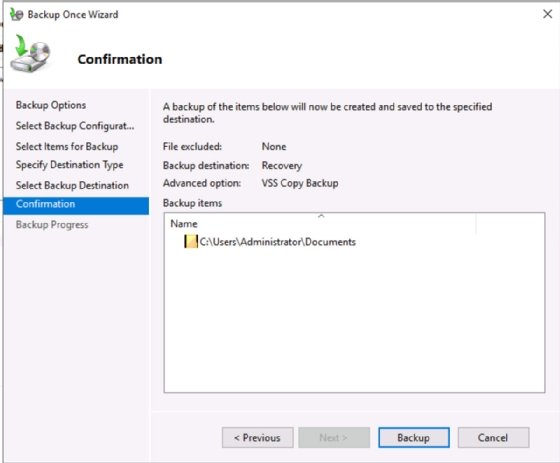
The time the job takes will vary by what you've selected and the speed of the drives or network connection.
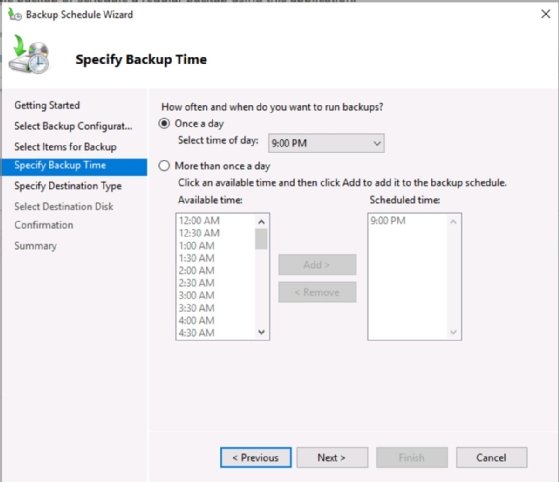
Scheduled backups require similar information. The primary difference is the windowpane to choose the backup frequency. By default, the tool suggests once a day at 9 p.m.
Scheduled backups offer a slightly more robust interface for backup storage locations, including disks, volumes, and remote locations. Select Backup when you've made your choice.
Backups to the local disk are typically not recommended, since you lose your primary data and the backup copy if the drive fails. At a minimum, back up to a second physical disk in the server if you cannot supply a network-based destination. Also, remember that for true disaster recovery, backups should also be stored offsite.
Configure a backup job with PowerShell
Managing server backups with PowerShell is more challenging and probably not worthwhile for a single manual backup job. However, the cmdlets lend themselves to scripting.
You'll need to create a backup policy consisting of a source location, backup job storage location, and general settings. Once you've written the policy using PowerShell, you can call it with the Start-WBBackup cmdlet.
Restore resources
The restore process varies somewhat depending on what you're trying to recover. If you're recovering lost or corrupted user files and directories from the local server, then launch the Windows Server Backup utility and direct it to the backup job storage location. If you're restoring a full system state, install and patch Windows Server first.

The Recovery Wizard first asks where the backup job is stored, either local or remote. If you select local, it scans the current drive for backup jobs. If you choose remote, it offers you the chance to browse to a second drive or volume, or you can enter a Universal Naming Convention path for a network location.
Next, the wizard asks for the backup date and recovery type. It offers the chance to drill down to specific files and folders in the backup job so that you can restore an accidentally deleted resource. Finally, choose where you want the resource restored. Remember that if you're doing a backup and restore test, you should restore resources to a different location than the production or real copies.
Recovery time varies by the size of the restore job, drive speed and network speed if restoring from a network location.

PowerShell has many cmdlets related to recovering files, including Start-WBFileRecovery, Start-WBVolumeRecovery, and Start-WBSystemStateRecovery.
Wrap up
Be sure to test backup and restore procedures regularly, especially the restores. There are several reasons to test backups:
- Verification that you can restore what you're backing up.
- Verification that you're backing up the right information.
- Better understanding of the restore steps. During downtime from a failed server is not the time to learn the restore process.
It's also essential to evaluate the backup process periodically. Server roles change over time, server storage configurations change and user needs evolve. You may have established a detailed and comprehensive server backup configuration a year or two ago, but consider how the server has changed. Be sure the backup configuration changes with it.
Damon Garn owns Cogspinner Coaction and provides freelance IT writing and editing services. He has written multiple CompTIA study guides, including the Linux+, Cloud Essentials+ and Server+ guides, and contributes extensively to TechTarget Editorial and CompTIA Blogs.