Getty Images
How to use Time Machine to back up your Mac
Mac Time Machine backup is a useful tool for small businesses. It does not support cloud targets, but has a user-friendly interface and simple scheduling options for basic backups.
Most of today's operating systems include file backup and restore utilities, and macOS is no different. Apple users can use Time Machine to help protect files from loss or restore files after undesired changes.
Mac Time Machine backup is a basic program for Mac users. While it doesn't have many bells and whistles, it is also very straightforward to use. Time Machine is not an enterprise backup tool, but it is effective for managing individual macOS systems for home users and small businesses.
Time Machine includes the following functions:
- Provides a simple and reliable backup utility.
- Offers manual or scheduled backups.
- Integrates with Migration Assistant for moving from an old Mac to a new one.
- Encrypts backup data.
Use the below tutorial to learn how to back up and restore using the Mac Time Machine interface.
Add a storage disk
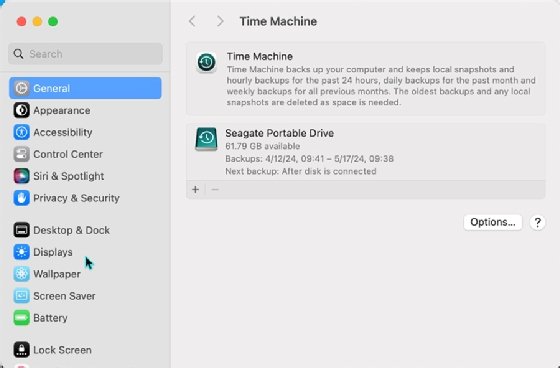
The first step to using Mac Time Machine backup is designating a backup storage disk. For laptops, plug an external disk into an available USB slot. Desktop systems might have extra internal hard disks too.
Follow these steps to add the disk to Time Machine:
- Access System Settings.
- Select Time Machine from the sidebar.
- Select the Add Backup Disk option.
- Select the disk where you want to store backup jobs.
- Choose Set Up Disk. The disk is erased and ready for use by Time Machine.
You will also have the option to encrypt the disk and protect it with a password.

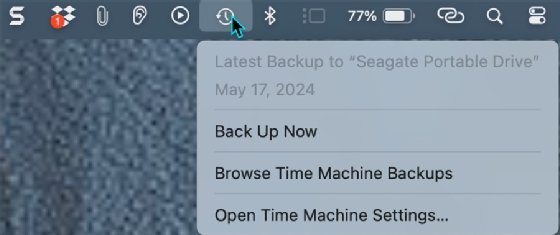
The Time Machine icon should appear in the menu bar, near the clock. Check your menu bar preferences if it does not appear.

Your Mac is now ready to back up files.
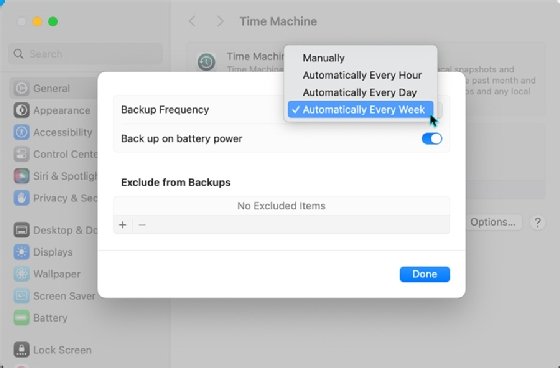
You can also specify whether backup jobs can run while the system is running on battery. You might also want to exclude specific directories and files from the backup job. Perhaps these resources are not important or do not change often.
One of Time Machine's biggest limitations is that it does not support cloud storage as a backup target. Backups must be local.
Run a backup job
Time Machine starts with a full system backup before using incremental snapshots to catch only changed files. Those backup jobs run relatively quickly. Time Machine offers manual or scheduled backup jobs. Note that you cannot choose specific times for scheduled backups.
The following sections detail manual and scheduled backups.
Manual backups
You can start a manual backup anytime the storage disk is connected to the computer. Consider running a manual backup before major configuration changes, OS updates or other significant events that could put data at risk.
Follow these steps to begin a manual backup using Time Machine:
- Select the Time Machine icon from the menu bar.
- Choose Back Up Now.

The first job is a full backup. This can take a significant amount of time, depending on the number of files and the speed of the disks involved. However, users can continue using a Mac during the backup process. Time Machine does incremental backups after the first full backup. Incremental backups are limited to files that have changed since the last backup.
Scheduled backups
Manual backups are useful, but you'll often want automatic backups to protect data regardless of whether you remember to run the backup job. Time Machine lets users specify hourly, daily or weekly scheduled backups. Which you choose depends on your recovery needs. If you have many critical files that change frequently, hourly backups might be useful.
Note that the storage disk must be attached to the system for Time Machine to run a backup job. Laptop users might consider weekly backups if their computer is often out of the office.

Configure the backup schedule using the Time Machine settings. Select the Options button to choose the backup frequency.
Restore from backup jobs
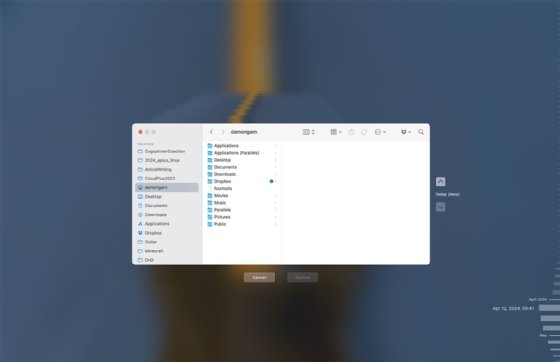
Time Machine's interface enables users to browse previous backups, including digging into specific directories.

If you accidentally deleted some files a few days ago and you know they were backed up by the most recent Time Machine job, you can easily restore them. Or maybe you modified a file and then realized you like the original version better. Simply find the version of it you want in a recent backup and restore it.

Notice in the screenshot above that you can select dates from the timeline along the right side of the screen and browse using the Finder window. Select the resources to restore and choose the Restore button.
Can I back up to iCloud?
Apple also offers iCloud storage. How does that compare with Time Machine? ICloud is a file storage and synchronization tool rather than a traditional backup utility. You will probably use both services since they serve two different purposes.
ICloud storage resembles Google Drive, Microsoft OneDrive or Dropbox. It's not a targeted storage location like a local disk or network-attached storage device, so Time Machine doesn't see it as a storage option. ICloud is intended for user files, not system configuration files, applications and their related data, or OS components. Time Machine covers these resources in addition to user data.
Damon Garn owns Cogspinner Coaction and provides freelance IT writing and editing services. He has written multiple CompTIA study guides, including the Linux+, Cloud Essentials+ and Server+ guides, and contributes extensively to TechTarget Editorial and CompTIA Blogs.


