F.Schmidt - Fotolia
Backing up VMware virtual machines: Free chapter download
What good is a VMware environment without a good backup strategy? This free chapter download explores different options for backing up VMware environments.
 What good is a VMware environment without a good backup strategy? While virtualization has many advantages, backing up VMware environments presents many new challenges to backup/storage administrators.
This chapter excerpt from VCP4 Exam Cram: VMware Certified Professional, 2nd Edition by Elias Khnaser explores the different options for backing up VMware. Read the excerpt below, and then download the entire chapter on backup and high availability.
VMware virtual machine backup options
As far as backing up VMware virtual machines (VMs) is concerned, you can back them up using any of the following methods:
- Installing a backup agent inside the guest operating system. This is the same as when you install a backup agent inside a physical machine’s guest operating system. You can then do file-level backups as frequently as your data changes or as frequently as your environment requires.
- Backing up the virtual machine files. Because a virtual machine is encapsulated inside regular files, you can back up or archive these files. When using this method, you can power off the VM and back up the files. Alternatively, if you need the VM to continue to be online, you can take a snapshot of it and back up the VMDK files.
When considering backup of virtual machine data, make sure that you have your application files stored on separate drives. This makes the process of backing up the data easier. This also concentrates the backup process on the data rather than the operating system files, which should be backed up infrequently because they do not change and you don’t want to have to back them up repeatedly. The system drive should be backed up in the event that you want to restore the entire virtual machine to the state it was in when you made the backup. The point to keep in mind here is that you are backing up the system drive for the Registry and the application-specific files that are installed with the virtual machine.
Host backup options
The ESX/ESXi host is primarily the Service Console. Because the Service Console is used for command-line advanced options, its files rarely change and most of the configurations you make in your VMware Infrastructure are stored in the vCenter database. That being said, backing up the Service Console is not really worth the time and effort involved. You can easily reinstall ESX and make the changes rather than deal with executing a backup and restore operation of the Service Console.
However, if you want to back up your Service Console, you can do so using one of the following two methods:
- Install a backup agent inside the Service Console and back up the files accordingly. This would be the same traditional agent backup approach that you would take with any physical machine running any guest operating system.
- Use third-party software to create a complete image of the ESX server and then use this same third-party software to restore the entire image and return the state of the ESX/ESXi host to the point when you took the image originally.
VMware Consolidated Backup
VMware Consolidated Backup (VCB) is an alternative method of backing up and restoring virtual machines at the file level or image level. VCB runs on a Windows server and makes a snapshot of the VM, and for file-level backups, it mounts the VMDK as a disk on the Windows backup server. Once the VMDK is mounted, you can see the contents of the VMDK appear under a specified directory on the VCB server. Now your file-level backup agent can access these files and write them to tape or any other backup destination.
When you want to make a full image backup, VCB also makes a snapshot but then copies the full VMDK as a file to a special backup LUN, which should be at least the size of the VMDK. After copying the VMDK to the LUN, the snapshot of the VM is released and your file-level backup agent can pick up the VMDK from the backup LUN.
To be able to do this, the VCB server has to have a direct connection to the LUNs on which the VMs reside. Keep in mind that VCB is not a backup product itself, but just a tool to help your traditional backup product access your VMs.
Consequently, you have taken the network out of the equation all the way to the backup server. Now, obviously, depending on what type of backup system you are using and how the backup server is connected to your backup robot, the network can remain out of the equation or can be used to move the files from the backup server to the backup tape library.
By using VCB, you have the following advantages:
- Because you are dealing with snapshot-level backups, there is no need for a backup window because no downtime is required to back up the VM. The VM is backed up while it is powered on.
- Backup load is moved away from the ESX/ESXi host because you are taking a snapshot and moving this snapshot to another location to be backed up directly by the VCB proxy server. By doing so, you offload all the processing requirements needed from the ESX/ESXi host to the backup server.
- The backup agent is optional. When using VCB, you take advantage of the VMware Tools that are installed inside the VM that allow for VCB to take place, thereby giving you the option to use the backup agent only if you want to restore directly to this virtual machine. Instead of restoring directly to a VM, you may opt to install a backup agent on a select few VMs and then restore any files to these VMs. At that point, you can copy the restored files to their final destination. This would save money and management of backup agents on multiple virtual machines.
When running VCB, you have full support for file-level backup of Microsoft Windows guest operating systems and image-level backups of any guest operating system.
Data Recovery
Data Recovery is a new backup and recovery tool for VMs feature that is introduced with vSphere 4, aimed at small- to medium-sized companies. Data Recovery is a Linux-based appliance that can be imported into vCenter and controlled through a vSphere Client plug-in.
The Data Recovery appliance is an agentless backup to disk type solution. Your destination backup location can be to VMware VMFS Datastores on local disk, iSCSI, FC, or it can be on an NFS Datastore. You can even back up using Data Recovery to Windows Common Internet File System (CIFS) shares.
A single Data Recovery Appliance can support the following:
- Up to 100 VMs.
- Up to 100 backup jobs.
- Each backup job can have a maximum of one destination.
- Each VM configured in a backup job is backed up once every 24 hours.
How to configure the Data Recovery Appliance
Setting up the Data Recovery Appliance is straightforward. After obtaining all the files necessary, follow these steps:
1. Deploy the Data Recovery OVF template to vCenter by going to File > Deploy OVF Template and following the wizard.
2. Configure the networking stack to allow for connectivity through the appliance’s console.
3. Configure the appropriate time zone settings through the appliance’s console.
4. Add destination storage to the appliance. To accomplish this, you would add a virtual disk to this appliance the same way you would any other VM by going to Edit Settings.
5. Install the Data Recovery plug-in for the vSphere Client.
Once you have installed and configured the appliance, you can access it via your vSphere client from the Home screen in the Solutions and Applications.
Backup process
Backing up VMs using the Data Recovery Appliance is easy and wizard-driven. Once you initiate the wizard, it leads you step by step to a successful backup job creation. The backup job wizard is capable of enumerating all objects in the vCenter inventory, which means you can back up any VM regardless of its logical grouping or location.
When you run the backup wizard, you are warned if:
- You have selected more than 100 VMs for backup.
- If a selected VM is on a nonlicensed host.
To start the backup job wizard, point to the Data Recovery Appliance in vCenter and select the Backup tab. You can then either select New at the top right-hand corner or right-click anywhere and click New.
The backup wizard prompts you to:
- Select the VM to back up or select certain components of a VM to back up, such as vdisks.
- Select the destination target from your available options.
- The Backup Window is next; specify the times that backup is allowed to run.
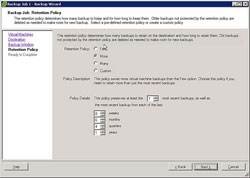
- Retention Policy settings are up next, as shown in the figure below (click on image for full size). This screen allows you to configure how long you retain data on the destination and how many backups to retain.
Figure 1: Retention policy settings
Restore VMs and files
The restore process using the Data Recovery Appliance is just as easy as the backup process and is completely wizard driven. You can:
- Restore a single file back to a VM (Windows and Linux support only).
- Restore a VM to a different host, datastore, or resource pool.
- Restore a VM due to deletion or corruption.
- Restore a VM to an earlier point in time.
- Restore a VM’s virtual disks.
To initiate the restore wizard, find the Data Recovery Appliance in your vCenter inventory and click on the Restore tab. You can then click on the Restore link in the top right-hand corner. This initiates the restore wizard, which prompts you to select what to restore. Based on the guidelines we discussed earlier, you can select anything from a full VM restore all the way to a specific vdisk restore.
Now to restore a file back into a VM, additional software needs to be downloaded from the VMware website. You need to download the restore client for Windows or Linux. This restore client is then installed in the VM allowing you to mount a restore point from the Data Recovery Appliance and select the appropriate file for restore directly to the VM.
About this author: Elias Khnaseris an author, speaker, and IT consultant specializing in Microsoft, Citrix, and VMware technologies. He has more than 12 years of experience in administration, engineering, and architecture and has written many books and articles on the subjects.


