Salesforce.com for dummies: Creating daily reports
Use this step-by-step guide to create daily reports from scratch in Salesforce.com.
Salesforce.com for Dummies
Chapter 15, Analyzing Data with Reports
Salesforce.com offers daily reports managers can use right out of the box, but those reports may lack some custom details that are pertinent for your particular organization. That's where Salesforce.com's Report Wizard comes in. This chapter explains in detail how to build and create custom reports from scratch using the Report Wizard.

Salesforce.com for Dummies, Ch. 15
Table of contents:
![]() Web reporting tools
Web reporting tools
![]() Creating daily reports
Creating daily reports
![]() Report features and functionality
Report features and functionality
![]() Organizing reports
Organizing reports

Creating daily reports
Developing Reports with the Wizard
Salesforce.com comes with a huge menu of useful reports, and yet they might not be exactly what you're looking for. For example, if your company has added custom fields on the account record that are unique to your customer, a standard New Accounts report doesn't show you all the information you want to see on recent accounts.
The next time you need a custom report, don't pester the IT geeks. Instead, use the report wizard to build a new report or customize an existing one.
|
||||
Building a report from scratch
You don't have to be a technical guru to create a report in salesforce.com. Just make sure you can articulate a question that you're trying to answer, and then salesforce.com's Report Wizard will guide you through the steps for creating a custom report that will help you answer the question. Anyone who can view the Reports tab can create a custom report. Whether you can make it public or just private depends on permissions.
To create a report from scratch, click the Reports tab and follow these steps:
1. Click the Create New Custom Report button.
The Report Wizard page appears.
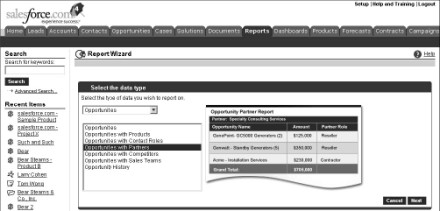
2. Select the data type you want to report on, and then click Next.
You do this by first selecting the basic type of data from the drop-down list and then being more specific in the dependent list box, as shown in Figure 15-3. When you click Next, Step 1 of the wizard appears.
3. Select the radio button for the type of report that you want. You have three options:
- Tabular Reports provide the most basic way to look at your data in a tabular format.
- Summary Reports allow you to view your data with subtotals and other summary information.
- Matrix Reports enable you to create reports in grids against both horizontal and vertical categories. This type of report is particularly helpful for comparing related totals, especially if you're trying to summarize large amounts of data. For example, the standard report called Sales to Date versus Last Month (located in the Opportunity and Forecast Reports folder) is a matrix report that summarizes new sales by month vertically and also by close date horizontally.
4. When you're done, select the Select Columns option from the Jump to Step drop-down list in the top-right corner, and then click Next.
The Select the Report Columns page appears.
The report type that you select dictates how many of the seven possible Report Wizard steps you see and the order that they're presented in the wizard. For example, if you selected the Matrix Report radio button in Step 3 of this list, the next step out of seven is Select Groupings. But if you select the Tabular Reports radio button, the next step is Select Columns, and you have only five steps. And at any time, you can use the Jump to Step drop-down list to skip around the wizard.

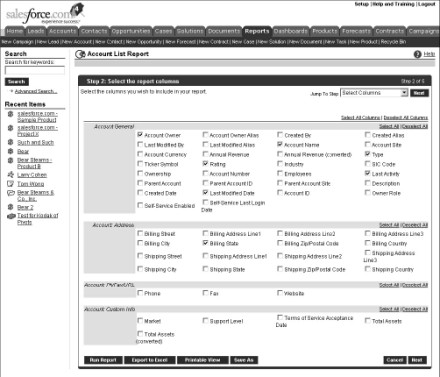
5. Select the check boxes for the columns that you want in your report.
Depending on the data type you chose, the Select the Report Columns page displays standard and then custom fields divided into sections, as shown in the example in Figure 15-4.
6. When you're done, select the Select Columns to Total option from the Jump to Step drop-down list.
A wizard page appears with the columns that can be totaled (such as currencies, amounts, and percentages) based on the columns you selected in Step 5 of this list.
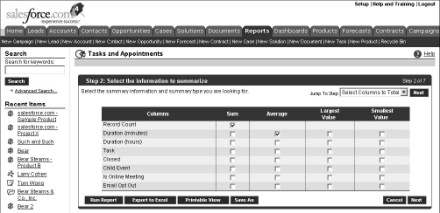
7. Select check boxes for columns that you want summarized and how you want them summarized.
Salesforce.com provides you options for summing, averaging, and choosing highest or lowest values. For example, on an activity report, you could use averaging to measure the average duration of an activity, as shown in the example in Figure 15-5.
8. When you're done, select the Order Columns option from the Jump to Step drop-down list and click Next.
The wizard page appears.


9. Click the directional arrows to order the columns.
This is how columns will appear on the report from left to right if you are showing all details.
10. When you're done, select the Select Criteria option from the Jump to Step drop-down list and click Next.
The wizard page appears.
11. Use the criteria filters to limit results on your report.
The standard filters will vary based on the data type you chose. For advanced filters, select fields and operators by using the drop-down lists, and then enter values, similar to creating custom views. (For help with advanced filters, see Chapter 2.)
With advanced And/Or filters you can now create precise reports that might include complex conditions. For example, if you define strategic accounts as companies that did either over $1 billion in annual revenue or had over 500 employees plus $500 million in annual revenue, you can now generate this report. To do this, enter your advanced filters as before, and then click the Advanced Options link at the bottom of the Advanced Filters section. When the page reappears, click the Tips link located next to the Advanced Filter Conditions field. Modify your Conditions as recommended before clicking the Run Report button. (You must have Professional or Enterprise Edition.)
12. When you're done, select the Select Groupings option from the Jump to Step drop-down list and click Next.
The wizard page appears.
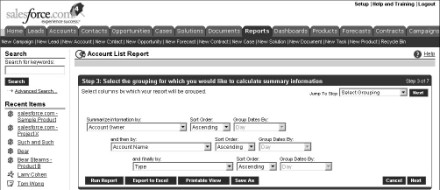
13. Select the columns by which your report will be grouped.
For example, if you want to measure the number of accounts owned by rep and subtotaled by account type, use an account matrix report. For the row headings, first sort by Account Owner, and then by Account Name. Then for the column headings, sort by Type, as shown in Figure 15-6.
14. When you're done, select the Select Chart Type option from the Jump to Step drop-down list and click Next.
The wizard page appears.
15. Complete the fields to build a chart, and then click the Run Report button.
Many users include this step only if they need to generate a specific chart or graph to support the report. See Chapter 16 for specific details on building charts in dashboards or reports. When you click the Run Report button, the custom report appears with Report Options at the top and the actual report data displayed under the Generated Report heading.
16. If you want to save the report, click the Save As button.
A New Custom Report page appears.
17. Complete the fields and click the Save As button.
Here are pointers for completing the fields:
- Enter a title for the report in the Report Name field.
- Type a question or sentence in the Report Question field that will help you remember the purpose of the report. For example, if you created an Opportunity by Competitor report, you might type Who are our biggest competitors measured by opportunities?
- If you have permissions to manage public folders, select a folder for the report.
After clicking the Save As button, the Reports home page appears with a link to the report under the selected folder.

Continue to the next section: Report features and functionality
Download Chapter 15, Analyzing Data with Reports
Read other excerpts and download more sample chapters from our CRM and call center bookshelf


