kentoh - Fotolia
How to embed video with SharePoint Media Web Part
Adding audio or video to a SharePoint page isn't rocket science -- but there are some tricks to make it easier. An expert explains.
For collaboration tools to be valuable to the enterprise, they have to fit changing needs. Some collaboration tools fall flat because they don't serve enough enterprise goals.
Since 2010, Microsoft has supported adding audio or video to a SharePoint page. However, SharePoint admins may be unsure about the process and have questions. Let's look at how to use the SharePoint Media Web Part to post audio or video to a SharePoint page.
Note that the browser, rather than SharePoint itself, can pose problems in this process. For example, if you attempt to add a WAV file to a SharePoint 2013 page, SharePoint displays a warning message saying that the Media Web Part cannot play files in this format. In actuality, the Media Player Web part has no trouble playing WAV files; it's some browsers (most notably Chrome) that have trouble with WAV files embedded in a SharePoint page.
Using SharePoint Media Web Parts to embed video
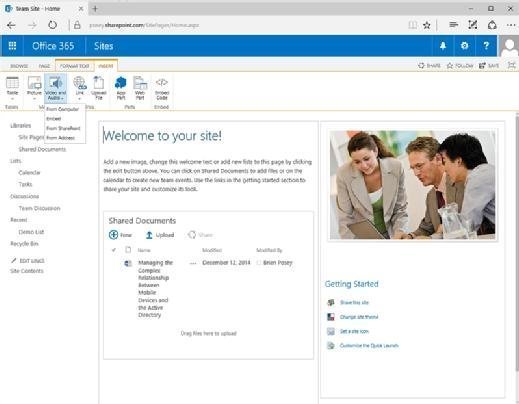
Adding audio or video to a SharePoint page is usually a straightforward process. To get started, open the page to which you want to add the multimedia element, go to the Page tab, and then click Edit (located on the ribbon). Now click on the area in which you want to add the multimedia content within the page, then click on the Insert tab and choose the Video and Audio option.
As you can see in Figure 1, SharePoint supports adding multimedia content from a variety of locations. You can add multimedia elements by uploading them from your computer, embedding items, selecting them from SharePoint or specifying an address where the content currently resides.

The options to upload multimedia content from your computer, to use content that already resides in SharePoint or to use an address are straightforward. After all, SharePoint users and administrators are generally familiar with uploading files or adding links. But the option to embed content is somewhat less intuitive.
The embed option allows you to include code from a video-sharing site, such as YouTube, directly into the SharePoint page. By doing so, you can embed the video sharing site's video player. There are two tricks to making the video embedding option work.
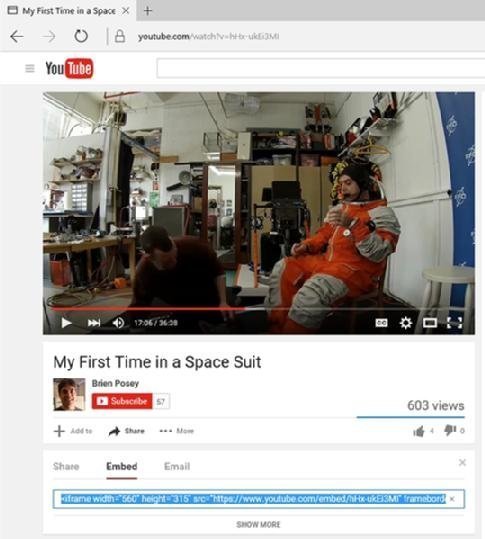
The first involves figuring out how to access the code to embed into a SharePoint page. Most of the more popular video-sharing sites include a link marked Share, Embed or something similar. If you look at Figure 2, for example, you can see that I have gone to one of the videos on my YouTube channel. Notice near the bottom of the figure that there is a link labeled Embed (I had to click Share to expose the Embed option). Clicking on this link reveals a block of code that you use to embed the video into SharePoint.

The second trick to making embedded videos work is that the code you use must be structured in the correct way. In Figure 2, the code starts with an iframe tag. SharePoint requires this tag to be used. As a security precaution, SharePoint does not allow you to embed code unless it uses an iframe.
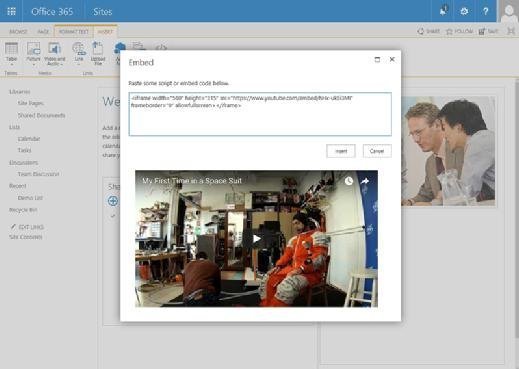
Embedding the video into a SharePoint page is easy. Choose the Embed option from the menu shown in Figure 1, and then paste the embed code from the video-sharing site into the space provided (Figure 3).

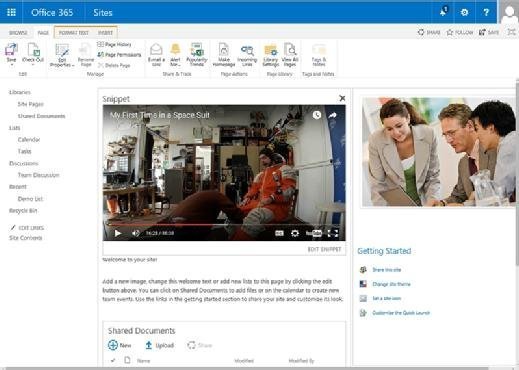
Now click Insert and the video is added to the SharePoint Page, as shown in Figure 4. Because I embedded YouTube code, SharePoint is using the YouTube video player rather than the SharePoint Media Web Part.

As you can see, it is easy to add multimedia elements to a SharePoint page. Although I focused on embedding a video, it is just as easy to add audio. In doing so, employees can have yet another way to communicate, collaborate and exchange information.


