Eclipse Digital - Fotolia
AWS Outposts: What you need to know to get started
AWS Outposts is a managed device that brings Amazon cloud services into your data center. Review its requirements, use cases and a step-by-step guide to the installation process.
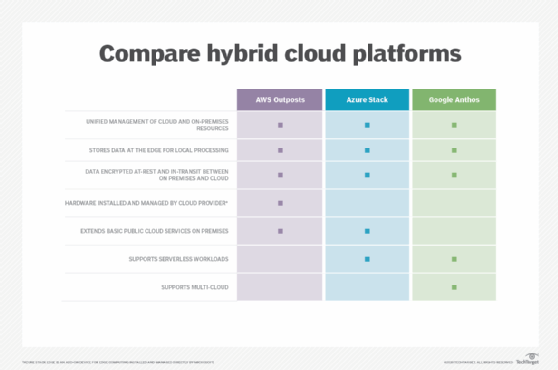
Many organizations must keep data and services on premises for compliance and regulatory reasons. If those organizations want to use AWS' public cloud and keep their workloads in-house, AWS Outposts is one way to do so.
An organization can use AWS Outposts to extend its Virtual Private Cloud (VPC) networking and Amazon cloud services to a private data center, edge location or colocation facility. This consistent infrastructure reduces the overall complexity required to maintain and run a hybrid cloud. But setting up an Outpost isn't as simple as creating a new account. There are a few hoops to jump through before it's operational.
In this article, we'll break down some of the key elements you need to know before you get started. We'll look at:
- How AWS Outposts works
- AWS Outposts use cases
- AWS Outposts pricing
We'll also review the installation process and show you how to deploy your first Outpost instances.
What is an Outpost and how does it work?
An Outpost is an on-premises device managed by AWS. It connects cloud-based services, APIs and managed infrastructure services to a client's private physical and virtual infrastructure.
Developers build and deploy applications using local computing power and on-board storage with the same interface used in Amazon's public cloud regions. This can support a hybrid cloud strategy for applications that require low latency or need to meet local data processing or residency requirements.
Developers deploy resources locally via a reduced set of Amazon cloud services, such as Amazon Relational Database Service (RDS), Elastic Container Service (ECS) and Elastic Block Store (EBS). They can also create subnets to connect to an Amazon VPC hosted on Amazon's public cloud.
There's object storage through a variant of Amazon Simple Storage Service (S3); though, it doesn't have the redundancy levels of the standard version. Still, it uses the same S3 APIs, and you can distribute up to 96 TB of data across devices and servers on an Outpost. An administrator can create up to 100 buckets per Outpost, and data can be moved to and from a tethered AWS Region using AWS DataSync.
Organizations can also integrate approved third-party providers as part of the AWS Service Ready Program. Dozens of companies are listed, including consulting partners and technology vendors like Citrix, Datadog and Trend Micro.
An Outpost relies on consistent and indefinite network connectivity between the device and the nearest Availability Zone, which is part of a larger AWS Region. To achieve constant connectivity and retain a link to local workloads on premises, you are required to connect the Outpost to an existing on-premises network.
This network should be able to provide WAN access back to the AWS Region. It should also be able to contribute LAN/WAN access on a local network, where the workloads and applications on your on-premises network reside.
AWS Outposts use cases and limitations
The very existence of AWS Outposts shows the public cloud is not the end-all, be-all for IT infrastructure. AWS Outposts infrastructure is a good fit for organizations that want to upgrade their on-premises servers or connect their current system with a scalable storage plan. Here are a few scenarios where you could deploy it:
- Run data-intensive workloads to process data locally and cut back on expensive and wasteful data transmissions to and from the cloud.
- Support all applications deployed over a local data processing or low-latency network. This includes apps that send real-time responses to and from an end-user application, or those that communicate with on-premises systems to control on-site equipment.
- Close the gap between the factory floor equipment and executed functions through edge computing. Run manufacturing execution systems and supervisory control and acquisition systems on the AWS-managed device.
- Utilize machine learning and analytics services so health management systems can make use of low-latency processing with local data storage.
- Orchestrate, scale, manage and update the lifecycle of virtual network functions across environments.
- Deploy GPUs for graphic processing, video rendering and audio segmenting.
- Run a managed software-defined data center through the VMware Cloud variant.
- Use S3 locally to support web applications, data analytics, hosting images and videos. There is no hierarchical relationship between the files within the object storage, therefore, data objects can be distributed across several machines, making the S3 service accessible from anywhere. However, if any of that data is stored on the cloud, it could be an issue for many enterprises.
We expect this list to expand, thanks to the introduction of smaller Outpost form factors. These server racks have, historically, been sizable and, thus, their applications were reserved for larger spaces. Smaller rack footprints are suitable for locations such as branch offices, factories, retail stores and health clinics. The AWS Outposts 1U and 2U form factors can run EC2, ECS and Elastic Kubernetes Service (EKS) workloads locally. The larger configuration requires just a 19-inch by 36-inch cabinet space, which means Amazon can deliver networking and application capabilities to a new pool of customers in smaller locations.
Organizations that already have an established on-premises setup are better off integrating their servers with AWS Direct Connect or Amazon VPC, which can help extend functionality and expand your current system in the format of your preference. An Outpost could be used for this, but it would require a relatively excessive amount of capacity management.
Also, Outposts isn't designed for disconnected operations or in locations with no internet connection. In those cases, you're better off using portable device services like AWS Snowball Edge.

AWS Outposts resources
With Outposts, you can use the same APIs and connect to all the tools and services available on AWS' public cloud, but not every service is directly available on the device. However, these are some valuable native resources that can work well with your Outpost device:
- Use Amazon ECS for low-latency workloads that need to be close to on-premises applications and data.
- Use Amazon EKS worker nodes for low-latency workloads that must run near on-premises data stores.
- Create Amazon Elastic MapReduce clusters to execute low-latency workloads with on-premises data and deploy applications on a constantly connected network.
- Use Amazon RDS to create a managed database with on-premises data centers. It enables you to use the same AWS Management Console, Command Line Interface (CLI) and RDS API in order to manage the RDS databases fully in the cloud. You can then use the nearest AWS Region for disaster recovery, archival storage or cloud bursting.
- Use an App Mesh Envoy proxy or container to run various low-latency workloads in order to manage the on-premises data centers and applications over a low-latency networking connection.
Some organizations need to back up data, yet keep it confined within a certain geographical region. This was previously a problem, because S3 had trouble storing snapshots and advanced metering infrastructure data locally. These S3 buckets were tied to specific regions, many of which were distant from on-premises environment.
Fortunately, local EBS Snapshots are now available on AWS Outposts. With this feature, users can take snapshots and practice on-site data redundancy. This development gives users more control and facilitates pairing sensitive data applications with Outposts.
Key terminology
Here are some terms you need to know before you order an Outpost:
Outpost site. A client-managed location space where AWS will deploy and install the device.
Outpost configuration. Each configuration has unique weight, cooling and power needs, established on a case-by-case basis. The configuration also consists of a mix of networking support, EC2 compute capacity, and EBS or S3 storage capacity.
Outpost equipment. On-premises hardware such as switches, servers, racks and cabling that establishes access to an AWS Outpost.
Outpost capacity. Storage and compute capacity resources available to your Outpost, accessed and managed from the Outposts console.
Local gateway. A direct interweaved virtual routing that employs unfettered communication between your on-premises network and the device.
Service link. The networking route used to communicate between the AWS Region and your device.
AWS Outposts pricing
Of course, none of the potential benefits of this service matter if the price doesn't make fiscal sense for your business. Outposts are purchased for three-year terms, and payments can be made upfront or spread out over the course of the deal. Upfront payments can be full or partial and they lower the total price, compared to putting $0 down to get started. Monthly payments without upfront investment are also available.
Outposts aren't cheap. EC2 configurations cost anywhere from approximately $118,000 to well over $1 million, depending on the region and payment plan. This cost includes delivery, installation, maintenance and upgrades. Your choice of compute, graphics, memory or storage optimization will influence this pricing. Cost also depends on unit size.
S3 storage is charged monthly by terabyte tier, maxing out at 96 TB and $0.1760 per gigabyte, monthly. New EBS storage options are also organized by tier -- maxing out at 55 TB and $0.57 per gigabyte, monthly -- all dependent on region.
How to order an Outpost device
Before you order an Outpost, make sure your site meets the detailed physical requirements, all of which are specified on the AWS website. You'll also need an AWS Enterprise Support plan. Once you've checked those boxes, follow these steps to order, install and launch your Outpost.
Create Outpost and order capacity
- Access the Outposts console at https://console.aws.amazon.com/outposts/. Then, select the Create Outpost
- Select Place order.
- Select a capacity configuration for your Outpost. If the available capacity configurations aren't suitable, you can instead request a custom configuration.

- Choose Next.
- Select your payment option.
- Choose Next.
- Select Create new Outpost.
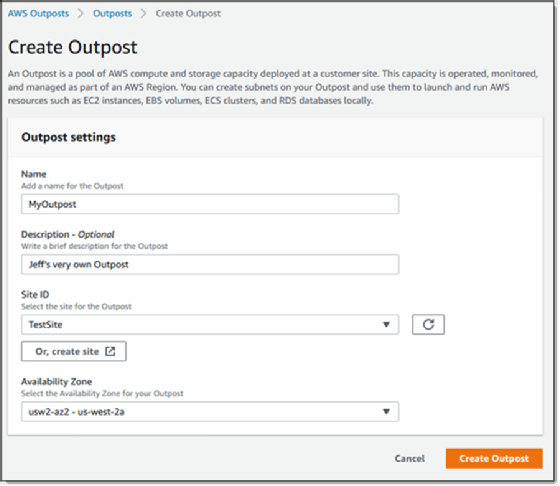
- Enter a name and description for your Outpost.

- Select an Availability Zone for your Outpost.
- (Optional) Choose Private connectivity option. For VPC and Subnet, select a VPC and subnet in the same AWS account and Availability Zone as your Outpost.
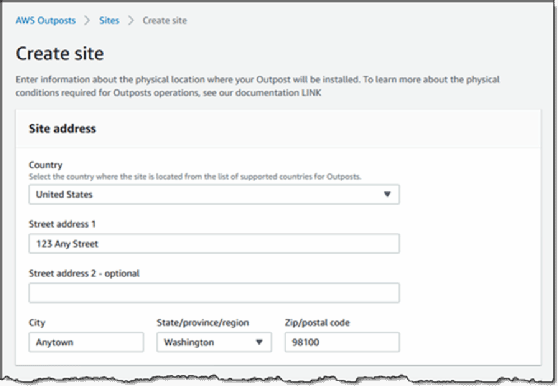
- Click Create new site.
- Choose Next.
- For Create site, enter your site information.

- Choose Next.
- Confirm your information is correct, then click Place order.

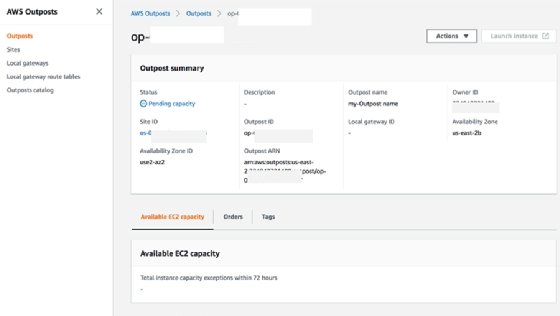
At this point, the order is submitted and you can check the status through the Outposts console -- it should say "Order received." An AWS rep will contact you within three days, and you will also receive an email stating the order has been changed to "Order processing."
To complete the order, AWS will schedule a time for you to speak with a representative. Before this call, AWS will give you a checklist of important points for you to verify for installation. Once everything checks out, the team will arrive at the appointed time.
They will position the rack in place. Your electrician can then connect the power to the rack and the AWS team will establish the networking to the uplink you provide.
After this, AWS will configure the rack capacity. When you confirm the storage and VM instances are available through your account, the installation is complete.
Launch your first Outpost
Now that you have installed the Outpost, use an Outpost subnet to launch your first EC2 instance.
Create the subnet
When you create an Outpost subnet and link it with a VPC in the associated AWS Region, the VPC will cover the Outpost itself as well.
- Open your AWS Management Console.
- Find the Outposts option in the navigation panel and select the installed Outpost.
- Choose Actions, and then click Create Subnet.
- Select your VPC and determine an IP range for the subnet that you can allocate.
- Select Create.
The subnet has been created, and we can begin to configure the route.
Routing configuration
You are required to link an existing VPC with your local gateway routing table. This connects your local network to the public cloud.
When you create the route, you are given the option to select certain local gateways, internet gateways, IP addresses and peering connections that can be designated as destinations.
- Click the Locate gateway route tables in the navigation panel.
- Select a routing table and click Actions and Associate VPC.
- Choose the dedicated VPC and click Associate VPC. The routing is now set up.
Launching the instance
Within the Outpost subnet, the security group for controlling inbound and outbound traffic works exactly as it would for an instance within an Availability Zone subnet.
In order to connect the EC2 instance within the subnet, link a key pair the same way you would within an Availability Zone subnet.
To launch the instance, execute the run-instances command in the AWS CLI. At this point, you can dedicate an Elastic IP address from a client-owned IP pool and perform these commands.
- describe-coip-pools -- to receive information about a client-owned IP pool
- allocate-address -- to dedicate the Elastic IP address, in combination with the customer-owned-ipv4-pool option for the PoolID, which was returned in the previous command
- associate-address -- to link the Elastic IP with the Outpost instance


