animind - Fotolia
Kubernetes service discovery tactics boost microservices
Customize or automate a containerized application's service discovery exactly to your preference by mastering a collection of Kubernetes features.
In a microservices application where each service is powered by containers -- or, in the case of Kubernetes, clusters of containers -- the lifecycle of each container instance is short. Still, each microservice is highly available, despite the dynamic nature of underlying containers. Containers are continually started and stopped as new containers replace outdated or long-running ones. In this dynamic environment, service discovery becomes crucial.
As new containers and microservices are created, they need to be registered on the network and be visible to other containers and microservices. This enables improved traffic flow as traffic is constantly rebalanced across new containers and services. Service discovery ensures that a microservices application is processing requests efficiently and that it's able to cope with changes in workloads and changes in the microservices application itself. While Kubernetes is widely employed to manage microservices and container environments, not everyone knows how to collaboratively use all of its features to control service discovery.
Unique IP addresses
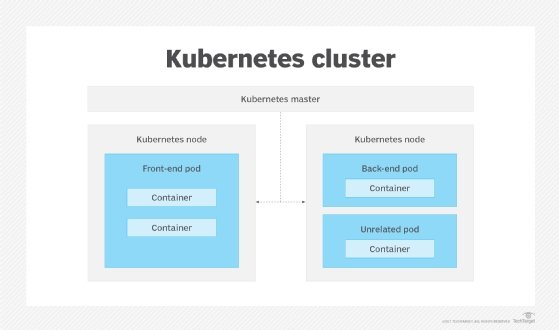
Due to the orchestration tool's architecture, Kubernetes service discovery involves multiple layers. Kubernetes instantiates containers, grouped in pods, on nodes. Then, pods are grouped into clusters with each node running multiple clusters on them. Every pod in Kubernetes has a unique IP address, and each pod has a replica. When a pod dies, the IP address is retired along with it, and any new pod that Kubernetes creates comes with a new unique IP address. IP addresses play a critical role in managing networking tasks, such as service discovery and load balancing.
Labels and selectors
Kubernetes doesn't stop at providing strong defaults for IP naming. The system assigns administrator labels and selectors to better organize and manage pods at scale. Labels help the container administrator easily identify components in the system, and selectors facilitate how the user groups and executes actions on same-labeled components. Essentially, labels and selectors are Key-value pairs of metadata that are not part of the core system and are used to loosely couple resources like pods.

Labels and selectors also help to manage pods that serve different aspects of the software delivery lifecycle. For example, use labels and selectors to organize different deployments, the same deployment on different environments or even different customer data. For example, one microservices deployment is labeled in three versions: stable, alpha and beta. These numerous uses for labels and selectors facilitate Kubernetes service discovery.
Replication controllers
The replication controller feature of Kubernetes controls how the tool automatically creates and deletes pods and their replicas. The replication controller aims to maintain high availability of resources at any given time. A replication controller recognizes labels and selectors and performs operations on pods based on the input from them. This information is then placed in a YAML file and can define any number of pods. Since labels are loosely coupled and aren't unique identifiers of pods, they exist independent of replication controllers. Even if replication controllers are replaced, the labels remain accessible to new replication controllers. In this way, labels bring consistency to an otherwise dynamic system.
Environment variables and DNS
Two primary methods exist for Kubernetes service discovery: via environment variables and via the domain name system (DNS).
An environment variable -- also known as an envar -- defines how the pod is named, and this name is specified by the name field in a configuration file for the pod. Environment variables make it easy to identify pods uniquely, ensuring that every pod is discoverable. Place environment variables not just at the pod level, but also at the container level. Additionally, run the printenv command to view a list of all environment variables.
The second option for service discovery is DNS, through which Kubernetes assigns a DNS name to each service. It uses SkyDNS, a distributed way to announce and discover services by default with the etcd key-value store.
Every service must be exposed to other services in Kubernetes, which can happen in a couple of ways. Kubernetes assigns each service a cluster IP, which will remain the same throughout the lifetime of the service. A cluster IP is visible internally to all pods on the same cluster, and every service has a cluster IP by default.
To make the service visible externally, utilize a node port. This port connection exposes the service to the node's IP address. The approach is useful if you must set up service discovery on a platform that doesn't natively support Kubernetes.
Another way to expose services is to use a load balancer provided by a cloud vendor. All leading cloud vendors have their own version of a load balancer, and all do the same job of ensuring services are discoverable by other services and that load is shared across services in a controlled manner.
DNS queries can be controlled by assigning DNS policies to govern each pod. By default, a pod inherits its DNS properties from the node it runs on. However, Kubernetes' ClusterFirst DNS policy enables customized stub-domains -- private DNS zones -- and upstream DNS nameservers for the pods. Alternatively, setting the DNS policy to None ensures that the policies must be provided at the pod level manually, instead of inheriting them from the Kubernetes environment.
Kubernetes service discovery options range from custom to automated using the system defaults. Features like unique IP addresses, labels and selectors, replication controllers, environment variables and DNS settings enable fine control over how to implement service discovery but also present a degree of complexity to the deployment manager.


